Giới thiệu
This manual provides detailed instructions for the safe and efficient operation, setup, and maintenance of your Flyrivergo Jewelry Polishing Machine and 3-inch Ball Vise. This combination tool is designed for precision work in jewelry making, polishing, engraving, and other intricate tasks. Please read this manual thoroughly before using the product to ensure proper function and safety.
Hướng dẫn an toàn
Luôn tuân thủ các biện pháp phòng ngừa an toàn cơ bản để giảm nguy cơ hỏa hoạn, điện giật và thương tích cá nhân.
- Đọc kỹ mọi hướng dẫn trước khi vận hành máy.
- Wear appropriate personal protective equipment (PPE), including safety glasses, gloves, and a dust mask, especially when polishing.
- Ensure the work area is well-lit and clean. Cluttered benches invite accidents.
- Tránh xa trẻ em và những người xung quanh.
- Không sử dụng dụng cụ điện trong môi trường dễ nổ, chẳng hạn như nơi có chất lỏng, khí hoặc bụi dễ cháy.
- Tránh khởi động ngẫu nhiên. Đảm bảo công tắc ở vị trí tắt trước khi cắm điện.
- Đừng tiếp cận quá mức. Luôn giữ thăng bằng và bước chân thích hợp.
- Rút phích cắm khỏi nguồn điện trước khi thực hiện bất kỳ điều chỉnh, thay đổi phụ kiện hoặc cất giữ dụng cụ.
- Use the correct tool for the application. Do not force a small tool or attachment to do the job of a heavy-duty tool.
- Bảo quản dụng cụ một cách cẩn thận. Giữ dụng cụ cắt luôn sắc bén và sạch sẽ để có hiệu suất tốt hơn và an toàn hơn.
- Check for misalignment or binding of moving parts, breakage of parts, and any other condition that may affect the tool’s operation. If damaged, have the tool repaired before use.
Nội dung gói
Carefully unpack all items and ensure all components are present and undamaged. If any items are missing or damaged, contact customer support.

Hình ảnh: Trênview of the complete package contents, including the ball vise, polishing machine accessories, and various attachments.
- Jewelry Polishing Machine (Bench Buffer Polisher)
- 3-inch Ball Vise
- Polishing Wheels (e.g., Yellow, White, Fiber)
- Polishing Compounds (e.g., White, Green)
- Various Ball Vise Attachments (pins, jaws, T-wrench)
- Hướng dẫn sử dụng
Sản phẩm trênview
Jewelry Polishing Machine
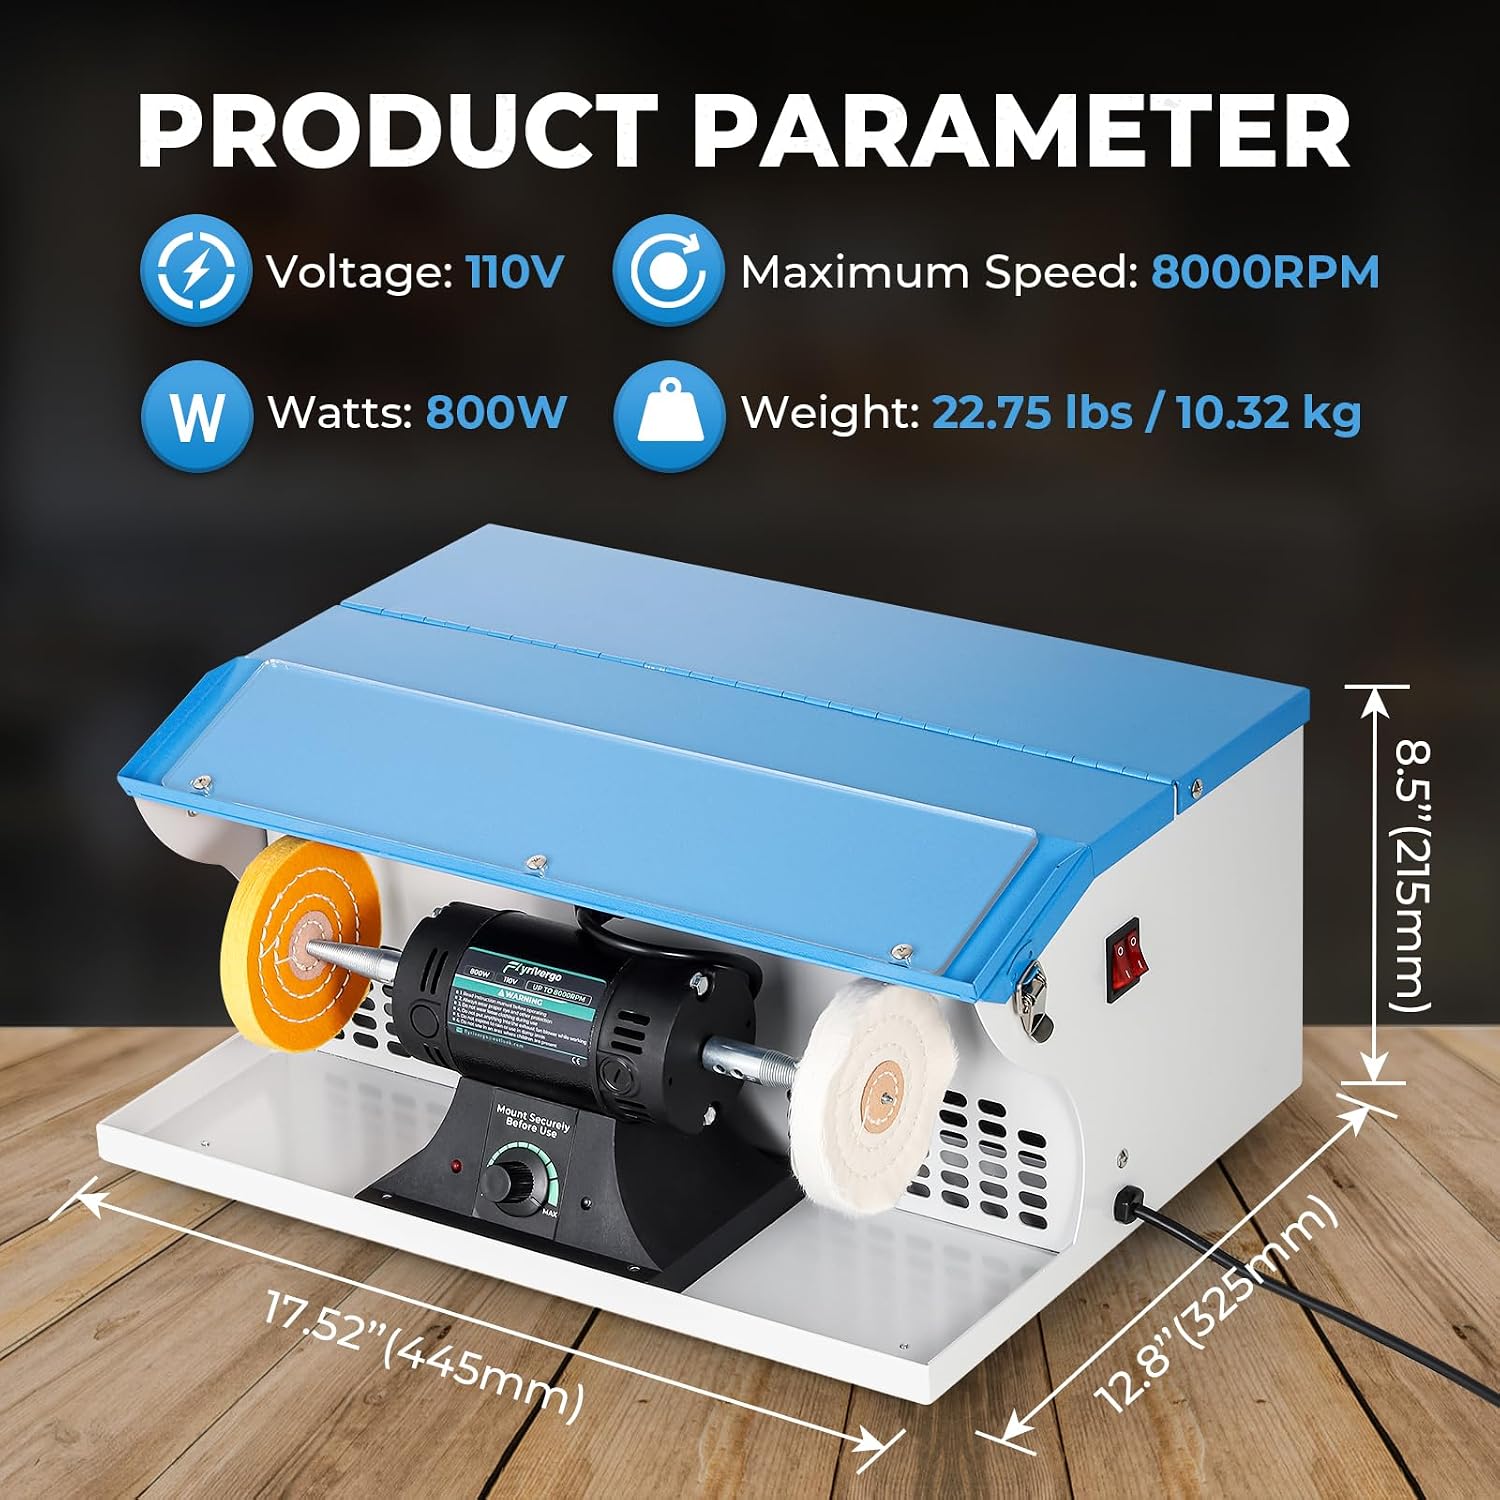
Hình ảnh: Mặt trước view of the polishing machine, showing its dimensions (17.52" L x 12.8" W x 8.5" H) and key parameters like 110V voltage, 8000 RPM max speed, 800W power, and 22.75 lbs weight.
The polishing machine features a powerful motor for efficient polishing of various materials. It includes a protective cover, a light tube for improved visibility, a dust collector, and an exhaust fan blower for maintaining a clean work environment.

Hình ảnh: Cận cảnh view highlighting the machine's features: integrated light tube, dust collector, exhaust fan blower, and the motor housing.
Different polishing wheels and compounds are available for various applications, from initial buffing to final high-shine polishing.

Image: Display of different polishing accessories: Yellow Wheel, White Wheel, Fiber Wheel, White Compound, and Green Compound.
3-inch Ball Vise

Image: The ball vise showing its adjustable clamping mechanism and the ability for 360-degree free rotation, indicated by arrows.
The 3-inch ball vise provides a stable and adjustable platform for holding small items during intricate work such as engraving, stone setting, and detailed jewelry repair. It features adjustable clamping force and 360-degree free rotation for optimal positioning.
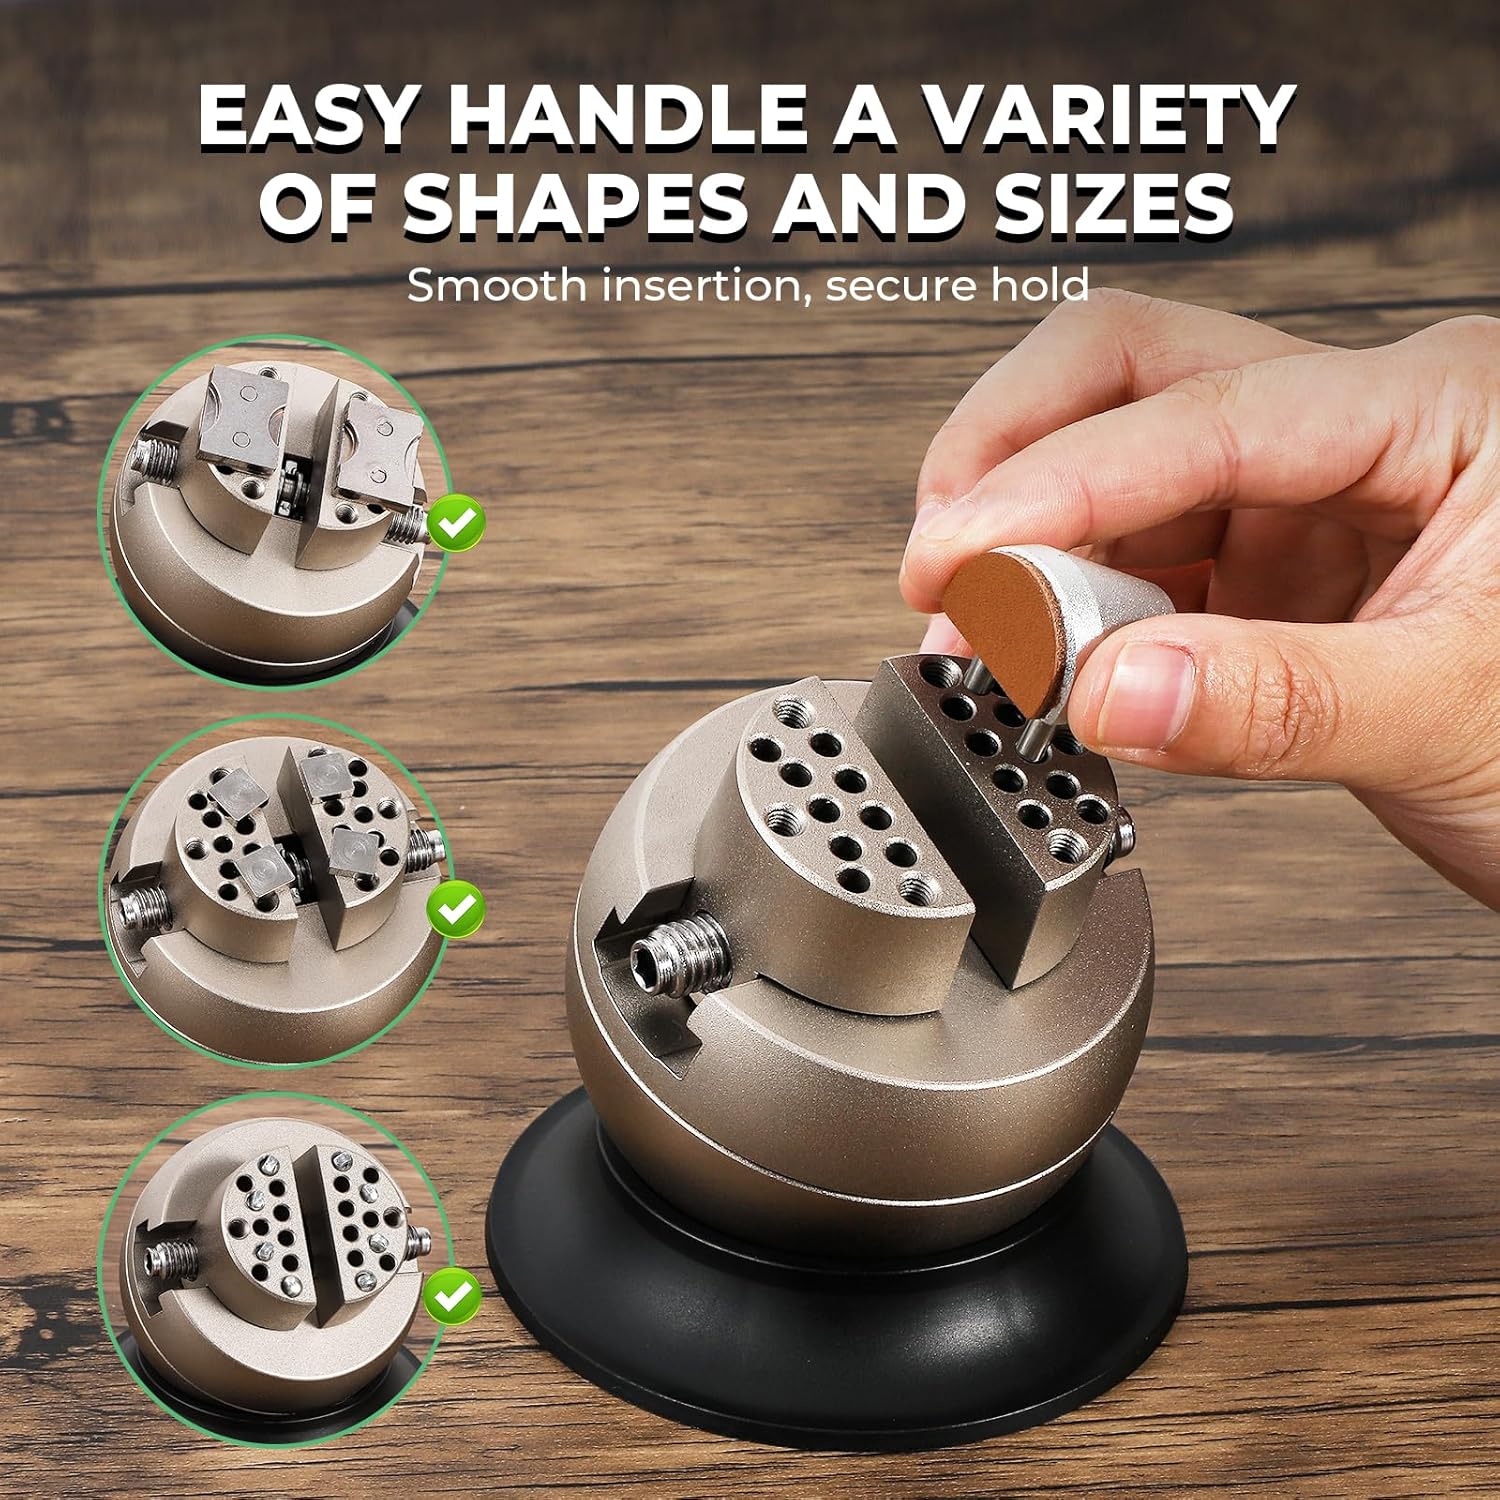
Image: The ball vise demonstrating its versatility in securely holding objects of different shapes and sizes.
Thông số kỹ thuật
| Tính năng | Chi tiết |
|---|---|
| Số hiệu mẫu | B0FGTY8C8C |
| Tậptage | 110V |
| Công suất (Watt) | 800W |
| Tốc độ tối đa | 8000 vòng/phút |
| Polishing Machine Dimensions (L x W x H) | 17.52" x 12.8" x 8.5" (445mm x 325mm x 215mm) |
| Polishing Machine Weight | 22.75 pound (10.32 kg) |
| Ball Vise Diameter | 3 inch (khoảng 76mm) |
| Ball Vise Height | 3.35" (85mm) |
| Ball Vise Base Diameter | 3.78" (96mm) |
Cài đặt
1. Polishing Machine Setup
- Tháo hộp: Remove the polishing machine and all accessories from the packaging. Inspect for any shipping damage.
- Vị trí: Place the polishing machine on a stable, level workbench. Ensure adequate clearance around the machine for ventilation and safe operation.
- Mounting Polishing Wheels:
- Select the appropriate polishing wheel and compound for your task.
- Securely attach the desired polishing wheel to the spindle on each side of the motor. Use the provided wrench to tighten the retaining nuts firmly.

Image: A hand using a wrench to securely attach a polishing wheel onto the machine's spindle.
- Kết nối nguồn điện: Ensure the power switch is in the "OFF" position. Plug the power cord into a standard 110V electrical outlet.
2. Ball Vise Setup
- Vị trí: Place the ball vise on a clean, stable surface. The suction base helps secure it.
- Attaching Jaws/Pins: Select the appropriate jaws or pins from the accessory set based on the item you intend to hold. Insert them into the vise head and secure them as needed.
Hướng dẫn sử dụng
1. Using the Jewelry Polishing Machine
- An toàn là trên hết: Always wear safety glasses and a dust mask before operating.
- Bật nguồn: Flip the power switch to the "ON" position. The motor will start, and the polishing wheels will begin to spin.
- Điều chỉnh tốc độ: Use the speed control knob (if available) to set the desired RPM for your polishing task. Start with a lower speed and gradually increase if necessary.
- Apply Compound: Lightly touch the polishing compound to the spinning wheel to transfer a small amount of compound onto the wheel. Do not over-apply.
- Đánh bóng: Gently bring the item to be polished into contact with the spinning wheel. Apply light, even pressure and move the item continuously to avoid overheating or creating flat spots.
Image: A close-up of a hand holding a ring against a spinning polishing wheel on the machine.
- Thu gom bụi: The integrated dust collector and exhaust fan will help manage polishing debris. Ensure these are clear and functioning.
- Tắt nguồn: Once finished, turn the power switch to "OFF" and allow the wheels to come to a complete stop before leaving the machine.
2. Using the 3-inch Ball Vise
- Mục an toàn: Place the item you wish to work on between the jaws or pins of the ball vise.
- Điều chỉnh Clamplực lượng: Use the adjustment mechanism to gently tighten the jaws until the item is held securely without being damaged.
Image: A hand turning the adjustment knob on the ball vise to control the clamplực lượng ing.
- Vị trí: The ball vise allows for 360-degree rotation and tilting. Adjust the position of your workpiece as needed for optimal access and comfort.

Hình ảnh: Ba ví dụamples demonstrating the ball vise's application in watch maintenance, ring grinding, and holding a rock sample để phân tích.
- Release Item: Once your work is complete, loosen the jaws and carefully remove the item.
BẢO TRÌ
- Vệ sinh: Regularly clean the polishing machine and ball vise to prevent buildup of dust and debris. Use a soft, dry cloth. For stubborn grime, a slightly damp cloth can be used, ensuring no moisture enters electrical components.
- Máy hút bụi: Periodically empty and clean the dust collector to maintain optimal suction and prevent motor strain.
- Polishing Wheels: Replace polishing wheels when they become worn, glazed, or contaminated with different compounds. Ensure the machine is unplugged before changing wheels.
- Ball Vise Jaws: Clean the jaws and pins of the ball vise to ensure a secure grip. Lubricate moving parts of the vise periodically with a light machine oil to maintain smooth operation.
- Kho: Store the tools in a clean, dry environment away from direct sunlight and extreme temperatures.
Xử lý sự cố
| Vấn đề | Nguyên nhân có thể | Giải pháp |
|---|---|---|
| Polishing machine does not start. | Không có nguồn điện; Công tắc nguồn đã tắt; Dây/phích cắm bị lỗi. | Check power outlet; Ensure switch is ON; Inspect cord for damage, contact support if damaged. |
| Excessive vibration or noise from polisher. | Unbalanced polishing wheel; Loose mounting; Worn bearings. | Re-seat or replace polishing wheel; Tighten mounting nuts; Contact support for bearing issues. |
| Poor polishing results. | Incorrect wheel/compound; Worn wheel; Insufficient pressure; Overheating workpiece. | Use appropriate wheel/compound; Replace worn wheel; Adjust pressure; Allow workpiece to cool. |
| Ball vise not holding item securely. | Jaws/pins not tightened; Incorrect jaw/pin selection; Dirty jaws. | Tighten adjustment knob; Select appropriate jaws; Clean jaws and pins. |
Bảo hành và Hỗ trợ
For warranty information, technical support, or to order replacement parts, please contact Flyrivergo customer service. Refer to your purchase documentation for specific warranty terms and contact details.
Dịch vụ khách hàng: Please visit the official Flyrivergo webtrang web hoặc tham khảo thông tin liên hệ được cung cấp kèm theo bao bì sản phẩm của bạn.

