1. Giới thiệu
The Canyon DVR40 is a dash camera designed to record driving footage. It features a Sony Starvis 415 sensor for 4K video recording, a 140° wide field of view, and a 3-inch IPS capacitive touchscreen. The device includes a supercapacitor for reliable operation and supports Wi-Fi connectivity for control via a mobile application.

Hình ảnh 1.1: Mặt trước view of the Canyon DVR40 Dash Camera, showing the lens and branding.
2. Nội dung gói hàng
Verify that all items listed below are present in the product packaging.

Image 2.1: All items included in the Canyon DVR40 Dash Camera package.
- Canyon DVR40 Dash Camera
- Hướng dẫn bắt đầu nhanh
- Thẻ bảo hành
- Accessories for Cable Installation
- Đầu đọc thẻ
- Magnetic suction cup holder with a USB Type-C connector
- Car power adapter (2 output connectors USB Type-A)
- Cable USB Type-C (cable length 3.6 m)
- Bộ lọc CPL
- Cloth for screen cleaning
- Vỏ dệt
3. Sản phẩm hếtview
Familiarize yourself with the main components of the DVR40 dash camera.

Image 3.1: The Canyon DVR40 Dash Camera, highlighting its compact design.
Các tính năng chính:
- 4K UltraHD Recording: Captures video at 30 frames per second for clear footage.
- Sony Starvis 415 Sensor: Enhances low-light performance with night vision mode.
- 140° Trường của View: Provides wide coverage of the road.
- 3-inch IPS Capacitive Touchscreen: For direct control and playback.
- Siêu tụ điện: Offers improved durability and temperature resistance compared to traditional batteries.
- Núi từ tính: Facilitates easy installation and removal with integrated power supply.
- Kết nối Wi-Fi: Allows control and footage management via the Canyon Eye mobile application.
- Cảm biến G: Tự động phát hiện va chạm và khóa video fileđể ngăn chặn việc ghi đè.
4. Thiết lập
4.1 Lắp đặt camera hành trình
The DVR40 uses a magnetic mount for secure attachment to your vehicle's windshield.
- Hãy làm sạch khu vực trên kính chắn gió nơi bạn dự định gắn camera.
- Attach the magnetic suction cup holder to the windshield. Ensure it is positioned to provide an unobstructed view của con đường.
- Connect the USB Type-C power cable to the magnetic mount.
- Align the dash camera with the magnetic mount. The camera will snap into place, establishing the power connection.

Image 4.1: The magnetic mount with integrated power supply for easy installation.
4.2 kết nối nguồn
Use the provided car power adapter and USB Type-C cable to power the dash camera.
- Plug the car power adapter into your vehicle's 12V power outlet (cigarette lighter socket).
- Connect the USB Type-C cable from the car power adapter to the magnetic mount.
- Once the vehicle's ignition is turned on, the dash camera will automatically power on and begin recording.
4.3 Initial Setup and MicroSD Card
Before first use, insert a compatible MicroSD card (not included) and format it.
- Insert a high-speed MicroSD card (Class 10 or higher, up to 128GB recommended) into the designated slot on the dash camera.
- Bật máy ảnh.
- Access the camera's settings via the touchscreen or the mobile app.
- Locate the "Format SD Card" option and confirm to format the card. This prepares the card for recording and ensures optimal performance.
5. Hướng dẫn vận hành
5.1 Ghi âm cơ bản
The DVR40 automatically begins loop recording when powered on.
- Ghi vòng lặp: The camera records video in segments (e.g., 1, 3, or 5 minutes). When the MicroSD card is full, the oldest unprotected files bị ghi đè.
- Ghi thủ công: Press the record button on the camera (if available) or use the mobile app to manually start/stop recording.
- Chất lượng video: The camera records in 4K UltraHD at 30 frames per second.

Image 5.1: Visual representation of the DVR40's high-quality video capabilities.
5.2 G-Sensor for Accident Recording
Cảm biến G tích hợp giúp phát hiện các va chạm đột ngột hoặc gia tốc/giảm tốc nhanh.
- When an event is detected, the current video segment is automatically locked and saved to a protected folder on the MicroSD card.
- These protected files sẽ không bị ghi đè bằng cách ghi vòng lặp.
- Adjust the G-Sensor sensitivity in the camera settings if needed.

Image 5.2: Illustration of the G-Sensor's function in accident recording.
5.3 Màn hình cảm ứng
The 3-inch IPS capacitive touchscreen allows for direct interaction with the camera.
- Navigate menus, adjust settings, and review ghi lại thức ăntage trực tiếp trên thiết bị.
- The IPS display offers wide viewing angles and clear visibility.

Image 5.3: The touch screen display in use on the DVR40.
5.4 Wi-Fi and Mobile Application Control
Connect the DVR40 to your smartphone via Wi-Fi using the Canyon Eye mobile application.
- Download the "Canyon Eye" application from your smartphone's app store.
- Enable Wi-Fi on the DVR40 through its settings menu.
- On your smartphone, connect to the DVR40's Wi-Fi network (SSID and password will be displayed on the camera screen).
- Open the Canyon Eye app. You can now view foo trực tiếptage. Truy cập video đã ghi, thay đổi cài đặt và tải xuống. fileGửi trực tiếp đến điện thoại của bạn.
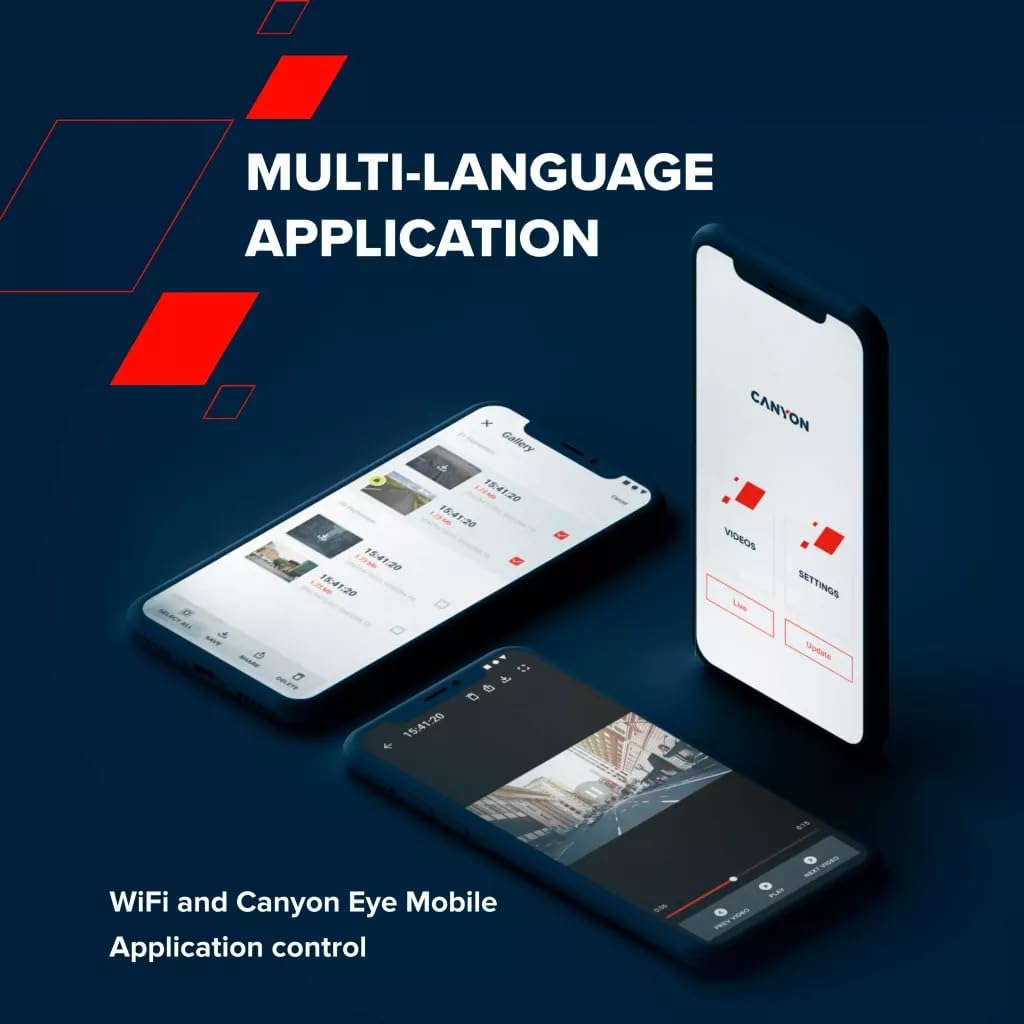
Image 5.4: The Canyon Eye mobile application interface for remote control and file sự quản lý.
6. Bảo trì
6.1 Siêu tụ điện
The DVR40 is equipped with a supercapacitor instead of a traditional lithium-ion battery.
- Supercapacitors offer enhanced durability and a wider operating temperature range (-30°C to 80°C).
- They are less prone to overheating and have a longer lifespan, making them suitable for automotive environments.
- The supercapacitor provides enough power to safely save the last recording when external power is disconnected.

Image 6.1: The DVR40's supercapacitor ensures reliable operation across a wide temperature range.
6.2 Vệ sinh và Bảo quản
- Use the provided cleaning cloth to gently wipe the screen and lens. Avoid abrasive materials or chemical cleaners.
- Ensure the camera is clean and dry before storing it.
- When not in use for extended periods, store the camera in a cool, dry place, away from direct sunlight.
KHAI THÁC. Xử lý sự cố
Tham khảo bảng dưới đây để biết các vấn đề thường gặp và giải pháp.
| Vấn đề | Nguyên nhân có thể | Giải pháp |
|---|---|---|
| Máy ảnh không bật được. | Không có nguồn điện; cáp/bộ chuyển đổi bị lỗi. | Check car power adapter connection. Ensure vehicle ignition is on. Try a different USB port or adapter if available. |
| Quá trình ghi âm dừng đột ngột. | MicroSD card full or corrupted; low-speed MicroSD card. | Format the MicroSD card. Replace with a high-speed (Class 10 or U3) MicroSD card. |
| video footage bị mờ hoặc không rõ ràng. | Lớp màng bảo vệ trên thấu kính; thấu kính bị bẩn; kính chắn gió bị che khuất. | Remove any protective film. Clean the camera lens and windshield. Ensure the camera is securely mounted. |
| Sự cố kết nối Wi-Fi. | Incorrect Wi-Fi password; camera Wi-Fi not enabled; app issues. | Ensure Wi-Fi is enabled on the camera. Verify the Wi-Fi password. Restart both the camera and smartphone. Reinstall the Canyon Eye app. |
| Cảm biến G quá nhạy/không đủ nhạy. | Cài đặt độ nhạy của cảm biến G. | Adjust the G-Sensor sensitivity level in the camera settings. |
8. Thông số kỹ thuật
Detailed technical specifications for the Canyon DVR40 Dash Camera.
| Tính năng | Đặc điểm kỹ thuật |
|---|---|
| Thương hiệu | CANYON |
| Tên mẫu | DVR40 |
| Số hiệu mẫu | CND-DVR40 |
| Màu sắc | Đen |
| Độ phân giải ghi video | 2160p (4K UltraHD) |
| Khung hình mỗi giây | 30 fps (at 4K) |
| Công nghệ cảm biến quang học | CMOS (Sony Starvis 415) |
| Kích thước cảm biến ảnh | 1/2.86'' |
| Lĩnh vực View | 140° |
| Tính năng đặc biệt | Integrated Supercapacitor, Touch Screen, Night Vision Mode, Wi-Fi, G-Sensor |
| Trưng bày | Màn hình cảm ứng điện dung IPS 3 inch |
| Kiểu lắp đặt | Gắn kết từ tính |
| Nguồn điện | Car power adapter (USB Type-C) |
| Phạm vi nhiệt độ hoạt động | -30°C to 80°C (due to Supercapacitor) |
| Các thành phần bao gồm | Dash Camera, Magnetic Mount, Car Power Adapter, USB-C Cable, Card Reader, CPL Filter, Cleaning Cloth, Textile Case, Quick Start Guide, Warranty Card, Cable Installation Accessories |
| Bao gồm pin | No (uses Supercapacitor) |
9. Thông tin an toàn
- Do not operate the camera or adjust settings while driving. Always pull over to a safe location.
- Ensure the camera is securely mounted and does not obstruct your view của con đường.
- Use only the provided power adapter and cables to prevent damage to the device.
- Do not expose the camera to extreme moisture or liquids.
- Avoid disassembling the device. Refer to qualified service personnel for repairs.
- Để máy ảnh và phụ kiện xa tầm tay trẻ em.
10. Bảo hành và Hỗ trợ
For warranty information and technical support, please refer to the warranty card included in your package or visit the official Canyon webđịa điểm.
Hỗ trợ trực tuyến: https://canyon.eu/support/


