1. Thông tin an toàn quan trọng
Vui lòng đọc và hiểu tất cả hướng dẫn trước khi lắp đặt hoặc vận hành thiết bị này. Việc không tuân theo các hướng dẫn này có thể dẫn đến điện giật, hỏa hoạn hoặc các nguy hiểm khác có thể gây thương tích cá nhân hoặc thiệt hại tài sản.
- CẢNH BÁO: Nguy cơ điện giật. Ngắt nguồn điện tại cầu chì hoặc cầu dao trước khi lắp đặt hoặc bảo dưỡng.
- CẢNH BÁO: Nguy cơ cháy nổ. Giữ các vật liệu dễ cháy tránh xa khu vực này.amp.
- This fixture is intended for indoor use only. Do not use in wet locations or where directly exposed to water.
- Đảm bảo nguồn cung cấp voltage is compatible with the fixture's requirements (120V-277V).
- Tất cả các đấu nối dây điện phải được thực hiện theo đúng quy định về điện của địa phương và quốc gia. Nếu bạn không chắc chắn về việc đấu dây, hãy tham khảo ý kiến của một thợ điện có chuyên môn.
- Do not attempt to modify or disassemble the fixture. There are no user-serviceable parts inside.
2. Có gì trong hộp
Xác minh rằng tất cả các thành phần đều có sẵn trước khi bắt đầu cài đặt:
- LED Shop Light Fixture(s)
- Phần cứng lắp đặt (vít, neo)
- Linking Cables (1.5" and 8" for daisy-chaining)
- Dây Nuts
3. Thông số kỹ thuật
| Tính năng | Đặc điểm kỹ thuật |
|---|---|
| Thương hiệu | Chiếu sáng Sunco |
| Tên mẫu | LED Shop Light, 4ft Wraparound, Prismatic Lens, 8.5 Inch |
| Kích thước (D x R x C) | Dài 48" x Rộng 8.58" x Cao 2.56" |
| Cái gì?tage | 60 Watt |
| Độ sáng | 7200 Lumen |
| Hiệu quả | 120 LM / W |
| Nhiệt độ màu (CCT) | Có thể lựa chọn: 4000K, 5000K, 6000K |
| Tậptage | 120V-277V |
| Có thể làm mờ | Không (Không thể điều chỉnh độ sáng) |
| Vật liệu | Thép hợp kim, Polycarbonate |
| Kiểu lắp đặt | Ceiling Mount (Flush Mount) |
| Tính năng đặc biệt | Linkable, Wide Beam Angle (110°) |
| Chứng nhận | ETL, FCC, RoHS |
| Tuổi thọ trung bình | 50,000 giờ |
The fixture features a durable build with an impact-resistant prismatic lens for wide and consistent light dispersion.

This image illustrates key features including impact resistance, the prismatic lens design, non-dimmable functionality, and the wide voltage compatibility of 120-277V.
4. Thiết lập và Cài đặt
Hãy làm theo các bước sau để cài đặt đúng cách. Đảm bảo đã ngắt nguồn điện trước khi bắt đầu.
4.1. Chuẩn bị cho Cài đặt
- Tắt nguồn: Locate the circuit breaker controlling the installation area and turn off the power.
- Remove Diffuser: Gently remove the prismatic diffuser from the lamp base to access the internal components.
- Chọn Nhiệt độ màu (CCT): Before mounting, locate the CCT switch inside the fixture. Select your desired color temperature (4000K, 5000K, or 6000K). This setting cannot be changed easily after installation.

This image shows the internal CCT switch, allowing selection between 4000K, 5000K, and 6000K before installation.
4.2. Lắp đặt đồ đạc
The fixture is designed for flush mounting to a ceiling or surface. It includes keyhole slots for easy installation.
- Đánh dấu các điểm lắp: Hold the fixture in the desired mounting location and mark the positions for the mounting screws. Ensure these align with a junction box or suitable support structure.
- Lắp đặt phần cứng gắn kết: Drill pilot holes if necessary and install the provided mounting screws, leaving a small gap for the fixture to slide onto.
- Chuẩn bị dây điện: If connecting to a junction box, knock out the appropriate punch hole on the fixture's housing.

This diagram illustrates the three main steps for installation: securing the housing, connecting electrical wires, and attaching the light fixture.
4.3. Kết nối điện
- Kết nối dây: Using the provided wire nuts, connect the fixture's wires to the supply wires: Live (black) to Live, Neutral (white) to Neutral, and Ground (yellow/green) to Ground. Ensure all connections are secure.
- Dây buộc: Carefully tuck all wires and wire nuts into the junction box or fixture housing.
4.4. Linking Multiple Fixtures (Daisy Chain)
This fixture supports daisy-chaining to extend lighting coverage. Use the provided linking cables.
- Connect Linking Cable: Insert one end of a linking cable into the designated port on the first fixture and the other end into the port on the next fixture.
- Kết nối an toàn: Ensure linking cables are securely connected and properly routed.
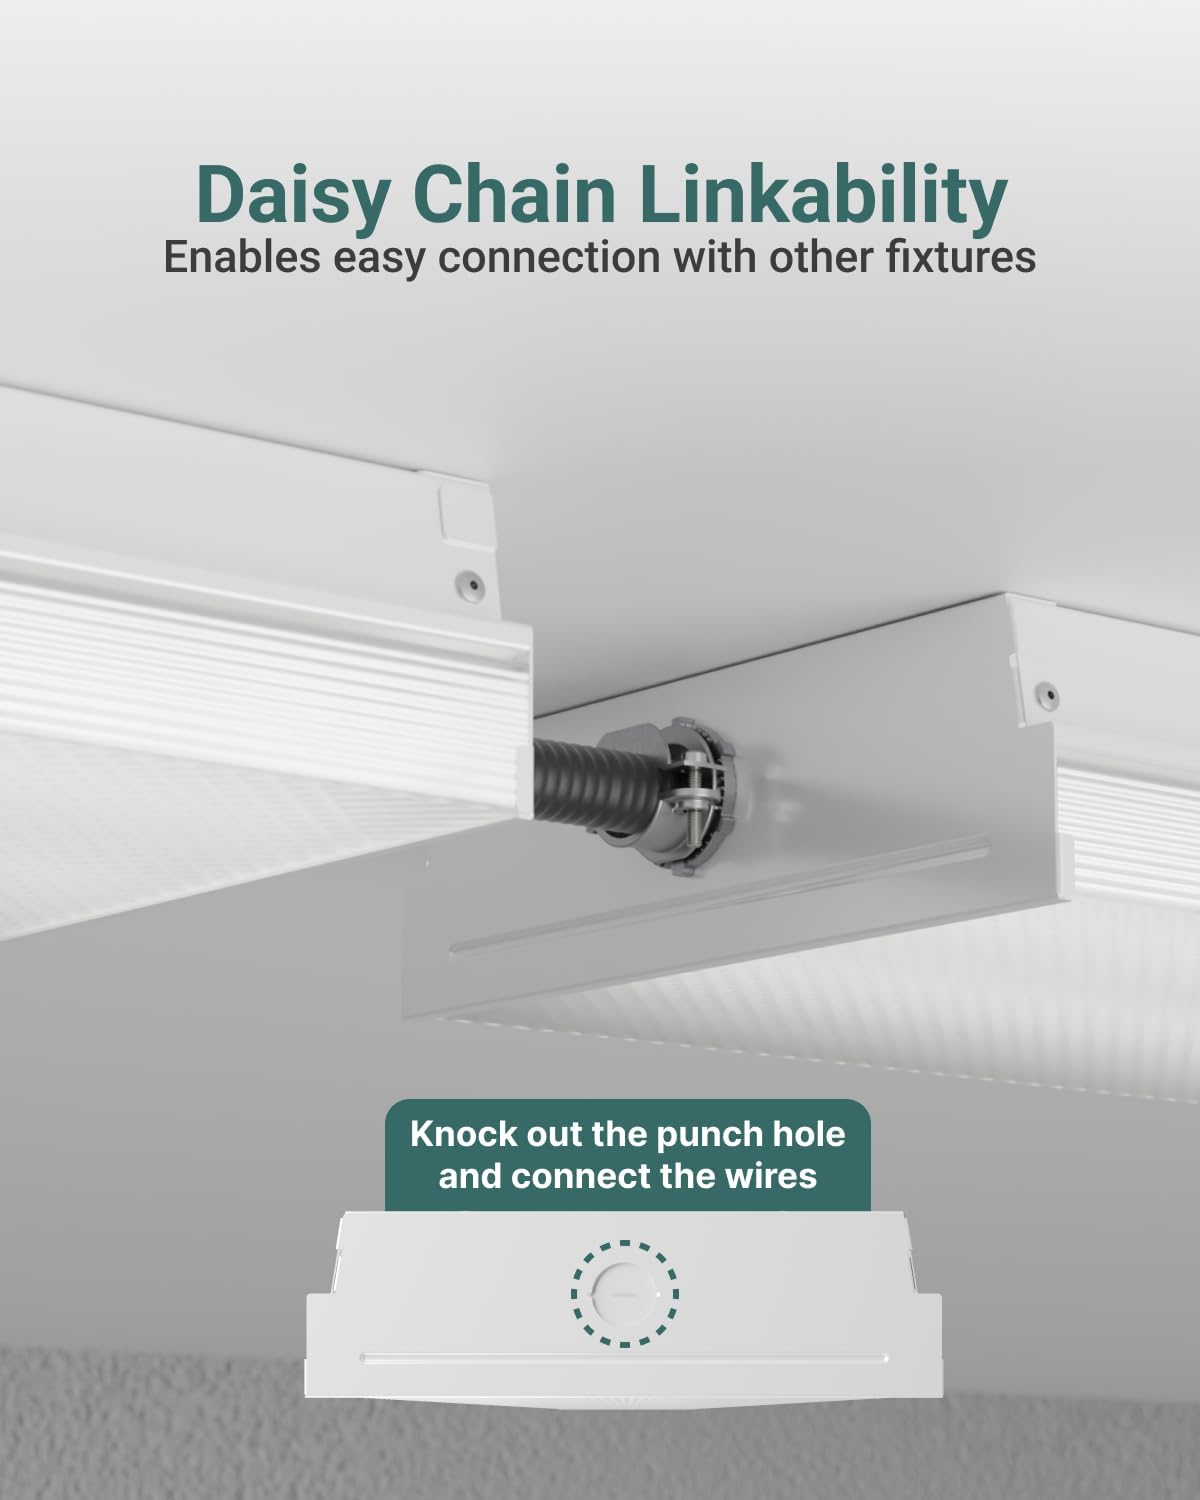
This image demonstrates how to daisy-chain multiple fixtures using the linking cables and highlights the knockout punch hole for electrical connections.
4.5. Các bước cuối cùng
- Reattach Diffuser: Align one end of the diffuser with the aluminum base and push it into place until it snaps securely.
- Khôi phục điện: Turn the circuit breaker back on to restore power to the fixture.
5. Hướng dẫn vận hành
The Sunco Lighting LED Shop Light is designed for straightforward operation once installed.
5.1. Lựa chọn nhiệt độ màu (CCT)
This fixture features a selectable color temperature (CCT) switch, allowing you to choose between 4000K (Cool White), 5000K (Daylight), and 6000K (Bright White) to suit your preference or application. The CCT switch is located inside the fixture and must be set during installation before the diffuser is reattached.
- 4000K: Provides a neutral white light, suitable for offices or general workspaces.
- 5000K: Offers a bright, crisp daylight-like illumination, ideal for tasks requiring high visibility.
- 6000K: Delivers a very bright, cool white light, often preferred for industrial settings or areas needing maximum brightness.

This image displays the internal components and wiring, emphasizing the high efficiency of the LED fixture operating within a 120-277V range.
5.2. Bật/Tắt nguồn
The fixture is non-dimmable and operates via a standard wall switch connected to its power supply. Simply toggle the wall switch to turn the light on or off.
6. Bảo trì
The Sunco Lighting LED Shop Light requires minimal maintenance. Always ensure power is disconnected before performing any maintenance.
- Vệ sinh: Lau bên ngoài của đồ đạc bằng khăn mềm, khô hoặc hơi ẩm.amp cloth. Do not use harsh chemicals or abrasive cleaners, as these can damage the finish or lens.
- Điều tra: Periodically inspect the fixture for any signs of damage, loose wiring, or wear. If any issues are found, disconnect power and consult a qualified electrician.
- Không cần thay bóng đèn: This fixture uses integrated LEDs, meaning there are no bulbs to replace. The LEDs are designed for a long lifespan of 50,000 hours.
KHAI THÁC. Xử lý sự cố
If you experience issues with your LED Shop Light, refer to the following common troubleshooting steps:
- Đèn không bật:
- Kiểm tra cầu dao để đảm bảo nguồn điện đã được bật.
- Verify all wire connections are secure and correct.
- Hãy đảm bảo công tắc trên tường đang ở vị trí BẬT.
- Ánh sáng nhấp nháy:
- Confirm the fixture is not connected to a dimmer switch, as it is non-dimmable.
- Kiểm tra xem kết nối dây điện có bị lỏng không.
- Đảm bảo nguồn cung cấp voltage ổn định và nằm trong phạm vi quy định.
- Nhiệt độ màu không chính xác:
- The CCT switch must be set before installation. If the diffuser is already installed, carefully remove it to access and adjust the switch.
If these steps do not resolve the issue, contact Sunco Lighting customer support for assistance.
8. Bảo hành và Hỗ trợ
Sunco Lighting cam kết về chất lượng sản phẩm của mình.
- Bảo hành: This product is backed by a 3-Year Warranty. Please refer to the official Sunco Lighting webXem trang web hoặc tài liệu mua hàng của bạn để biết đầy đủ chi tiết và điều khoản bảo hành.
- Hỗ trợ khách hàng: For technical assistance, troubleshooting, or warranty claims, please contact Sunco Lighting customer support.


