Hướng dẫn sử dụng máy chiếu mini BlitzWolf BW-VT2
Your comprehensive guide to setting up, operating, and maintaining your BlitzWolf BW-VT2 Mini Projector.
1. Sản phẩm hếtview
1.1 Nội dung gói
Vui lòng kiểm tra xem có đầy đủ các mục trong gói hàng của bạn không:
- BlitzWolf BW-VT2 Mini Projector
- Điều khiển từ xa
- Bộ đổi nguồn
- Cáp HDMI
- Hướng dẫn sử dụng (tài liệu này)
1.2 Bố cục thiết bị
Familiarize yourself with the various parts and ports of your projector.
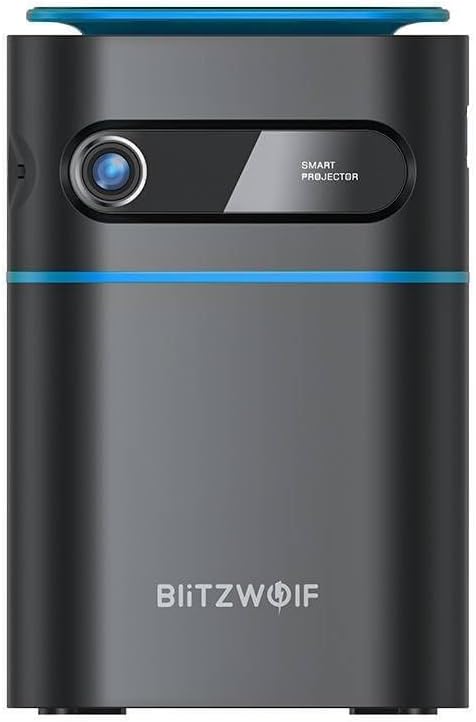
Hình 1.1: Mặt trước View. This image displays the front of the BlitzWolf BW-VT2 Mini Projector, highlighting the projection lens and the 'SMART PROJECTOR' branding.

Figure 1.2: Projector with Remote Control. This image shows the BlitzWolf BW-VT2 Mini Projector alongside its dedicated remote control, illustrating the compact size of both devices.
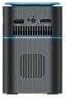
Hình 1.3: Phía sau View. The rear of the projector is shown, featuring ventilation grilles and various input/output ports.

Hình 1.4: Mặt bên View. This image highlights the side of the projector where additional connectivity options such as USB and HDMI ports are located.

Hình 1.5: Trên cùng View. The top surface of the projector is visible, featuring the integrated touch control panel for direct interaction.
1.3 Cổng và Điều khiển
- Cảng HDMI: Connect to laptops, game consoles, Blu-ray players, etc.
- Cổng USB: Kết nối ổ đĩa flash USB để phát lại đa phương tiện.
- Cổng xuất âm thanh (3.5mm): Kết nối loa ngoài hoặc tai nghe.
- Cổng DC IN: Kết nối bộ đổi nguồn.
- Nút nguồn: Bật/tắt máy chiếu.
- Bánh xe lấy nét: Điều chỉnh độ rõ nét của hình ảnh.
- Bảng điều khiển cảm ứng: Navigate menus and control playback directly on the device.
2. Hướng dẫn cài đặt
2.1 Bật nguồn
- Kết nối bộ đổi nguồn vào cổng DC IN trên máy chiếu.
- Cắm bộ đổi nguồn vào ổ cắm trên tường.
- Press and hold the Power Button on the projector or the remote control until the device powers on.
2.2 Vị trí ban đầu
Để tối ưu viewDựa trên kinh nghiệm, hãy xem xét những điều sau:
- Đặt máy chiếu trên bề mặt phẳng, ổn định.
- Ensure there is adequate ventilation around the projector to prevent overheating.
- Position the projector perpendicular to the projection surface (wall or screen) for a rectangular image.
- Điều chỉnh khoảng cách để có được kích thước màn hình mong muốn.
2.3 Điều chỉnh tiêu cự
After powering on, adjust the focus to ensure a clear image:
- Rotate the focus wheel located near the lens until the projected image appears sharp and clear.
2.4 Thiết lập điều khiển từ xa
Insert batteries into the remote control before first use:
- Mở nắp ngăn chứa pin ở mặt sau của điều khiển từ xa.
- Lắp hai pin AAA (không kèm theo), đảm bảo đúng cực (+/-).
- Đóng nắp ngăn chứa pin.
3. Hướng dẫn vận hành
3.1 Điều hướng
You can navigate the projector's interface using either the remote control or the touch control panel on top of the device.
- Điều khiển từ xa: Use the directional buttons (up, down, left, right) to move through menus and the 'OK' button to select.
- Bảng điều khiển cảm ứng: Swipe and tap on the touch-sensitive surface to navigate.
3.2 Kết nối thiết bị
The BW-VT2 supports various input sources:
- Đầu vào HDMI: Connect your laptop, game console, or other HDMI-enabled devices using an HDMI cable. Select the HDMI input source from the projector's menu.
- Đầu vào USB: Cắm ổ USB vào cổng USB. Trình phát đa phương tiện của máy chiếu thường sẽ tự động nhận diện ổ đĩa, cho phép bạn duyệt và phát các nội dung đa phương tiện được hỗ trợ. file(video, ảnh, nhạc).
- Kết nối Wi-Fi: Navigate to the 'Settings' menu, then 'Network' or 'Wi-Fi'. Select your Wi-Fi network and enter the password to connect the projector to the internet. This enables access to online streaming apps and updates.
3.3 Tính năng hệ điều hành Android
As an Android-powered projector, the BW-VT2 offers smart functionalities:
- Truy cập ứng dụng: Download and install various streaming apps (e.g., Netflix, YouTube) directly from the pre-installed app store or by sideloading APKs.
- Cài đặt: Customize display settings, audio output, network configurations, and system preferences through the Android settings menu.
- Phản chiếu màn hình: Utilize built-in screen mirroring features (e.g., Miracast, AirPlay compatible apps) to project content from your smartphone or tablet wirelessly.
3.4 Ngõ ra âm thanh
The projector has built-in speakers, but you can also connect external audio devices:
- Đầu ra âm thanh 3.5mm: Connect headphones or external speakers via the 3.5mm audio jack for enhanced sound.
4. Bảo trì
Bảo trì đúng cách sẽ đảm bảo độ bền và hiệu suất tối ưu cho máy chiếu của bạn.
4.1 Vệ sinh ống kính
To maintain clear image quality, clean the projector lens regularly:
- Hãy sử dụng một loại vải mềm, không xơ, được thiết kế đặc biệt cho thấu kính quang học.
- Lau nhẹ ống kính theo chuyển động tròn.
- Tránh sử dụng chất tẩy rửa có tính mài mòn hoặc dùng lực quá mạnh, vì có thể làm trầy xước thấu kính.
4.2 Thông gió
Ensure proper airflow to prevent overheating:
- Do not block the ventilation vents on the projector.
- Hãy vận hành máy chiếu ở khu vực thông thoáng.
- Periodically clean dust from the vents using a soft brush or compressed air.
4.3 Lưu trữ
When not in use, store your projector properly:
- Store the projector in a cool, dry place, away from direct sunlight and extreme temperatures.
- Use the original packaging or a protective case to prevent dust accumulation and physical damage.
KHAI THÁC. Xử lý sự cố
Tham khảo phần này để biết các vấn đề thường gặp và giải pháp.
| Vấn đề | Nguyên nhân có thể | Giải pháp |
|---|---|---|
| Máy chiếu không bật nguồn. | Không có kết nối nguồn; bộ chuyển đổi nguồn bị lỗi. | Ensure power adapter is securely connected to both projector and outlet. Try a different outlet. |
| Không có hình ảnh nào được chiếu. | Incorrect input source selected; loose HDMI/USB cable. | Verify the correct input source is selected in the menu. Check cable connections. |
| Hình ảnh bị mờ. | Tiêu cự chưa được điều chỉnh; máy chiếu quá gần/quá xa. | Rotate the focus wheel until the image is clear. Adjust projection distance if necessary. |
| Không có âm thanh. | Volume too low; external audio device not connected properly. | Increase volume. Check connections to external speakers/headphones. Ensure audio output is set correctly in settings. |
| Sự cố kết nối Wi-Fi. | Sai mật khẩu; sự cố bộ định tuyến; nhiễu sóng. | Re-enter Wi-Fi password. Restart router. Move projector closer to router. |
| Điều khiển từ xa không hoạt động. | Hết pin; vật cản; điều khiển từ xa chưa được ghép nối. | Replace batteries. Ensure no obstruction between remote and projector. |
6. Thông số kỹ thuật
Key specifications of the BlitzWolf BW-VT2 Mini Projector:
| Tính năng | Đặc điểm kỹ thuật |
|---|---|
| Thương hiệu | BlitzWolf |
| Số hiệu mẫu | BW-VT2EU |
| Màu sắc | Đen |
| Công nghệ kết nối | HDMI, USB, VGA, Wi-Fi |
| Độ phân giải màn hình | 1920 x 1080 (Full HD) |
| Kiểu hiển thị | Màn hình tinh thể lỏng, LED |
| Yếu tố hình thức | Cầm tay |
| Tính năng đặc biệt | Portable, Android OS, Wi-Fi, HDMI, USB, VGA |
| Thiết bị tương thích | Laptops, Smartphones, Game Consoles, Blu-ray Players, Media Players, Wi-Fi enabled devices |
| Sử dụng được đề xuất | Rạp chiếu phim tại nhà |
7. Bảo hành và Hỗ trợ
7.1 Bảo hành của nhà sản xuất
The BlitzWolf BW-VT2 Mini Projector comes with a Bảo hành 2 năm của nhà sản xuấtBảo hành này bao gồm các lỗi về vật liệu và tay nghề trong điều kiện sử dụng bình thường. Vui lòng giữ lại hóa đơn mua hàng để yêu cầu bảo hành.
7.2 Hỗ trợ khách hàng
If you encounter issues not covered in the troubleshooting section or require further assistance, please contact BlitzWolf customer support. Refer to the product packaging or the official BlitzWolf webtrang web để biết thông tin liên lạc mới nhất.


