1. Giới thiệu
This manual provides detailed instructions for the Arducam Raspberry Pi Camera Module 3 (Model B0312). This camera module features a 12-megapixel IMX708 sensor with High Dynamic Range (HDR) and autofocus capabilities, designed for use with various Raspberry Pi models including Pi 5, 4B, 3B, Zero W, and 2 W. It offers high-resolution still images (4608 x 2592) and supports both libcamera and Picamera2 for seamless integration and control.

Figure 1: Arducam Raspberry Pi Camera Module 3 with attached ribbon cable.
2. Nội dung gói hàng
Xác minh rằng tất cả các mục đều có trong gói hàng của bạn:
- 1 x Arducam 12MP IMX708 Camera Module 3
- 1 x 66° HFOV Autofocus Lens (integrated)
- Raspberry Pi compatible FFC cables (various lengths/types for different Pi models)
3. Thiết lập
3.1 Kết nối phần cứng
Carefully connect the camera module to your Raspberry Pi board using the appropriate Flexible Flat Cable (FFC). Ensure correct orientation to prevent damage.
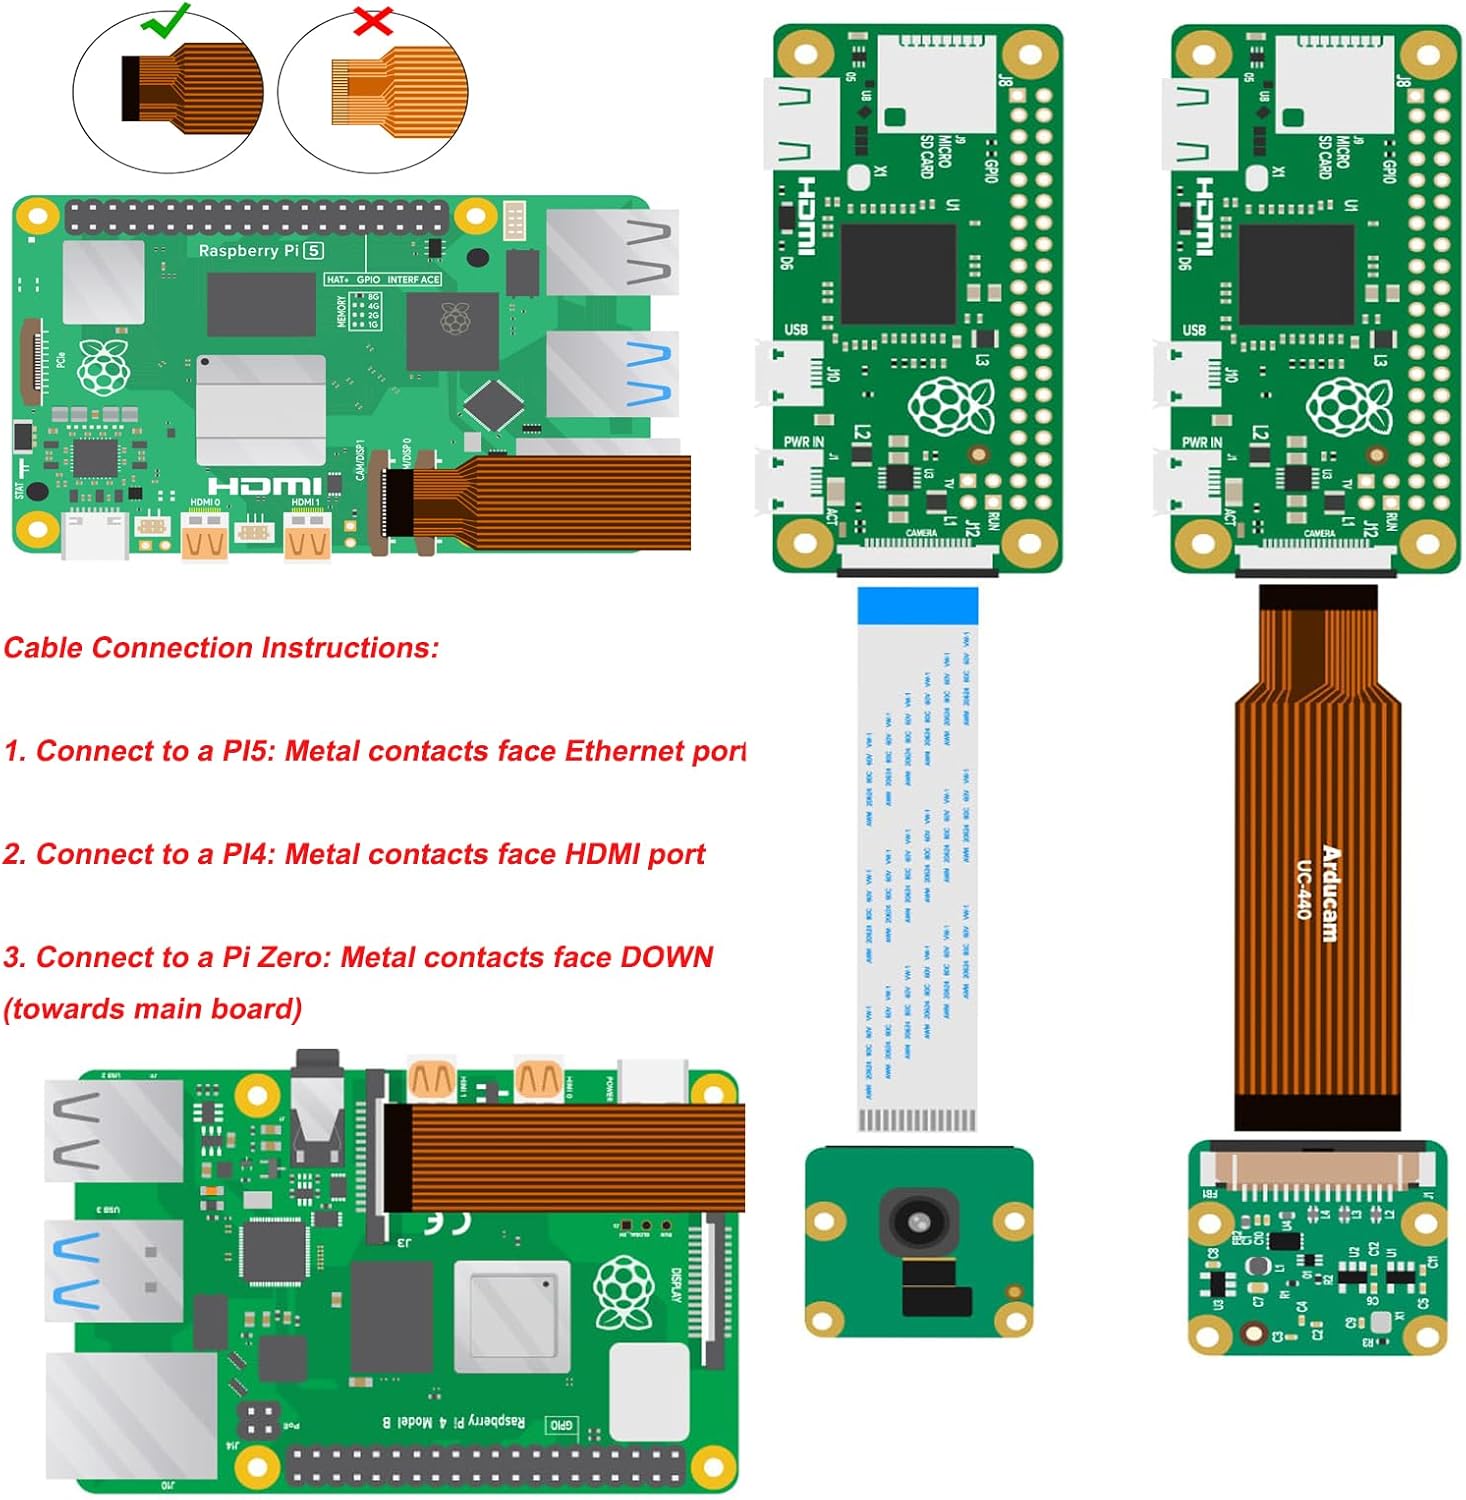
Figure 2: FFC cable connection instructions for various Raspberry Pi models.
- For Raspberry Pi 5: The metal contacts of the FFC cable should face the Ethernet port.
- For Raspberry Pi 4B/3B: The metal contacts of the FFC cable should face the HDMI port.
- For Raspberry Pi Zero W/2 W: The metal contacts of the FFC cable should face DOWN (towards the main board). Note that a thinner FFC cable is required for Pi Zero models.

Figure 3: Connection to Raspberry Pi Zero.

Figure 4: Connection to Raspberry Pi 4B.

Figure 5: Connection to Raspberry Pi 5.
3.2 Cấu hình phần mềm
The Arducam Camera Module 3 requires specific software configuration on your Raspberry Pi. This camera module is designed for the new camera stack (libcamera/Picamera2) and is not compatible with the legacy camera stack (raspistill/raspivid).
- Install Raspberry Pi OS: Ensure your Raspberry Pi is running a recent version of Raspberry Pi OS (e.g., Bullseye OS or newer) that supports the new camera stack.
- Update System: Open a terminal and run the following commands to update your system:
sudo apt update && sudo apt upgrade - Install libcamera-apps: Install the necessary camera applications:
For headless setups, consider `sudo apt install rpicam-apps-lite`.sudo apt install libcamera-apps - Configure `config.txt`: Edit the boot configuration file:
Locate or add the following lines:sudo nano /boot/firmware/config.txt
Save and exit the editor.camera_auto_detect=0
dtoverlay=imx708 - Enable I2C: If not already enabled, enable I2C via `raspi-config`:
Điều hướng đến Tùy chọn giao diện > I2C và kích hoạt nó.sudo raspi-config - Khởi động lại: Reboot your Raspberry Pi for changes to take effect:
sudo reboot
4. Hướng dẫn vận hành
After successful setup, you can operate the camera using `libcamera` commands or the Picamera2 library.
4.1 Basic Commands (libcamera)
- List Cameras: Verify the camera is detected:
You should see output similar to: `0 : imx708 [4608x2592 10-bit RGGB]`.rpicam-hello --list-cameras - Capture Still Image: Capture a JPEG image:
rpicam-jpeg -o test.jpg - Quay Video: Record an H.264 video:
(Ghi hình trong 10 giây)rpicam-vid -t 10000 -o video.h264
4.2 Autofocus and HDR
The IMX708 sensor supports autofocus (PDAF and CDAF) and HDR. These features are typically managed automatically by the libcamera stack. For advanced control, refer to the official libcamera and Picamera2 documentation for specific parameters and settings.
5. Bảo trì
The Arducam Camera Module 3 is a delicate electronic component. Follow these guidelines for proper maintenance:
- Xử lý: Always handle the camera module by its edges to avoid touching the lens or sensor.
- Vệ sinh: Use a soft, lint-free cloth or a specialized lens cleaning pen to gently clean the lens if necessary. Avoid abrasive materials or harsh chemicals.
- Kho: Bảo quản máy ảnh ở nơi khô ráo, không có bụi khi không sử dụng.
- Chăm sóc cáp: Ensure FFC cables are not bent sharply or stressed, as this can damage the conductors.
KHAI THÁC. Xử lý sự cố
If you encounter issues with your Arducam Camera Module 3, consider the following:
- "No Cameras Available" Error:
- Verify the FFC cable is correctly inserted at both the camera module and the Raspberry Pi. The metal contacts must be fully engaged and facing the correct direction as described in Section 3.1. Try flipping the cable at each end, one at a time, and rebooting.
- Ensure `camera_auto_detect=0` and `dtoverlay=imx708` are correctly set in `/boot/firmware/config.txt`.
- Confirm I2C is enabled via `raspi-config`.
- Ensure your Raspberry Pi OS is updated and `libcamera-apps` are installed.
- `dmaHeap allocation failure` Error: This error, often seen on older Pi models (e.g., Pi 4 running Bookworm), indicates insufficient memory for camera buffers. While increasing CMA (Contiguous Memory Allocator) might help, it's not always a guaranteed fix. Consider reducing resolution or frame rate, or using a newer Raspberry Pi model if possible.
- Poor Image Quality/Focus Issues:
- Tháo bỏ lớp màng bảo vệ khỏi ống kính.
- Hãy đảm bảo môi trường xung quanh bạn có đủ ánh sáng.
- For specific autofocus control, consult the libcamera/Picamera2 documentation for manual focus options.
- Compatibility with Pi Zero: While compatible, ensure you are using the correct, thinner FFC cable designed for the Pi Zero's smaller camera connector.
7. Thông số kỹ thuật
| Tính năng | Chi tiết |
|---|---|
| Số hiệu mẫu | B0312 |
| Cảm biến hình ảnh | SonyIMX708 |
| Nghị quyết | 12 Megapixel (4608 x 2592) |
| Lĩnh vực View (Đường chéo) | 75° |
| Tự động lấy nét | Yes (PDAF and CDAF) |
| HDR (Dải động cao) | Đúng |
| Kết nối | CSI-2 |
| Khả năng tương thích | Raspberry Pi 5, 4B, 3B, Zero W, 2 W |
| Hỗ trợ hệ điều hành | Bullseye OS, libcamera, Picamera2 |
| Trọng lượng sản phẩm | 1.27 ounce |
| Kích thước gói hàng | 2.1 x 1.75 x 0.67 inch |
8. Thông tin bảo hành
For detailed warranty information regarding your Arducam Raspberry Pi Camera Module 3, please refer to the official Arducam webhoặc liên hệ trực tiếp với bộ phận hỗ trợ khách hàng của họ. Điều khoản và điều kiện bảo hành có thể khác nhau.
9. Hỗ trợ
If you require further assistance or have technical questions not covered in this manual, please visit the official Arducam support resources or contact their customer service department. Online forums and community resources for Raspberry Pi camera users may also provide helpful information.


