Giới thiệu
Thank you for choosing the Epson EB-L210SF projector. This manual provides essential information for the safe and efficient use of your projector. Please read it thoroughly before operating the device and keep it for future reference.
The Epson EB-L210SF is a 3LCD Full-HD projector designed for clear and vibrant image projection. It features a laser light source for long-lasting performance.
Thông tin an toàn quan trọng
- An toàn laze: Do not look directly into the projector lens when the laser light source is active. Avoid direct eye exposure to the laser beam.
- Thông gió: Ensure adequate ventilation around the projector. Do not block ventilation openings. Overheating can cause damage.
- Nguồn điện: Chỉ sử dụng bộ nguồn được chỉ định cho máy chiếu này.
- Xử lý: Hãy sử dụng máy chiếu cẩn thận. Tránh làm rơi hoặc để máy chiếu chịu những va đập mạnh.
- Vệ sinh: Rút dây nguồn trước khi vệ sinh. Sử dụng khăn mềm, khô. Không sử dụng chất tẩy rửa dạng lỏng hoặc dạng xịt.
Cài đặt
1. Tháo dỡ và sắp xếp
Carefully remove the projector and all accessories from the packaging. Place the projector on a stable, level surface. Ensure there is sufficient space around the projector for proper ventilation.

Hình 1: Mặt trước và mặt bên view of the Epson EB-L210SF projector, showing the lens and ventilation grilles.
2. Kết nối nguồn
- Kết nối dây nguồn được cung cấp kèm theo máy chiếu với cổng nguồn AC của máy chiếu.
- Cắm đầu kia của dây nguồn vào ổ cắm điện được nối đất.
3. Kết nối các nguồn đầu vào
The projector supports various input sources. Connect your device (computer, Blu-ray player, etc.) to the appropriate port on the projector's rear panel.

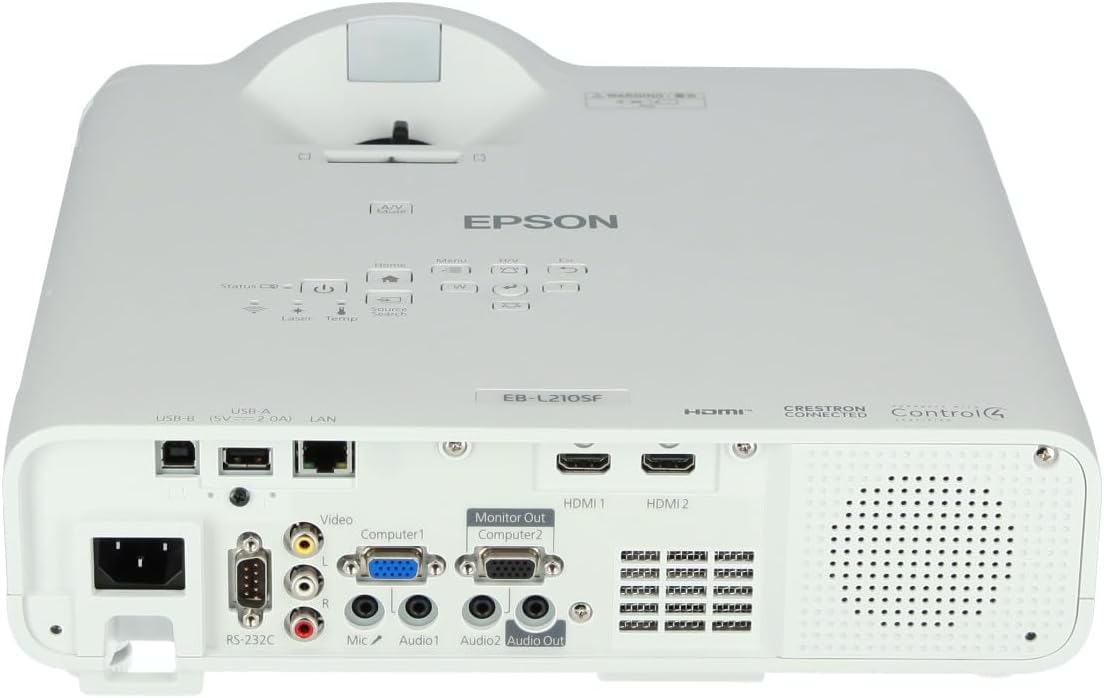
Figure 2: Rear panel of the projector, displaying various input and output ports including HDMI, Computer (VGA), Video, USB, and Audio connections.
- HDMI: Connect an HDMI cable from your device to one of the HDMI ports (HDMI 1 or HDMI 2).
- Máy tính (VGA): Connect a VGA cable from your computer to the Computer 1 or Computer 2 port. For audio, connect a separate audio cable to Audio 1 or Audio 2.
- Băng hình: Connect composite video and audio cables to the Video and Audio (R/L) ports.
- USB: Use the USB-A port for connecting USB storage devices or the USB-B port for display over USB.
- LAN: Kết nối cáp Ethernet để điều khiển và giám sát mạng.
4. Khởi động ban đầu và điều chỉnh hình ảnh
- Press the power button on the projector or remote control to turn on the device. The power indicator will illuminate.
- Điều chỉnh vòng lấy nét Di chuyển chuột quanh ống kính cho đến khi hình ảnh sắc nét và rõ ràng.
- Sử dụng cần gạt thu phóng (if available) to adjust the image size.
- Nếu hình ảnh có dạng hình thang, hãy sử dụng hiệu chỉnh keystone feature (manual or automatic) to square the image. Refer to the Operating section for details on menu navigation.
Vận hành máy chiếu
1. Bảng điều khiển kết thúcview
The control panel on top of the projector allows access to various functions and settings.
Hình 3: Trên cùng view of the projector, highlighting the control panel with buttons for power, menu, source selection, and navigation.
- Nút nguồn: Bật hoặc tắt máy chiếu.
- Tìm kiếm nguồn: Lặp qua các nguồn đầu vào có sẵn.
- Nút Menu: Mở menu hiển thị trên màn hình (OSD).
- Navigation Buttons (Arrow keys): Dùng để điều hướng qua các tùy chọn menu.
- Nút Nhập: Xác nhận lựa chọn trong menu.
- Nút Esc: Thoát khỏi menu hiện tại hoặc trở về màn hình trước đó.
- Nút Home: Accesses the home screen or quick settings.
- Tắt tiếng A/V: Temporarily mutes audio and blanks the screen.
2. Chọn nguồn đầu vào
Nhấn nút Tìm kiếm nguồn button on the control panel or remote control to cycle through the connected input sources (e.g., HDMI 1, HDMI 2, Computer 1, Video). The projector will automatically detect and display the active source.
3. Adjusting Image and Audio Settings
Nhấn nút Thực đơn button to access the projector's on-screen display (OSD) menu. Use the navigation buttons to browse categories such as:
- Hình ảnh: Điều chỉnh độ sáng, độ tương phản, màu sắc, sắc độ, độ sắc nét và nhiệt độ màu.
- Tín hiệu: Configure input signal settings, aspect ratio, and overscan.
- Cài đặt: General projector settings like language, display options, and power management.
- Âm thanh: Adjust volume, mute, and audio input selection.
Chọn một tùy chọn và nhấn Đi vào to modify its value. Press Thoát để thoát khỏi menu.
BẢO TRÌ
1. Vệ sinh máy chiếu
- Bên ngoài: Wipe the projector's exterior with a soft, dry, lint-free cloth. For stubborn dirt, dampen the cloth slightly with water, then wipe dry.
- Ống kính: Gently wipe the lens with a lens cleaning cloth or lens paper. Avoid using abrasive materials or excessive force.
- Bộ lọc khí: Regularly check and clean the air filter to prevent dust buildup, which can affect performance and cause overheating. Refer to the projector's on-screen menu for filter maintenance reminders.
2. Nguồn sáng laser
The Epson EB-L210SF uses a laser light source, which offers a long operational life and does not require lamp replacement. No user maintenance is typically required for the laser light source itself.
Xử lý sự cố
Nếu bạn gặp sự cố với máy chiếu, hãy tham khảo các sự cố và giải pháp phổ biến sau đây:
| Vấn đề | Nguyên nhân có thể / Giải pháp |
|---|---|
| Không có hình ảnh nào được chiếu |
|
| Hình ảnh bị mờ hoặc mất nét |
|
| Hình ảnh bị biến dạng (hình thang) |
|
| Không có âm thanh |
|
| Projector is not wireless | The Epson EB-L210SF is not inherently a wireless projector. Wireless functionality typically requires an optional external wireless adapter, which is sold separately. Please consult Epson's official website or your retailer for compatible wireless adapters. |
| Overheating warning (Temp indicator) |
|
Thông số kỹ thuật
| Tính năng | Chi tiết |
|---|---|
| Số hiệu mẫu | V11HA75080 |
| Độ phân giải màn hình | 1920 x 1080 (Full HD) |
| Công nghệ kết nối | HDMI, VGA, USB, LAN |
| Kích thước sản phẩm | 11.81 x 11.81 x 11.81 inch |
| Trọng lượng sản phẩm | 10.14 pound |
| Nguồn sáng | Tia laze |
| Nhà sản xuất | Máy in Epson |
| Sử dụng được đề xuất | Giám sát |
| Tính năng đặc biệt | Nhẹ |
| Pin cần thiết | 1 AAAA (for remote control, not included with projector unit) |
| Ngày đầu tiên có sẵn | Ngày 14 tháng 2023 năm XNUMX |
Bảo hành và Hỗ trợ
Để biết thông tin chi tiết về bảo hành, vui lòng tham khảo thẻ bảo hành đi kèm sản phẩm hoặc truy cập trang web chính thức của Epson. webtrang web. Điều khoản và điều kiện bảo hành có thể thay đổi tùy theo khu vực.
Để được hỗ trợ kỹ thuật, đăng ký sản phẩm hoặc tải xuống trình điều khiển và phần mềm mới nhất, vui lòng truy cập trang hỗ trợ chính thức của Epson. website or contact Epson customer service in your region. Contact information can typically be found on the Epson webđịa điểm.


