1. Giới thiệu
This manual provides detailed instructions for the Arducam 16MP Autofocus Quad-Camera Kit. This kit is designed to interface four 16MP IMX519 autofocus cameras with a single MIPI CSI-2 slot on compatible single-board computers, such as Raspberry Pi and Nvidia Jetson Boards, using the Arducam Camarray HAT.
The system enables synchronized image and video capture from multiple camera modules, expanding possibilities for advanced applications like VR, AR, SLAM, 3D sensing, and image stitching.
Figure 1.1: Arducam 16MP Autofocus Quad-Camera Kit in an example thiết lập.
2. Nội dung gói hàng
Xác minh rằng tất cả các thành phần sau đây đều có trong gói của bạn:
- Four (4) Arducam 16MP IMX519 Autofocus Camera Modules
- One (1) Arducam Camarray HAT (UC-512 Rev.D2)
- One (1) Short FPC Cable (UC-440)
- Four (4) Long FPC Cables (UC-593)
- Mounting Hardware (Screws and Standoffs)
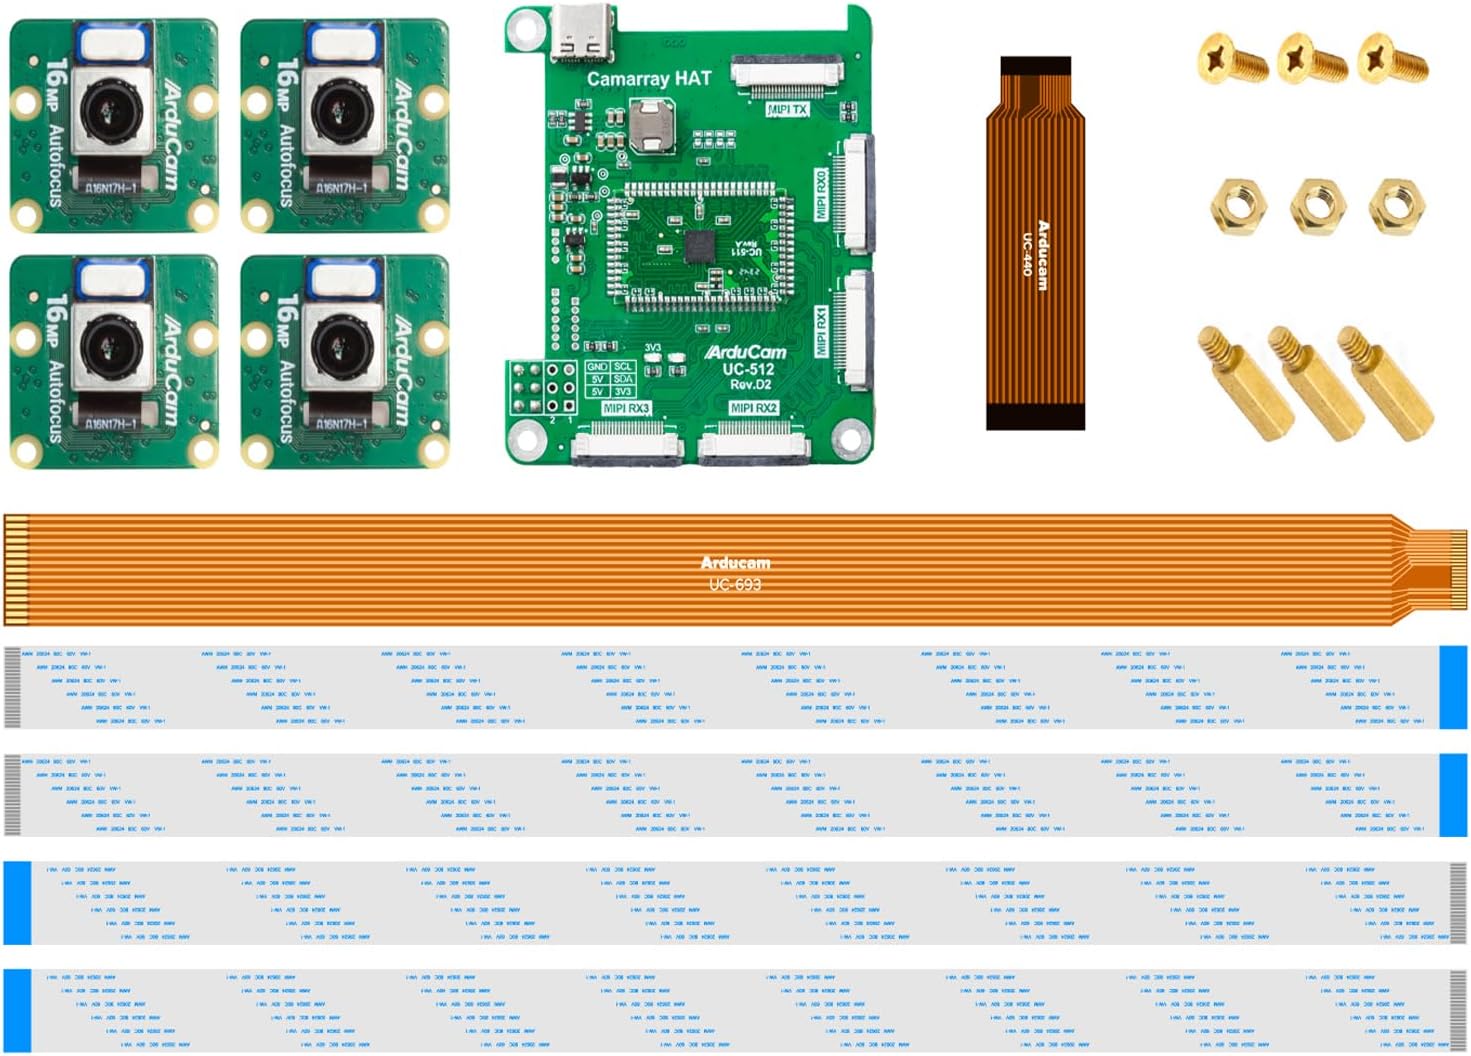
Hình 2.1: Hếtview của tất cả các thành phần được bao gồm.
3. Hướng dẫn thiết lập
Follow these steps to assemble and prepare your Arducam Quad-Camera Kit for operation.
3.1 Hardware Assembly
- Connect FPC Cables to Camera Modules: Carefully insert one end of each long FPC cable (UC-593) into the CSI connector on each of the four 16MP IMX519 camera modules. Ensure the blue tab on the FPC cable faces away from the camera lens when inserting. Secure the connection by closing the connector latch.

Figure 3.1: Proper orientation for FPC cable connection to camera module.
- Connect Camera Modules to Camarray HAT: Insert the other end of the four long FPC cables into the MIPI RX0, RX1, RX2, and RX3 slots on the Arducam Camarray HAT (UC-512 Rev.D2). Ensure the blue tab faces the same direction as the corresponding connector on the HAT. Close the latches to secure.

Figure 3.2: Connecting all four camera modules to the Camarray HAT.
- Connect Camarray HAT to Host Board: Use the short FPC cable (UC-440) to connect the MIPI TX port on the Camarray HAT to the CSI-2 camera input on your Raspberry Pi or Nvidia Jetson Board. Ensure correct orientation and secure the connection.
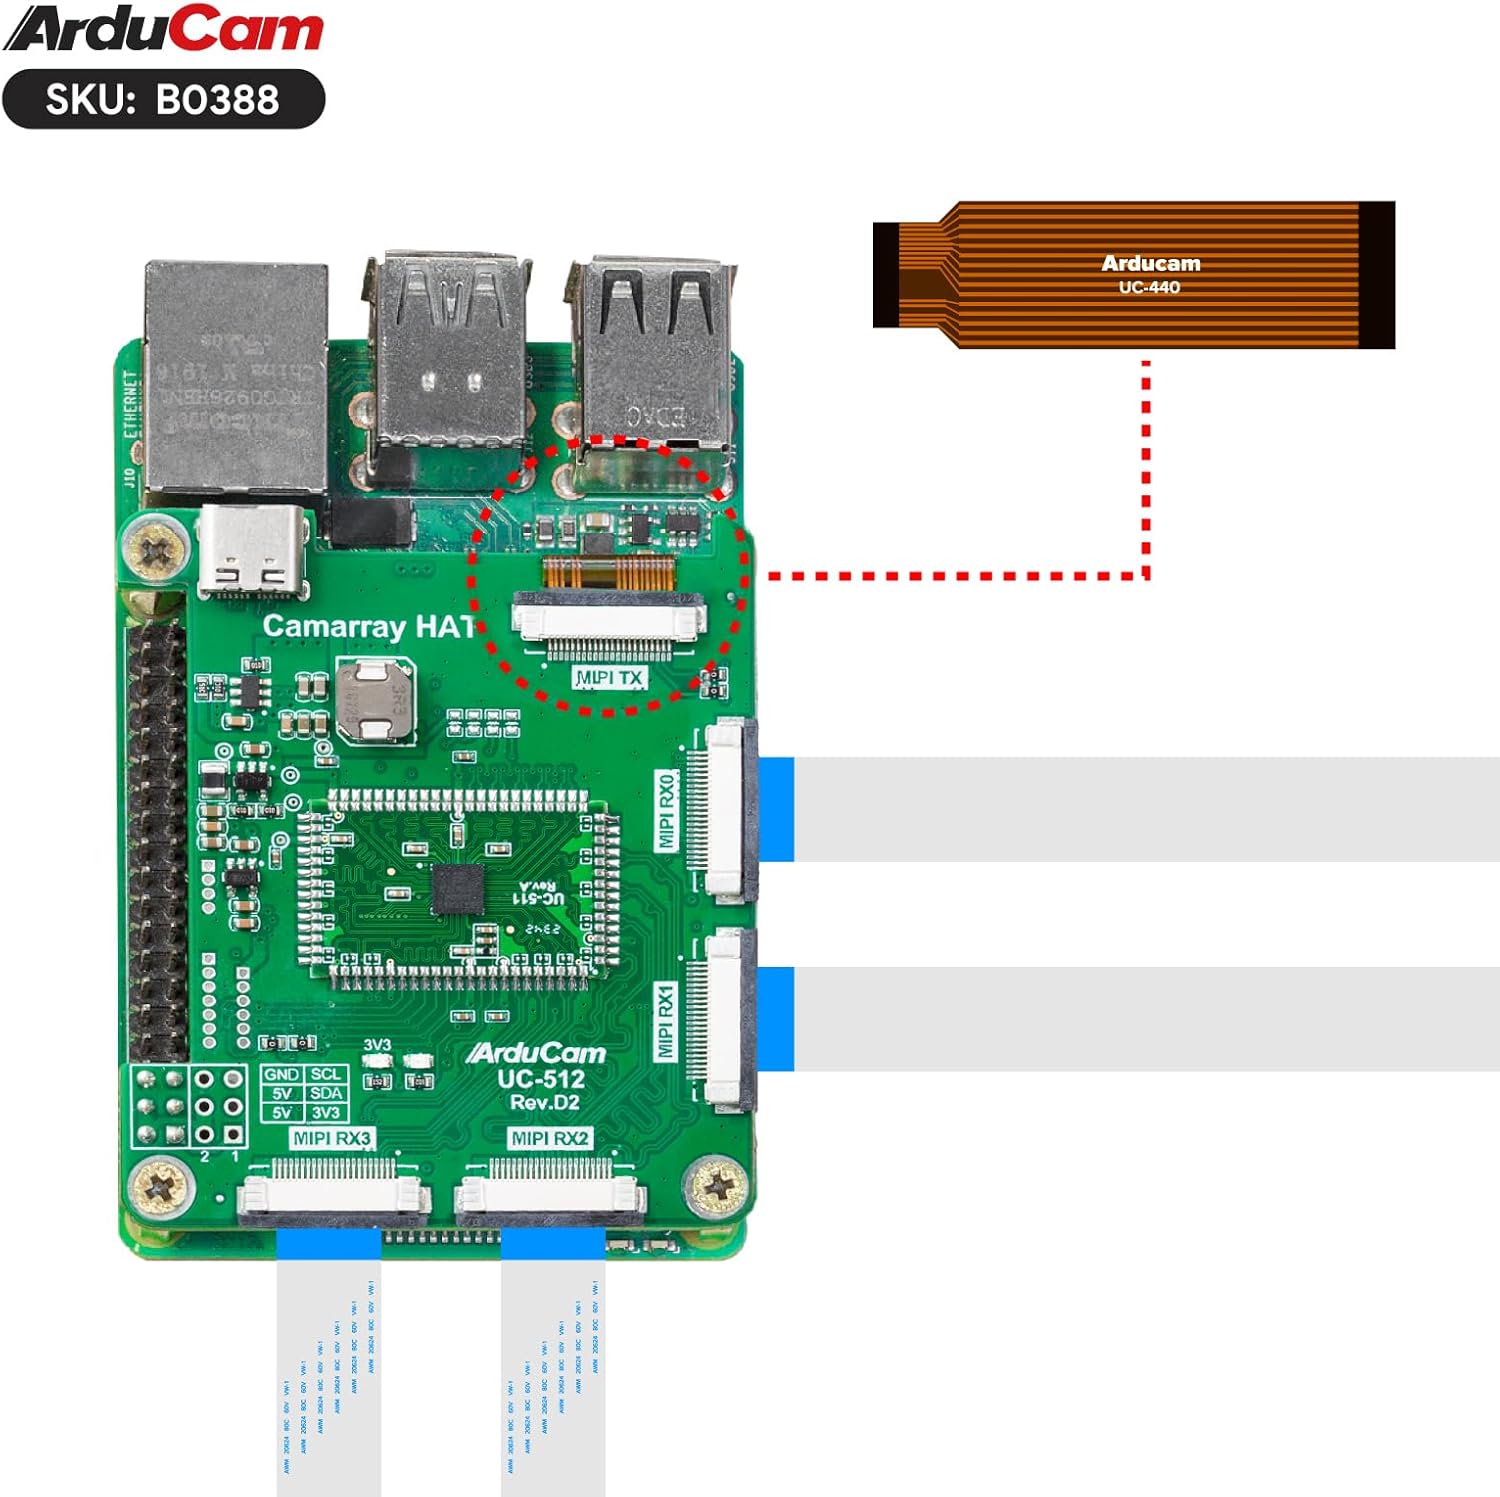
Figure 3.3: Connecting the Camarray HAT to the host board via the short FPC cable.

Hình 3.4: Ví dụample connection to an Nvidia Jetson Board.
- Secure with Mounting Hardware: Use the provided screws and standoffs to securely mount the Camarray HAT to your host board, if applicable.
3.2 Cấu hình phần mềm
Proper software configuration is essential for the kit to function correctly. Ensure your operating system is up to date.
- Raspberry Pi: It is recommended to run the latest version of Raspberry Pi OS (Debian version 11 Bullseye, January 28th, 2022, or later releases). The kit is compatible with the latest Pi camera software (libcamera) and uses the official Pi camera tuning algorithm.
- Jetson Board: The camera is compatible with Jetson Developer Kits. Compatibility with other third-party boards is not guaranteed.
For detailed software setup guides, refer to the official Arducam documentation:
Lưu ý quan trọng:
- The four-channel camera is a customized model that requires the HAT to provide a clock. The individual camera modules cannot be removed and directly connected to a Raspberry Pi without the Camarray HAT.
- At least three of the four cameras must be connected for the system to output any images.
4. Hoạt động
The Arducam Quad-Camera Kit allows for simultaneous image and video capture from all four connected cameras.
4.1 Chụp ảnh và quay video
- The system combines four camera feeds into one frame.
- Each individual camera feed has a maximum resolution of 2288(H) x 1736(V).
- The maximum output resolution for still images is 4656 x 3496.
- The maximum output resolution for video is 1920 x 1080.
- Due to the combination of four feeds, the frame rate for both video and still images will be approximately half of what a single camera would typically achieve.
4.2 Chức năng tự động lấy nét
Each 16MP IMX519 camera module features autofocus capability, allowing for clear imaging across a focus range of 10 cm to infinite. The autofocus function is managed through the software interface.

Figure 4.1: Detail of the autofocus lens.
4.3 Đồng bộ hóa
The Camarray HAT enables synchronized capture across the four camera modules. Specifically:
- Images from cameras 0 and 1 are completely synchronized.
- Images from cameras 2 and 3 are completely synchronized.
- Images from cameras 2/3 will be one frame behind the images from cameras 0/1.
4.4 Ứng dụng
The synchronized multi-camera capabilities of this kit are suitable for various advanced applications, including but not limited to:
- Thực tế ảo (VR)
- Thực tế tăng cường (AR)
- Simultaneous Localization and Mapping (SLAM)
- 3D Sensing
- Khâu hình ảnh
- Theo dõi đối tượng
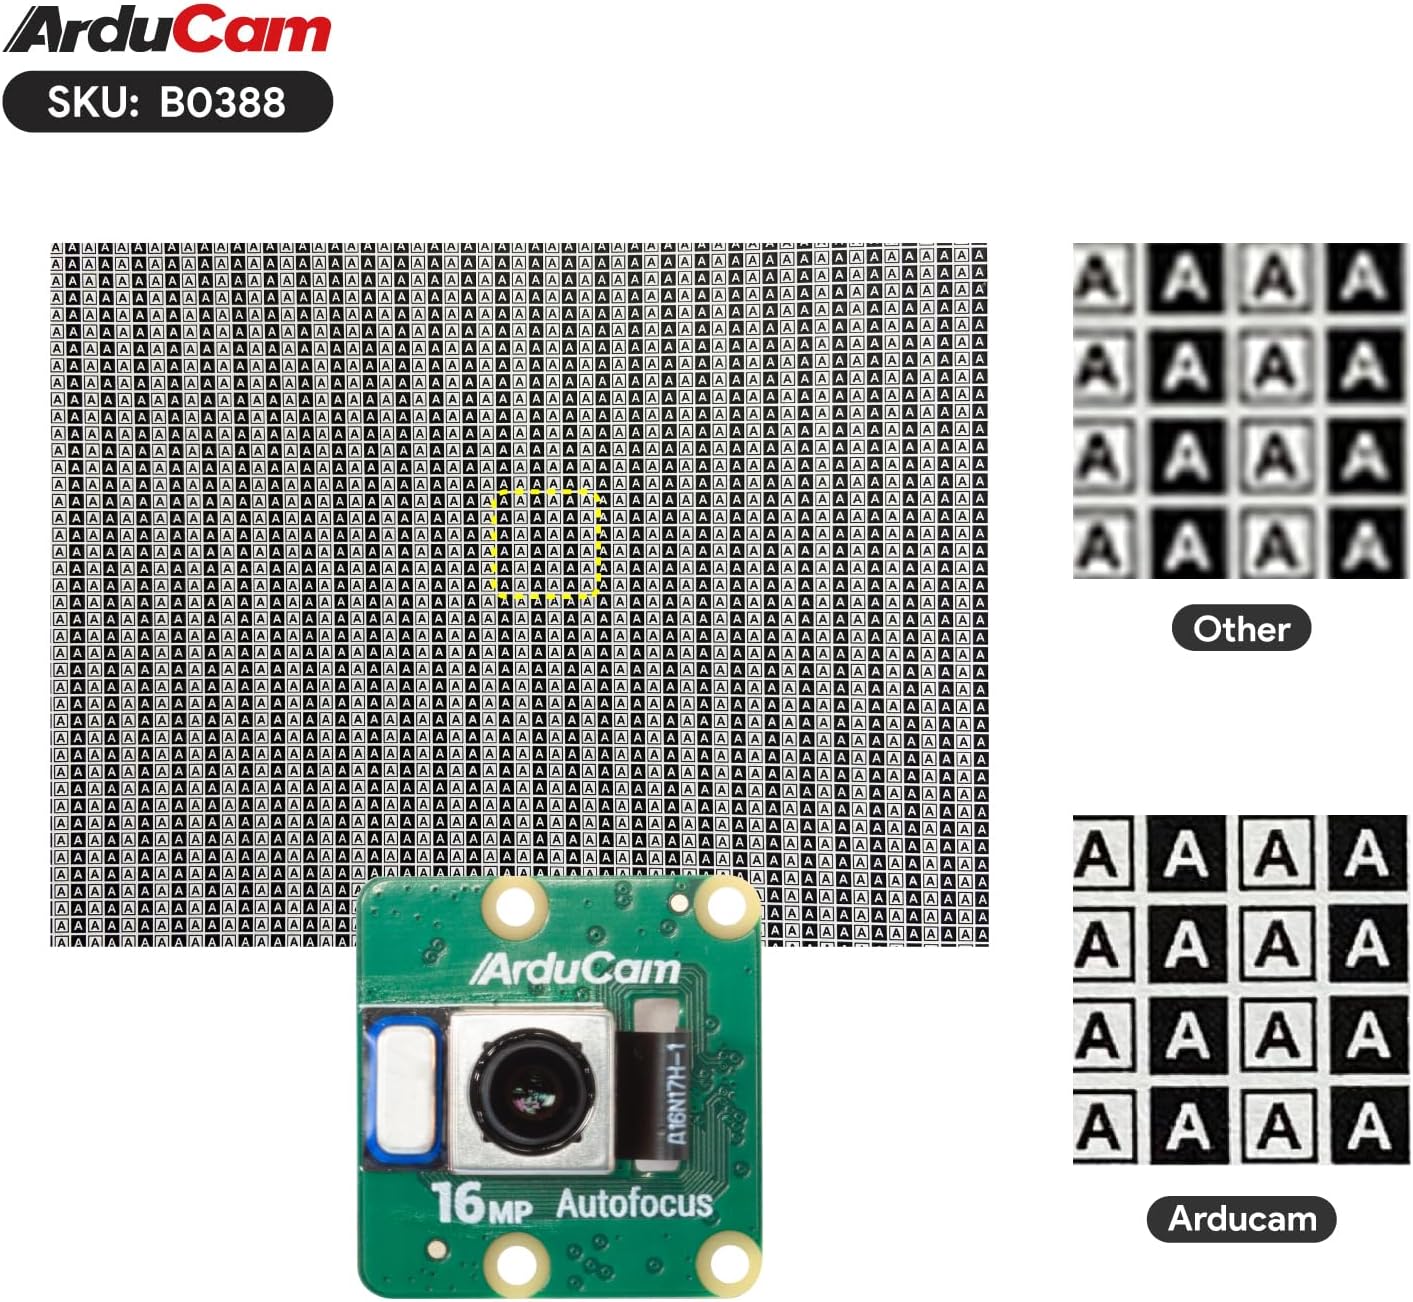
Hình 4.2: Ví dụample of image quality from Arducam cameras.
5. Bảo trì
To ensure the longevity and optimal performance of your Arducam Quad-Camera Kit, follow these maintenance guidelines:
- Xử lý: Handle all components, especially the camera modules and FPC cables, with care. Avoid bending or creasing the FPC cables sharply.
- Vệ sinh: Use a soft, dry, lint-free cloth to gently clean the camera lenses and circuit boards. Avoid using liquid cleaners or abrasive materials.
- Kho: Store the kit in a cool, dry environment, away from direct sunlight, extreme temperatures, and high humidity.
- Sự bảo vệ: When not in use, consider using a protective case to prevent dust accumulation and physical damage to the camera modules and HAT.
KHAI THÁC. Xử lý sự cố
This section addresses common issues you might encounter with the Arducam Quad-Camera Kit.
6.1 Các vấn đề thường gặp và giải pháp
| Vấn đề | Nguyên nhân có thể | Giải pháp |
|---|---|---|
| No image output or black screen. | Not enough cameras connected, incorrect FPC cable connection, or software issue. | Ensure at least three camera modules are connected to the Camarray HAT. Verify all FPC cables are correctly inserted and latches are closed. Check software configuration and ensure the correct OS version is installed. |
| Individual camera feed is black. | Faulty camera module or FPC cable, or loose connection. | Re-seat the FPC cable for the affected camera. If the issue persists, try swapping the camera module or FPC cable with a known working one to isolate the problem. The composite image will still output, with the failed camera's area appearing black. |
| Chức năng tự động lấy nét không hoạt động. | Software not detecting autofocus feature or incorrect command. | Refer to the specific software guide for your host board (Raspberry Pi or Jetson) to ensure correct autofocus commands are being used. Ensure your OS and camera software are up to date. |
| Reduced frame rate. | Normal operation for quad-camera setup. | This is expected behavior. The frame rate for video and still images will be halved compared to a single camera due to the processing of four simultaneous feeds. |
| Cameras cannot be used directly with Raspberry Pi. | Misunderstanding of product design. | The 16MP IMX519 cameras in this kit are specifically designed to share clocks with the Camarray HAT for frame-level synchronization and cannot be used as standalone camera modules directly connected to a Raspberry Pi. |
If you encounter issues not listed here, or if the suggested solutions do not resolve your problem, please refer to the official Arducam documentation or contact Arducam support for assistance.
7. Thông số kỹ thuật
Detailed specifications for the Arducam 16MP Autofocus Quad-Camera Kit:
| Tính năng | Đặc điểm kỹ thuật |
|---|---|
| Cảm biến | IMX519 stacked, back-illuminated sensor |
| Nghị quyết | 16 Megapixels (per camera) |
| Kích thước điểm ảnh | 1.22 µm × 1.22 µm |
| Cảm biến chéo | 7.103 mm (Loại 1/2.534) |
| Định dạng đầu ra | RAW10 / 8, COMP8 |
| Loại ống kính | Tự động lấy nét |
| Aperture (f-number) | f/1.75 |
| Effective Focal Length (EFL) | 4.28mm |
| Lĩnh vực View (FOV) | 80° |
| Phạm vi tập trung | 10 cm ~ infinite |
| Bộ lọc cắt IR | Tích hợp |
| Giá đỡ ba chân | 1/4”-20 (Note: Tripod not included) |
| Khả năng tương thích | Raspberry Pi (Pi 3, Pi 4), Nvidia Jetson Board (Developer Kit) |
| Hệ điều hành | Linux (Raspberry Pi OS Debian 11 Bullseye recommended) |
| Trọng lượng sản phẩm | Khoảng 3.52 ounce (toàn bộ bộ dụng cụ) |
| Kích thước gói hàng | Khoảng 4.92 x 3.66 x 2.52 inch |

Figure 7.1: Dimensions of a single 16MP Autofocus camera module.

Figure 7.2: Layout of the Arducam Camarray HAT (UC-512 Rev.D2).
8. Bảo hành và Hỗ trợ
Arducam is committed to providing high-quality products and customer satisfaction. While specific warranty details are not provided in this manual, Arducam offers extensive documentation and an active support team to assist users.
For technical support, product inquiries, or to access additional resources, please visit the official Arducam webtrang web hoặc cửa hàng Amazon của họ:


