1. Giới thiệu
Welcome to the user manual for your Ulefone Armor X9 Rugged Phone. This guide provides essential information on setting up, operating, maintaining, and troubleshooting your device. The Ulefone Armor X9 is designed for durability and performance, featuring robust protection and advanced functionalities.
Key features of your Ulefone Armor X9 include:
- IP68/IP69K Grade 360 All Round Protection: Được thiết kế để chịu được môi trường khắc nghiệt.
- Hệ điều hành Android 11: Enjoy the latest Android experience.
- RAM 4GB + ROM 128GB: AmpBộ nhớ và dung lượng lưu trữ cho các ứng dụng và dữ liệu của bạn.
- 16MP Triple Rear Camera: Capture high-quality photos and videos.
- Massive 5580mAh Battery Capacity: Thời gian sử dụng kéo dài.
- Triple Navigation System: Enhanced positioning accuracy.
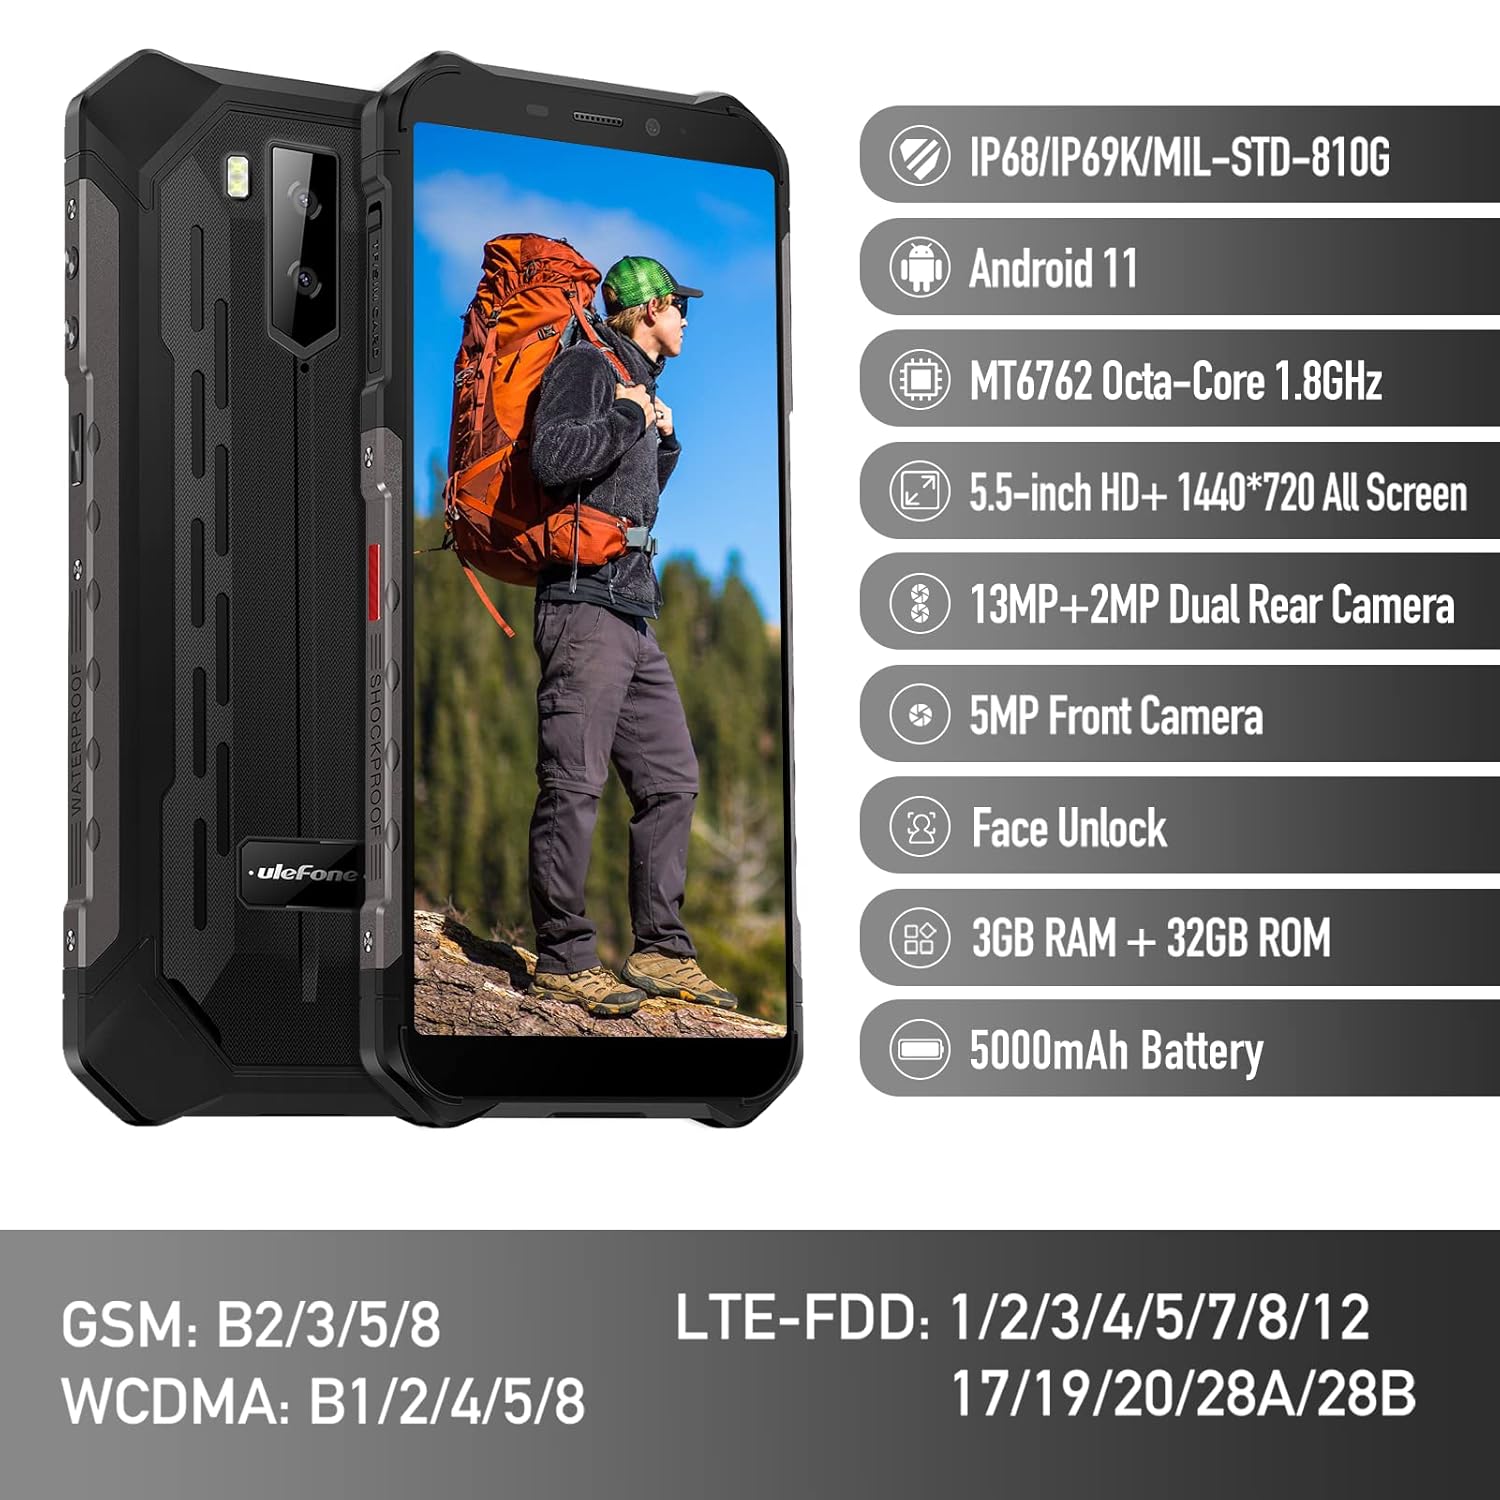
Figure 1: Ulefone Armor X9 Rugged Phone overview, highlighting its robust design and core specifications like IP68/IP69K rating, Android 11, Octa-Core processor, 5.5-inch HD+ screen, 13MP+2MP dual rear camera, 5MP front camera, Face Unlock, 3GB RAM + 32GB ROM, and 5000mAh battery.
2. Thiết lập
2.1. Lắp đặt thẻ SIM và thẻ TF
The Ulefone Armor X9 supports dual SIM cards and a TF (microSD) card for expandable storage. Follow these steps to install them:
- Xác định vị trí khay thẻ SIM ở bên cạnh điện thoại.
- Sử dụng dụng cụ đẩy SIM được cung cấp để mở khay.
- Carefully place your Nano-SIM cards into the designated slots (SIM1 and SIM2).
- If using a TF card, place it into the dedicated TF card slot. Note that some configurations may share a slot between SIM2 and the TF card.
- Gently push the tray back into the phone until it is flush with the device body. Ensure the tray is properly sealed to maintain water and dust resistance.

Figure 2: Illustration of the dual SIM and TF card tray, showing how to insert SIM1, SIM2, and a TF card into the Ulefone Armor X9.
2.2. Sạc ban đầu
Before first use, it is recommended to fully charge your Ulefone Armor X9. Use the provided USB cable and power adapter.
- Kết nối cáp USB vào cổng sạc trên điện thoại.
- Kết nối đầu kia của cáp USB với bộ đổi nguồn.
- Cắm bộ đổi nguồn vào ổ cắm trên tường.
- Chỉ báo sạc sẽ hiển thị trên màn hình. Hãy để điện thoại sạc cho đến khi biểu tượng pin hiển thị đầy.
2.3. Bật / Tắt nguồn
- Để bật nguồn: Nhấn và giữ nút Nguồn (thường nằm ở bên phải) cho đến khi logo Ulefone xuất hiện.
- Để Tắt Nguồn: Nhấn và giữ nút Nguồn cho đến khi menu tùy chọn nguồn xuất hiện trên màn hình. Chọn "Tắt nguồn" và xác nhận.
- Khởi động lại: Từ menu tùy chọn nguồn, chọn "Khởi động lại" và xác nhận.
3. Hướng dẫn vận hành
3.1. Điều hướng cơ bản (Android 11)
Your Ulefone Armor X9 runs on Android 11, offering an intuitive user interface. Common gestures and navigation include:
- Kéo mạnh lên: Truy cập vào ngăn kéo ứng dụng.
- Vuốt xuống: Mở bảng thông báo và cài đặt nhanh.
- Vỗ nhẹ: Chọn một mục hoặc mở một ứng dụng.
- Nhấn lâu: Truy cập menu ngữ cảnh hoặc di chuyển biểu tượng.
- Chụm để phóng to: Phóng to hoặc thu nhỏ hình ảnh và web trang.

Figure 3: Screenshots of the Android 11 interface on the Ulefone Armor X9, showing settings menus, quick toggles, and the sound recorder application.

Figure 4: The 5.5-inch 18:9 All Screen display of the Ulefone Armor X9, showcasing its immersive viewing experience with an image of a skier.
3.2. Sử dụng máy ảnh
Your phone is equipped with a 16MP Triple Rear Camera and a Front Camera. To use the camera:
- Mở ứng dụng "Máy ảnh" từ màn hình chính hoặc ngăn kéo ứng dụng.
- Nhấn nút chụp để chụp ảnh.
- Chuyển đổi giữa chế độ ảnh và video khi cần.
- Tap the icon to switch between the front and rear cameras.
- Explore various camera modes and settings for optimal results.
3.3. Kết nối
The Ulefone Armor X9 supports various connectivity options:
- Wi-Fi: Vào Cài đặt > Mạng & Internet > Wi-Fi để kết nối với các mạng khả dụng.
- Bluetooth: Go to Settings > Connected devices > Bluetooth to pair with Bluetooth devices.
- GPS: The phone features AGPS for accurate location services. Ensure location services are enabled in Settings > Location.
- USB: Connect your phone to a computer using a USB cable for data transfer or charging.
3.4. Mở khóa bằng khuôn mặt
For convenient and secure unlocking, your Ulefone Armor X9 supports Face Unlock:
- Go to Settings > Security > Face Unlock.
- Làm theo hướng dẫn trên màn hình để đăng ký khuôn mặt của bạn.
- Ensure good lighting and hold the phone at eye level during registration.
- Sau khi đăng ký thành công, bạn có thể mở khóa điện thoại chỉ bằng cách nhìn vào camera trước.
4. Bảo trì
4.1. Vệ sinh và chăm sóc
To maintain the performance and appearance of your rugged phone:
- Lau màn hình và thân máy bằng vải mềm, không xơ.
- Đối với vết bẩn cứng đầu, hãy sử dụng một chút damp vải. Tránh hóa chất mạnh hoặc vật liệu mài mòn.
- Ensure all port covers are securely closed to maintain water and dust resistance, especially after charging or using headphones.

Figure 5: The Ulefone Armor X9's 360° All Protection Design, showcasing its superior materials and superb durability against impacts and harsh conditions.
4.2. Water and Dust Resistance (IP68/IP69K)
The Ulefone Armor X9 is rated IP68/IP69K, meaning it is resistant to dust and water immersion. However, this resistance is not permanent and may decrease over time with normal wear. To ensure optimal protection:
- Do not intentionally submerge the phone in water for extended periods or beyond specified depths.
- Avoid exposing the phone to high-pressure water or extreme temperatures.
- Ensure all port covers are tightly sealed before exposure to water or dust.
- Nếu điện thoại bị ướt, hãy lau khô hoàn toàn trước khi sạc hoặc mở bất kỳ cổng nào.
4.3. Chăm sóc pin
Để kéo dài tuổi thọ pin Lithium Polymer 5580mAh của bạn:
- Tránh nhiệt độ quá cao hoặc quá thấp vì chúng có thể làm giảm hiệu suất pin.
- Chỉ sử dụng bộ sạc và cáp chính hãng hoặc các phụ kiện tương thích đã được chứng nhận.
- Không nên để pin cạn kiệt hoàn toàn thường xuyên. Hãy sạc pin trước khi mức pin xuống rất thấp.
KHAI THÁC. Xử lý sự cố
If you encounter issues with your Ulefone Armor X9, try the following troubleshooting steps:
5.1. Điện thoại không bật lên
- Hãy đảm bảo pin đã được sạc đầy. Kết nối điện thoại với bộ sạc trong ít nhất 30 phút.
- Nhấn và giữ nút Nguồn trong 10-15 giây để buộc khởi động lại.
5.2. Các vấn đề về sạc pin
- Verify that the charging cable and adapter are working correctly. Try a different charger if available.
- Đảm bảo cổng sạc sạch sẽ và không có mảnh vụn nào.
- Make sure the charging cable is fully inserted into the port. Some rugged phone ports may require a firm connection due to protective covers.
5.3. SIM/TF Card Not Detected
- Ensure the SIM/TF card is correctly inserted into the tray and the tray is fully seated.
- Khởi động lại điện thoại.
- Check if the SIM card is active with your network provider.
5.4. App Crashes or Freezing
- Đóng và mở lại ứng dụng có vấn đề.
- Xóa bộ nhớ đệm và dữ liệu của ứng dụng (Cài đặt > Ứng dụng > [Tên ứng dụng] > Bộ nhớ & bộ nhớ đệm).
- Đảm bảo ứng dụng được cập nhật lên phiên bản mới nhất.
- Khởi động lại điện thoại.
5.5. Khôi phục cài đặt gốc
Nếu sự cố vẫn tiếp diễn, khôi phục cài đặt gốc có thể giải quyết được. Cảnh báo: Thao tác này sẽ xóa toàn bộ dữ liệu trên điện thoại của bạn. Vui lòng sao lưu dữ liệu quan trọng trước khi tiếp tục.
- Vào Cài đặt > Hệ thống > Tùy chọn đặt lại.
- Chọn "Xóa toàn bộ dữ liệu (khôi phục cài đặt gốc)".
- Xác nhận quyết định của bạn và nhập mã PIN/mật khẩu nếu được yêu cầu.
6. Thông số kỹ thuật
Below are the detailed specifications for the Ulefone Armor X9:

Figure 6: Details of the Ulefone Armor X9's Octa-Core Processor, highlighting its power-efficient yet powerful performance, along with 3GB RAM and 32GB ROM, and support for up to 256GB TF card extendable storage.
| Tính năng | Đặc điểm kỹ thuật |
|---|---|
| Hệ điều hành | Android 11.0 |
| ĐẬP | 3GB (Note: Feature bullets mention 4GB RAM, please verify actual model) |
| Dung lượng lưu trữ bộ nhớ | 32GB (Expandable with TF card up to 256GB. Feature bullets mention 128GB ROM, please verify actual model) |
| Mô hình CPU | MT6762 Tám nhân 1.8GHz (Note: Specifications list 'Snapdragon', but image indicates MT6762. Please verify actual model) |
| Kích thước sản phẩm | 15.8 x 7.75 x 1.38cm |
| Trọng lượng sản phẩm | 472 gam |
| Pin | 1 pin Lithium Polymer (5580mAh, đã bao gồm) |
| Truyền thông không dây | Cellular, Bluetooth, USB, Wi-Fi |
| GPS | AGPS |
| Tính năng đặc biệt | Rear Camera, Face Unlock, IP68/IP69K, MIL-STD-810G |
| Trưng bày | 5.5-inch HD+ 1440*720 All Screen |
| Camera sau | 13MP+2MP Dual Rear Camera (Note: Feature bullets mention 16MP Triple Rear Camera, please verify actual model) |
| Camera trước | Camera trước 5MP |
| Màu sắc | Đen |
| Nhà sản xuất | Ulefone |
Note: Specifications are based on available product data and may vary slightly. Please refer to your product packaging for the most accurate information. There are discrepancies between feature bullets, specifications, and image text regarding RAM, ROM, CPU, and camera megapixels. This manual uses the most frequently cited or detailed information, with notes for clarification.
7. Bảo hành và Hỗ trợ
7.1. Thông tin bảo hành
Your Ulefone Armor X9 is covered by a manufacturer's warranty. The specific terms and duration of the warranty may vary by region and retailer. Please refer to the warranty card included in your product packaging or contact your point of purchase for detailed information regarding warranty coverage and claims.
7.2. Hỗ trợ khách hàng
For technical assistance, troubleshooting beyond this manual, or warranty inquiries, please contact Ulefone customer support or your authorized dealer. You can typically find contact information on the official Ulefone webtrang web hoặc trong tài liệu sản phẩm của bạn.
- Visit the official Ulefone website for FAQs, software updates, and support contact details.
- Hãy giữ sẵn hóa đơn mua hàng và số seri sản phẩm khi liên hệ với bộ phận hỗ trợ.


