1. Giới thiệu
Thank you for choosing the Aigostar Retro Desk LampSách hướng dẫn này cung cấp thông tin cần thiết để sử dụng sản phẩm mới của bạn một cách an toàn và hiệu quả.ampVui lòng đọc kỹ hướng dẫn này trước khi lắp ráp và vận hành, và giữ lại để tham khảo trong tương lai.

Figure 1: Aigostar Retro Desk Lamp đang sử dụng.
2. Nội dung gói hàng
Ensure all components are present and undamaged before proceeding with assembly. If any parts are missing or damaged, please contact customer support.
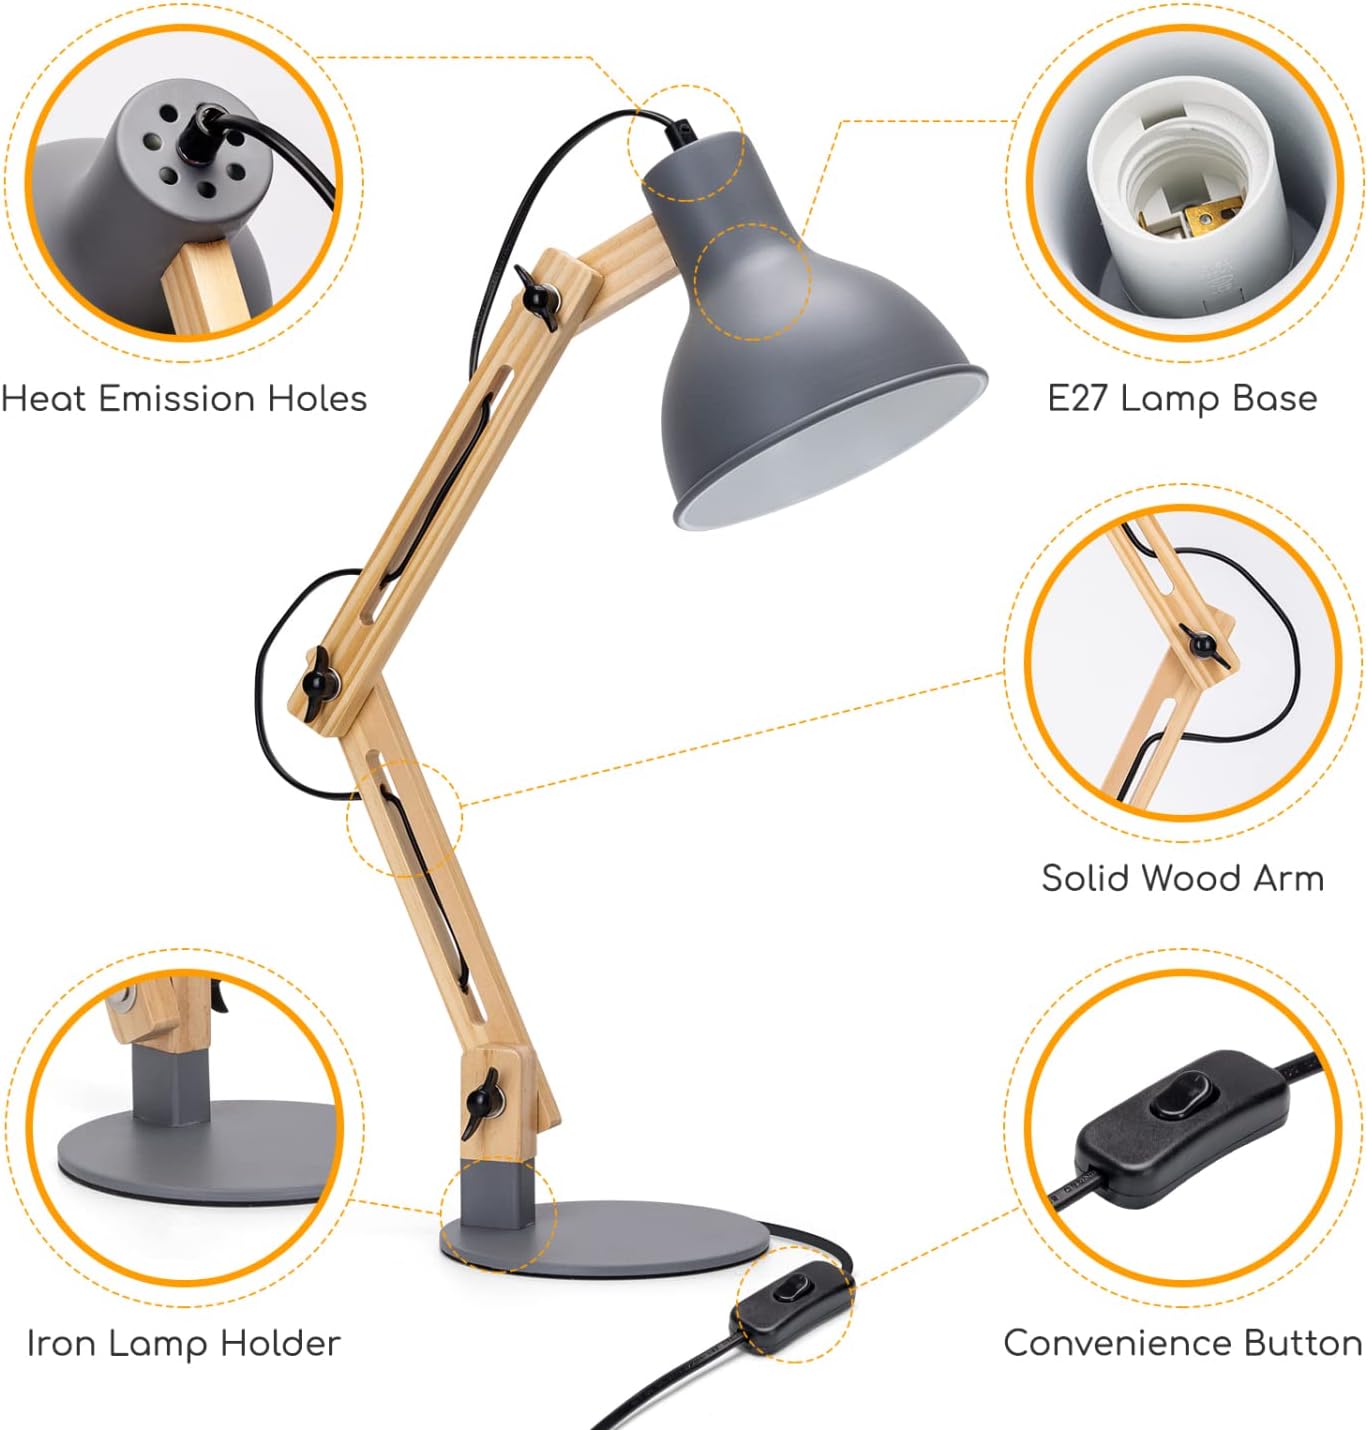
- Lamp Căn cứ
- Adjustable Wooden Arm Assembly
- Lamp Shade with E27 Socket
- Power Cord with On/Off Switch
- Hướng dẫn sử dụng
Lưu ý: Bóng đèn không được bao gồm và phải mua riêng.
3. Hướng dẫn thiết lập
The Aigostar Retro Desk Lamp is designed for tool-free setup. Follow these steps to assemble your lamp:
- Giải nén các thành phần: Cẩn thận loại bỏ tất cả các bộ phận khỏi bao bì.
- Đặt đế: Vị trí lamp dựa trên một bề mặt phẳng, ổn định.
- Attach Arm Assembly: The wooden arm assembly is pre-attached to the base and lamp head. Ensure all joints are securely tightened.
- Lắp đặt bóng đèn: Screw an E27 base bulb (maximum 40W) into the lamp ổ cắm. Không vặn quá chặt.
- Kết nối nguồn: Cắm dây nguồn vào ổ cắm điện phù hợp.

Figure 2: Tool-free setup for quick assembly.
Hình 3: Hếtview của tôiamp thành phần.

Hình 4: Lamp dimensions and bulb specifications.
4. Hướng dẫn vận hành
Your Aigostar Retro Desk Lamp is designed for ease of use and flexibility.
4.1 Bật / Tắt
Locate the convenience button (switch) on the power cord. Press the switch to turn the lamp bật hoặc tắt.
4.2 Điều chỉnh Lamp Cánh tay
Cái lamp features a swivel hinge arm and multiple adjustable joints, allowing you to direct light precisely where needed. Gently loosen the wing nuts at the joints, adjust the arm to your desired position, and then tighten the wing nuts to secure it.
- Cái lamp head can rotate up to 210 degrees.
- The upper arm can adjust by 60 degrees.
- The lower arm can adjust by 15 degrees.

Figure 5: Demonstrating the adjustable design of the lamp.

Figure 6: Specific adjustment angles for optimal light positioning.
5. Bảo trì
5.1 Vệ sinh
Để làm sạch lamp, ensure it is unplugged from the power outlet. Use a soft, dry cloth to wipe down the surfaces. Do not use abrasive cleaners or solvents, as these may damage the finish.
5.2 Thay bóng đèn
Before replacing the bulb, always unplug the lamp and allow the old bulb to cool completely. Unscrew the old E27 bulb and screw in a new E27 bulb, ensuring it does not exceed 40W. Refer to Figure 4 for bulb specifications.
KHAI THÁC. Xử lý sự cố
- Lamp không bật:
- Check if the power cord is securely plugged into the wall outlet.
- Ensure the bulb is correctly screwed into the socket and is not burnt out.
- Verify that the on/off switch on the power cord is in the 'on' position.
- Ánh sáng nhấp nháy:
- Siết chặt bóng đèn vào ổ cắm.
- Hãy thử một bóng đèn khác để loại trừ khả năng bóng đèn bị lỗi.
- Lamp arm is loose:
- Tighten the wing nuts at the adjustable joints to secure the arm in place.
7. Thông số kỹ thuật
| Tính năng | Đặc điểm kỹ thuật |
|---|---|
| Số hiệu mẫu | 218188 |
| Kích thước sản phẩm (D x R x C) | 16D x 16W x 45.5H cm |
| Trọng lượng sản phẩm | 1.38 Kilôgam |
| Màu sắc | Xám |
| Vật liệu cơ bản | Gỗ |
| LampVật liệu bóng râm | Sắt |
| Lamp ổ cắm | E27 |
| tối đatage | 40.00W |
| Loại công tắc | Touch (Inline Switch) |
| Tính năng đặc biệt | Cánh tay có thể điều chỉnh |
| Nguồn điện | Điện có dây |
| Sử dụng trong nhà/ngoài trời | Trong nhà |
| Nước xuất xứ | Trung Quốc |
8. Bảo hành và Hỗ trợ
For warranty information or technical support, please refer to the documentation provided with your purchase or contact Aigostar customer service directly. Keep your purchase receipt as proof of purchase.


