1. Giới thiệu
Thank you for choosing the HiLook HIKVISION 204U-K1 4-Channel 5MP HD DVR. This manual provides essential information for the proper installation, operation, and maintenance of your digital video recorder. Please read this manual thoroughly before using the product and retain it for future reference.
2. Hướng dẫn an toàn quan trọng
- Nguồn điện: Chỉ sử dụng bộ chuyển đổi nguồn được chỉ định cho thiết bị này. Đảm bảo điện áp nguồn.tage is stable and meets the requirements.
- Thông gió: Không chặn bất kỳ lỗ thông gió nào. Lắp đặt theo hướng dẫn của nhà sản xuất.
- Nước và độ ẩm: Do not expose the device to rain or moisture. Do not place objects filled with liquids, such as vases, on the apparatus.
- Nhiệt độ: Operate the device within the specified temperature range. Avoid extreme hot or cold environments.
- Vệ sinh: Chỉ lau sạch bằng vải khô. Không sử dụng chất tẩy rửa hoặc làm sạch dạng phun chất lỏng.
- Bảo dưỡng: Đừng cố gắng tự bảo dưỡng sản phẩm này. Giới thiệu tất cả các dịch vụ cho nhân viên dịch vụ có trình độ.
- Ổ cứng: Handle the hard drive with care. Improper installation or removal can cause data loss or damage.
3. Nội dung gói hàng
Kiểm tra kỹ xem tất cả các mặt hàng có đầy đủ và trong tình trạng tốt khi mở hộp. Nếu thiếu hoặc hư hỏng bất kỳ mặt hàng nào, hãy liên hệ với nhà bán lẻ.
- HiLook HIKVISION 204U-K1 DVR Unit
- Bộ đổi nguồn
- Chuột USB
- SATA Data Cable (for HDD connection)
- SATA Power Cable (for HDD connection)
- Hướng dẫn bắt đầu nhanh

Figure 3.1: The HiLook HIKVISION 204U-K1 DVR unit, shown with an optional hard drive and included accessories such as a mouse and cables.
4. Thiết lập ban đầu
4.1. Kết nối DVR
Follow these steps to connect your DVR to cameras, a monitor, and the network.
- Lắp đặt ổ cứng (Tùy chọn): Nếu đầu ghi DVR của bạn không có ổ cứng được cài đặt sẵn, hãy mở nắp DVR.asing, connect the SATA data and power cables to the HDD, and secure the HDD inside the DVR.
- Kết nối máy ảnh: Connect your surveillance cameras to the BNC video input ports on the rear panel of the DVR. This model supports 4 channels.
- Kết nối màn hình: Connect a monitor to the HDMI or VGA output port on the rear panel.
- Kết nối mạng: Connect an Ethernet cable from the DVR's LAN port to your router or network switch for remote access and network features.
- Kết nối chuột USB: Plug the included USB mouse into one of the USB ports for navigation.
- Kết nối nguồn: Connect the power adapter to the DVR's power input and then plug it into a power outlet.

Figure 4.1: Rear panel of the DVR, illustrating the various input and output ports including video in, audio in/out, VGA, HDMI, USB, network interface, and power supply.
4.2. Bật nguồn
After all connections are made, the DVR will power on automatically. The system will boot up, and you should see the HiLook logo on your connected monitor. Follow the on-screen prompts for initial setup, including setting up an administrator password and configuring network settings.
5. Hướng dẫn vận hành
5.1. Giao diện người dùng quaview
The DVR's graphical user interface (GUI) can be navigated using the USB mouse. Right-click to access the main menu, and left-click to select options. The live view displays feeds from connected cameras.
5.2. Ghi âm và Phát lại
- Ghi thủ công: Từ trực tiếp view, click the record icon to start or stop manual recording for a specific channel.
- Ghi theo lịch trình: Access the main menu, navigate to Ghi > Lịch trình to set up continuous or motion-triggered recording schedules for each camera.
- Phát lại: Từ menu chính, chọn Phát lại. Choose the date, time, and camera channel to review ghi lại thức ăntage.
5.3. Phát hiện chuyển động và cảnh báo
The DVR supports smart motion detection and can send alerts via email or push notifications to a mobile application.
- Configure Motion Detection: Đi đến Main Menu > Alarm > Motion Detection. Select the camera channel, enable motion detection, and define the detection area and sensitivity.
- Set Up Email Alerts: In Main Menu > Network > Email, configure your SMTP server settings and recipient email addresses. Enable email linkage for motion detection events.
- Thông báo ứng dụng trên điện thoại di động: Download the official HiLook mobile application. Add your DVR to the app and enable push notifications for alarm events.

Figure 5.1: A smartphone screen showing a real-time email notification triggered by smart motion detection.

Figure 5.2: A smartphone displaying multiple smart motion-triggered alerts, indicating movement detected in specific areas monitored by surveillance cameras.
6. Bảo trì
- Vệ sinh: Regularly clean the exterior of the DVR with a soft, dry cloth. Ensure ventilation openings are free from dust.
- Cập nhật chương trình cơ sở: Hãy kiểm tra trang web chính thức của HiLook. website for the latest firmware updates. Updating firmware can improve performance and add new features. Follow the provided instructions carefully.
- Quản lý ổ cứng: Periodically check the health of your hard drive through the DVR's system settings. Ensure sufficient storage space is available for recordings.
- Bảo mật mật khẩu: Regularly change your administrator password to maintain system security.
KHAI THÁC. Xử lý sự cố
If you encounter issues with your DVR, refer to the table below for common problems and solutions.
| Vấn đề | Nguyên nhân có thể | Giải pháp |
|---|---|---|
| Màn hình không hiển thị hình ảnh. | Loose HDMI/VGA cable; Incorrect monitor input; DVR not powered on. | Check cable connections; Select correct input on monitor; Verify power supply. |
| Không có hình ảnh camera | Camera not powered; Loose BNC cable; Faulty camera. | Ensure camera power; Check BNC connections; Test camera with another input if possible. |
| Không thể truy cập DVR từ xa | Network cable disconnected; Incorrect network settings; Firewall blocking access. | Verify Ethernet connection; Check IP address, gateway, DNS settings; Configure router/firewall. |
| Không có ghi chú | Hard drive not installed/initialized; Recording schedule not set; HDD full. | Install/initialize HDD; Configure recording schedule; Check HDD status and capacity. |
| Phát hiện chuyển động không hoạt động | Motion detection disabled; Sensitivity too low; Detection area not set. | Enable motion detection; Adjust sensitivity; Define detection area. |
8. Thông số kỹ thuật
Below are the key technical specifications for the HiLook HIKVISION 204U-K1 DVR.
| Tính năng | Đặc điểm kỹ thuật |
|---|---|
| Người mẫu | 204U-K1 |
| Đầu vào video | 4-channel BNC interface (supports HDTVI/AHD/CVI/CVBS/IP) |
| Nén Video | H.265 Pro+/H.265 Pro/H.265/H.264 |
| Đầu ra video | 1 cổng HDMI, 1 cổng VGA (xuất tín hiệu đồng thời) |
| Độ phân giải đầu ra HDMI | Up to 4K (3840 × 2160) for 204U-K1 |
| Đầu vào/Đầu ra âm thanh | 1-ch RCA (2-way audio) / 1-ch RCA |
| Ổ đĩa cứng (HDD) | 1 giao diện SATA, dung lượng lên đến 10 TB |
| Giao diện mạng | 1 giao diện Ethernet tự thích ứng RJ45 10M/100M |
| Giao diện USB | 2×USB 2.0 |
| Nguồn điện | 12Vdc |
| Kích thước (Rộng × Sâu × Cao) | Kích thước xấp xỉ 200 × 200 × 45 mm (7.9 × 7.9 × 1.8 inch) |
| Trọng lượng (không có ổ cứng) | Xấp xỉ 1 kg (2.2 lb) |
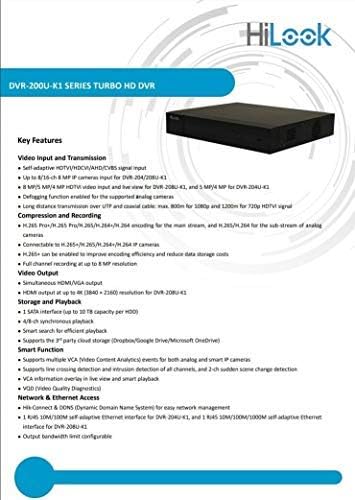
Figure 8.1: A detailed list of key features for the DVR-200U-K1 series, including video input/transmission, compression, video output, storage, smart functions, and network access.
9. Bảo hành và Hỗ trợ Khách hàng
Your HiLook HIKVISION 204U-K1 DVR comes with a limited warranty. Please refer to the warranty card included in your package or visit the official HiLook website for detailed warranty terms and conditions. For technical assistance, troubleshooting, or service inquiries, please contact your authorized HiLook dealer or customer support.
Tài nguyên trực tuyến: For additional support, firmware downloads, and FAQs, please visit the official HiLook support webđịa điểm.