1. Giới thiệu
Cảm ơn bạn đã lựa chọn KOLINK Refractor Midi-Tower computer case. This manual provides essential information for the proper installation, operation, and maintenance of your new PC chassis. Please read this manual carefully before beginning the assembly process to ensure a smooth and safe build.
1.1 Thông tin an toàn
- Luôn ngắt nguồn điện khỏi ổ cắm trên tường trước khi lắp đặt hoặc tháo bất kỳ linh kiện nào.
- Hãy đeo dây đeo cổ tay chống tĩnh điện để ngăn ngừa hư hỏng do phóng điện tĩnh (ESD) gây ra cho các linh kiện nhạy cảm.
- Handle components with care. Avoid touching pins or circuit boards directly.
- Giữ các bộ phận nhỏ và dụng cụ tránh xa trẻ em.
- Đảm bảo thông gió thích hợp xung quanh vỏ máy để tránh quá nhiệt.
2. Nội dung gói hàng
Vui lòng kiểm tra xem tất cả các mặt hàng sau đây có đầy đủ trong gói hàng của bạn hay không:
- KOLINK Refractor Midi-Tower Chassis
- Hộp phụ kiện (chứa ốc vít, trụ đỡ, dây buộc cáp, v.v.)
- Hướng dẫn sử dụng (tài liệu này)
If any items are missing or damaged, please contact your retailer or KOLINK support.
3. Sản phẩm hếtview
Familiarize yourself with the key features and components of your KOLINK Refractor Midi-Tower.
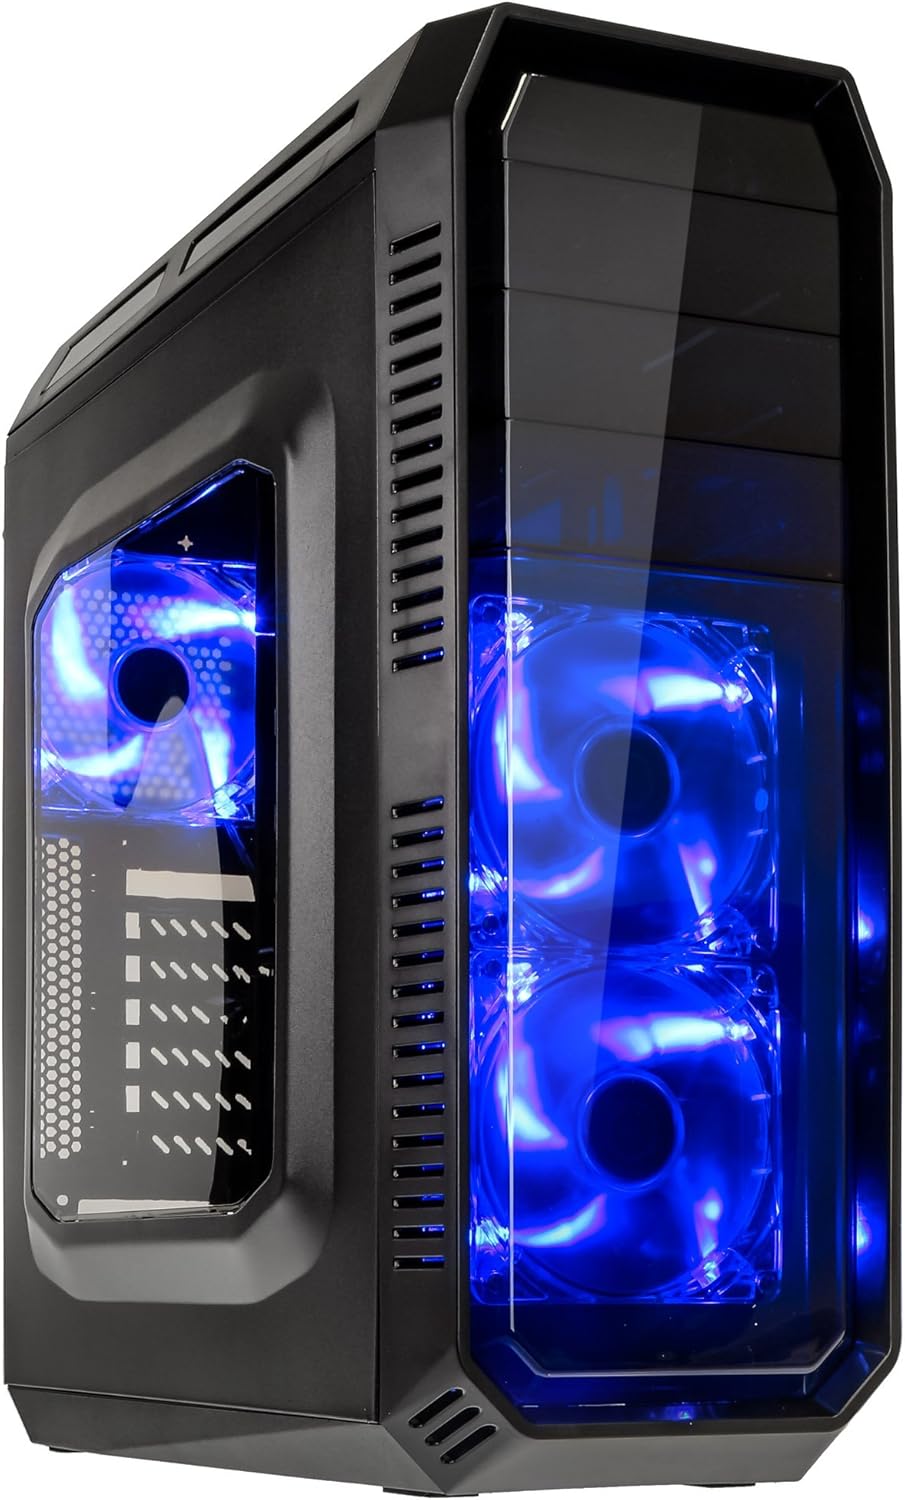
This image displays the KOLINK Refractor Midi-Tower from a front-left perspective, highlighting its sleek black design. The front panel features two pre-installed 120mm blue LED fans, visible through a transparent section, providing both cooling and aesthetic appeal. The left side panel includes a window, allowing visibility of internal components.

A top-front view of the case, illustrating the conveniently located I/O panel on the top. This panel includes two USB 3.0 ports, two USB 2.0 ports, and audio input/output jacks. The top surface also features a mesh area for additional ventilation, contributing to optimal airflow.

This image shows the right side panel of the KOLINK Refractor Midi-Tower. It is a solid black panel, designed for cable management behind the motherboard tray, ensuring a clean and organized interior.

This composite image provides three distinct views of the case. The left panel shows the front with its blue LED fans. The middle panel displays the rear of the case, featuring the motherboard I/O cutout, seven expansion slots, and a 120mm fan mount. The right panel offers a close-up of the top I/O ports, including USB 3.0, USB 2.0, and audio jacks.

A detailed close-up of the top I/O panel. It clearly shows the power and reset buttons, two USB 3.0 ports, two USB 2.0 ports, and the microphone and headphone jacks, providing easy access for peripherals.
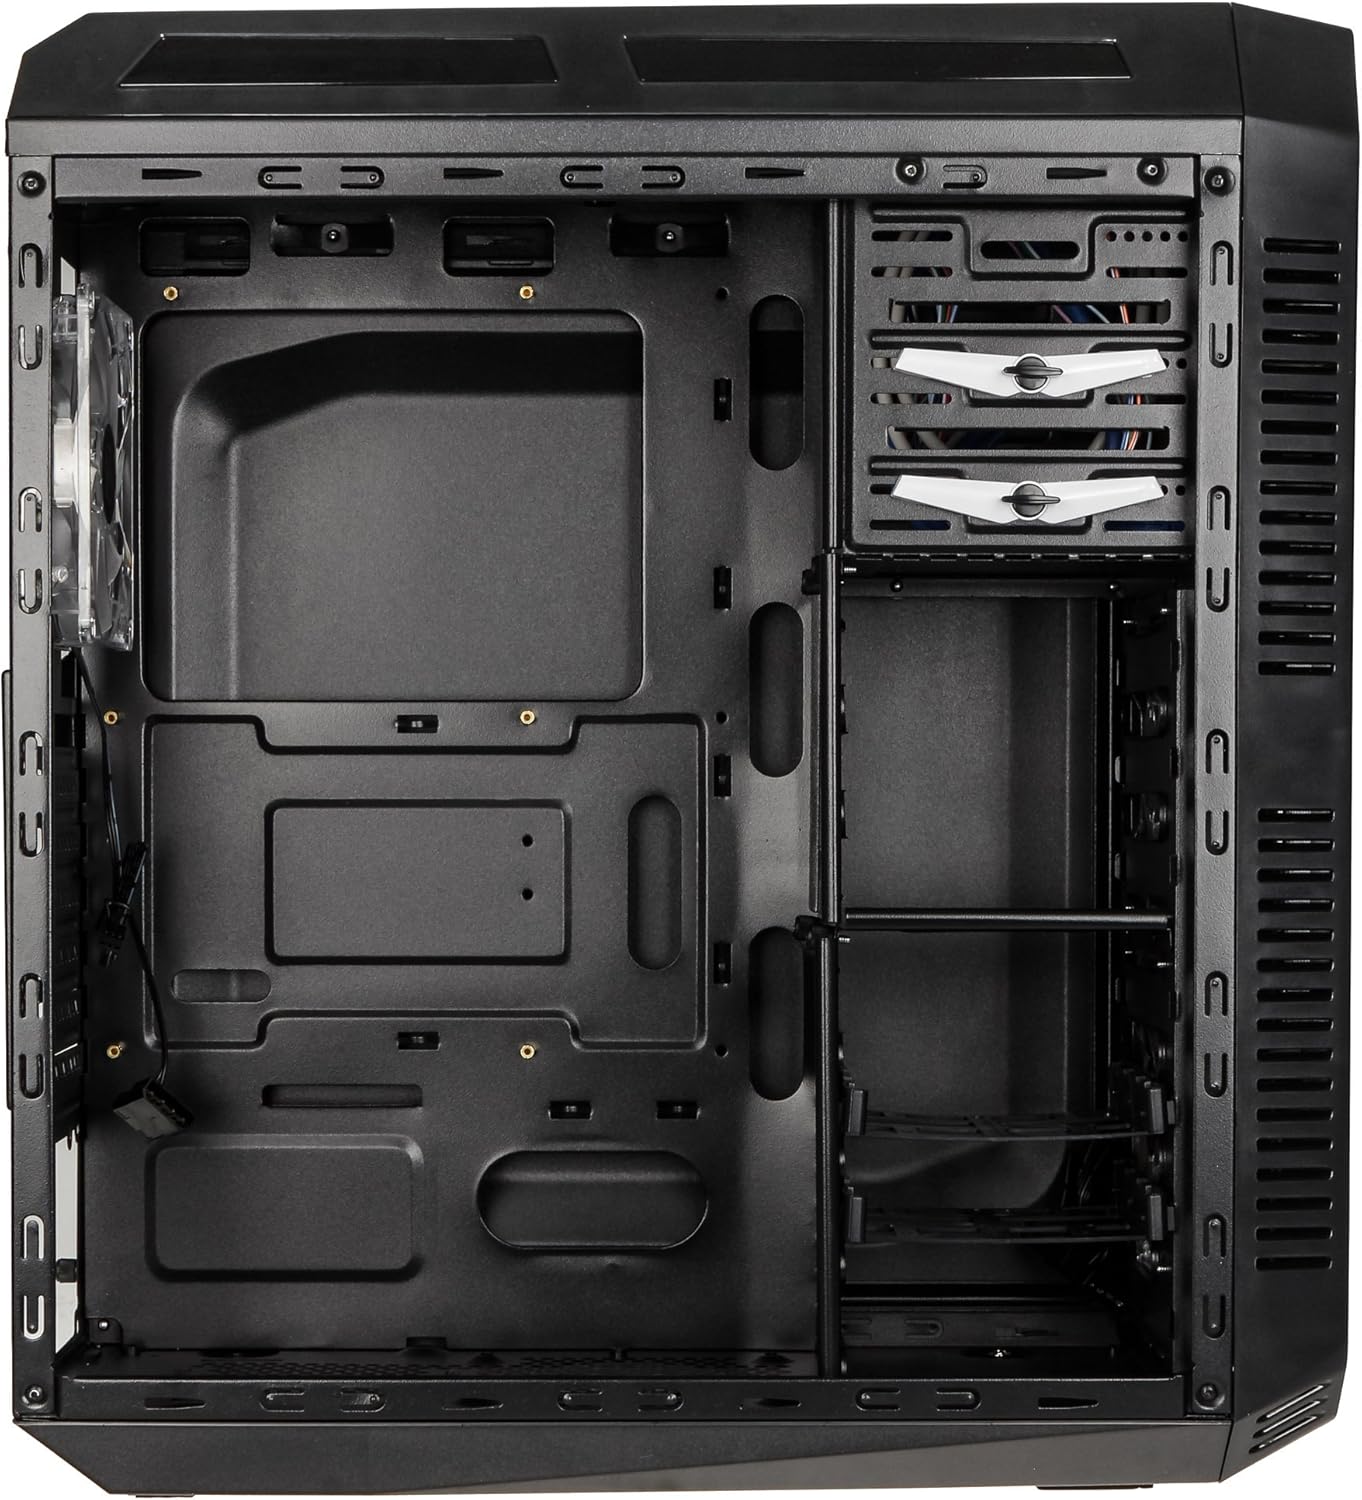
This image presents the interior of the case from the left side, revealing the spacious motherboard tray compatible with ATX motherboards. It features a large cutout behind the CPU area for easy cooler installation and multiple grommeted holes for efficient cable routing.

Một nội bộ view from the right side, focusing on the drive bay configuration. The case offers three external 5.25-inch bays and seven internal 2.5/3.5-inch drive bays, providing ample storage expansion options.

A closer look at the internal drive bays, illustrating the design for mounting 2.5-inch or 3.5-inch storage drives. These bays are designed for easy installation and removal of hard drives and SSDs.

Hình ảnh này cung cấp một nội bộ view looking down from the top, showcasing the pre-installed 120mm blue LED fan at the rear for exhaust. The top panel's mesh area for additional fan mounting is also visible, contributing to overall system cooling.
4. Thiết lập và Cài đặt
Follow these steps to install your computer components into the KOLINK Refractor Midi-Tower.
4.1 Chuẩn bị hồ sơ
- Đặt hộp đựng lên một bề mặt phẳng và chắc chắn.
- Remove the left and right side panels by unscrewing the thumbscrews at the rear of the case and sliding the panels backward.
4.2 Cài đặt bo mạch chủ
- Install the I/O shield that came with your motherboard into the cutout at the rear of the case.
- Ensure the correct motherboard standoffs are installed for your ATX motherboard. Adjust or add standoffs as necessary using the provided accessory kit.
- Cẩn thận đặt bo mạch chủ lên các trụ đỡ, căn chỉnh các lỗ vít.
- Cố định bo mạch chủ bằng các ốc vít phù hợp từ bộ phụ kiện.
4.3 Lắp đặt nguồn điện
- Position your ATX power supply unit (PSU) in the designated compartment at the bottom rear of the case.
- Căn chỉnh bộ nguồn sao cho thẳng hàng với các lỗ vít ở phía sau vỏ máy.
- Secure the PSU using the screws provided with your power supply.
4.4 Cài đặt ổ đĩa
5.25-inch External Drives:
- Remove the desired 5.25-inch bay cover from the front panel.
- Slide your optical drive or other 5.25-inch device into the bay from the front.
- Secure the drive using the tool-less clips or screws.
2.5/3.5-inch Internal Drives:
- Locate the internal drive bays.
- Mount your 2.5-inch SSD or 3.5-inch HDD into the drive trays.
- Slide the populated drive trays back into the drive cage until they click into place.
4.5 Lắp đặt thẻ mở rộng
- Tháo các nắp đậy khe cắm mở rộng cần thiết ở phía sau thùng máy.
- Insert your graphics card or other PCIe expansion card into the corresponding slot on the motherboard.
- Secure the card with the provided screws.
4.6 Quản lý cáp
Utilize the cable routing holes and tie-down points behind the motherboard tray to organize cables. This improves airflow and gives your build a cleaner appearance.
4.7 Fan Installation (Optional)
The case comes with two 120mm blue LED fans pre-installed at the front and one 120mm blue LED fan at the rear. Additional fan mounting locations include:
- Top: 1x 120/140mm fan
- Bottom: 1x 120mm fan (under the PSU)
Install additional fans as needed for optimal cooling, ensuring proper airflow direction.
5. Hướng dẫn vận hành
5.1 Bật nguồn ban đầu
- Once all components are installed and cables are connected, replace both side panels.
- Kết nối màn hình, bàn phím, chuột và các thiết bị ngoại vi khác.
- Connect the power cable to the PSU and then to a wall outlet.
- Press the power button on the top I/O panel to start your system.
5.2 Front Panel I/O Usage
Bảng điều khiển I/O phía trên cung cấp khả năng truy cập thuận tiện vào:
- Cổng USB 3.0 (x2): Để truyền dữ liệu tốc độ cao với các thiết bị tương thích.
- Cổng USB 2.0 (x2): Để kết nối các thiết bị USB tiêu chuẩn.
- Audio Jacks (Headphone/Microphone): For connecting headsets or external audio devices.
- Nút nguồn: Để bật/tắt hệ thống.
- Nút Đặt lại: Để khởi động lại hệ thống.
5.3 đèn LED chiếu sáng
The pre-installed front and rear fans feature blue LED lighting, which illuminates when the system is powered on, adding an aesthetic element to your build.
6. Bảo trì
Regular maintenance helps ensure optimal performance and longevity of your computer system.
6.1 Vệ sinh
- Bộ lọc bụi: The case includes a removable dust filter under the PSU. Regularly remove and clean this filter to prevent dust buildup and maintain airflow.
- Bên ngoài: Lau các bề mặt bên ngoài bằng giẻ mềm, damp vải. Tránh chất tẩy rửa mài mòn.
- Nội thất: Periodically use compressed air to remove dust from internal components and fan blades. Ensure the system is powered off and unplugged before cleaning the interior.
6.2 Tối ưu hóa luồng không khí
Ensure that the case's ventilation areas (front, top, rear, bottom) are not obstructed. Proper cable management also contributes significantly to unrestricted airflow within the case.
KHAI THÁC. Xử lý sự cố
Phần này giải quyết những vấn đề phổ biến mà bạn có thể gặp phải.
7.1 Các vấn đề chung
- Hệ thống không bật nguồn:
- Kiểm tra xem dây nguồn đã được kết nối chắc chắn với cả bộ nguồn và ổ cắm điện chưa.
- Hãy đảm bảo công tắc nguồn của bộ nguồn đang ở vị trí 'BẬT'.
- Hãy kiểm tra xem cáp nút nguồn mặt trước đã được kết nối đúng cách với bo mạch chủ chưa.
- Confirm all internal power cables (24-pin ATX, CPU, GPU) are properly seated.
- Quạt không quay:
- Check if the fan power cables are correctly connected to the motherboard or fan controller.
- Hãy đảm bảo hệ thống đang nhận được nguồn điện.
- Cổng USB không hoạt động:
- Verify that the front panel USB 3.0 and USB 2.0 headers are correctly connected to the motherboard.
- Ensure the device you are connecting is functioning correctly.
- Audio Ports Not Working:
- Check that the front panel audio header (HD Audio) is correctly connected to the motherboard.
- Confirm your audio drivers are installed and up to date.
For further assistance, please refer to your motherboard manual or contact KOLINK support.
8. Thông số kỹ thuật
Thông số kỹ thuật chi tiết cho KOLINK Refractor Midi-Tower.
| Tính năng | Đặc điểm kỹ thuật |
|---|---|
| Tên mẫu | Refractor Midi-Tower |
| Kích thước (Rộng x Cao x Sâu) | 190 x 475 x 445 mm (7.5 x 18.7 x 17.5 inch) |
| Vật liệu | Thân xe bằng thép, mặt trước bằng nhựa. |
| Cân nặng | Xấp xỉ 4.8 kg (10.6 lbs) |
| Màu sắc | Đen |
| Yếu tố hình thức | Tháp Midi |
| Khả năng tương thích của bo mạch chủ | ATX |
| Khe ổ đĩa ngoài | 3x5.25 inch |
| Khoang ổ đĩa nội bộ | 7x 2.5/3.5-inch |
| Khe cắm mở rộng | 7 |
| Quạt được cài đặt sẵn | 2x 120mm (front, blue LED), 1x 120mm (rear, blue LED) |
| Sự ủng hộ của người hâm mộ (Tổng số lượng có thể) | Front: 2x 120mm, Top: 1x 120/140mm, Bottom: 1x 120mm, Rear: 1x 120mm |
| Bảng điều khiển I/O | 2x USB 3.0, 2x USB 2.0, 1x Audio In/Out |
| Chiều dài card đồ họa tối đa | 360mm |
| Chiều cao tối đa của bộ làm mát CPU | 174mm |
| Khả năng tương thích PSU | Standard ATX (optional) |
| Bộ lọc bụi | Floor (under PSU, removable) |
9. Bảo hành và Hỗ trợ
KOLINK products are manufactured to high-quality standards. This product is covered by a manufacturer's warranty against defects in materials and workmanship. The specific terms and duration of the warranty may vary by region and retailer.
Please retain your proof of purchase for warranty claims. For technical support, warranty inquiries, or to report missing/damaged parts, please contact your point of purchase or visit the official KOLINK webtrang web cho các tài nguyên hỗ trợ.
KOLINK Official Webđịa điểm: www.kolink.eu (Please note: This is a general link and may not lead directly to a support page for this specific model.)


