1. Giới thiệu
The Weintek MT8100iE is a 10.2-inch Human Machine Interface (HMI) designed for industrial automation applications. It features an 800 x 480 TFT industrial-grade LCD and is built to fully support major PLCs such as Rockwell, Siemens, Mitsubishi, and Omron. This manual provides essential information for the proper installation, operation, and maintenance of your MT8100iE HMI.
2. Thông tin an toàn
Please read and understand all safety instructions before operating the device. Failure to comply may result in injury or damage to the equipment.
- Hãy đảm bảo ngắt nguồn điện trước khi tiến hành bất kỳ thao tác lắp đặt hoặc bảo trì nào.
- Chỉ những nhân viên có chuyên môn mới được phép lắp đặt và bảo trì thiết bị này.
- Do not expose the device to excessive moisture, dust, or extreme temperatures.
- Verify correct wiring and connections to prevent electrical hazards.
- The front panel is NEMA4/IP65 compliant, but ensure proper sealing during installation to maintain this rating.
3. Nội dung gói hàng
Xác minh rằng tất cả các mục đều có trong gói hàng:
- MT8100iE HMI Unit
- Giá đỡ lắp đặt (4 cái)
- Đầu nối nguồn
- Hướng dẫn sử dụng (tài liệu này)
- CD-ROM with EasyBuilder Pro Software (or download link)
4. Sản phẩm hếtview
Familiarize yourself with the components and interfaces of the MT8100iE HMI.
4.1 Mặt trước View

Hình 4.1: Mặt trước view of the MT8100iE HMI, showing the 10.2-inch TFT LCD touchscreen and the power indicator LED at the top left.
4.2 Mặt View
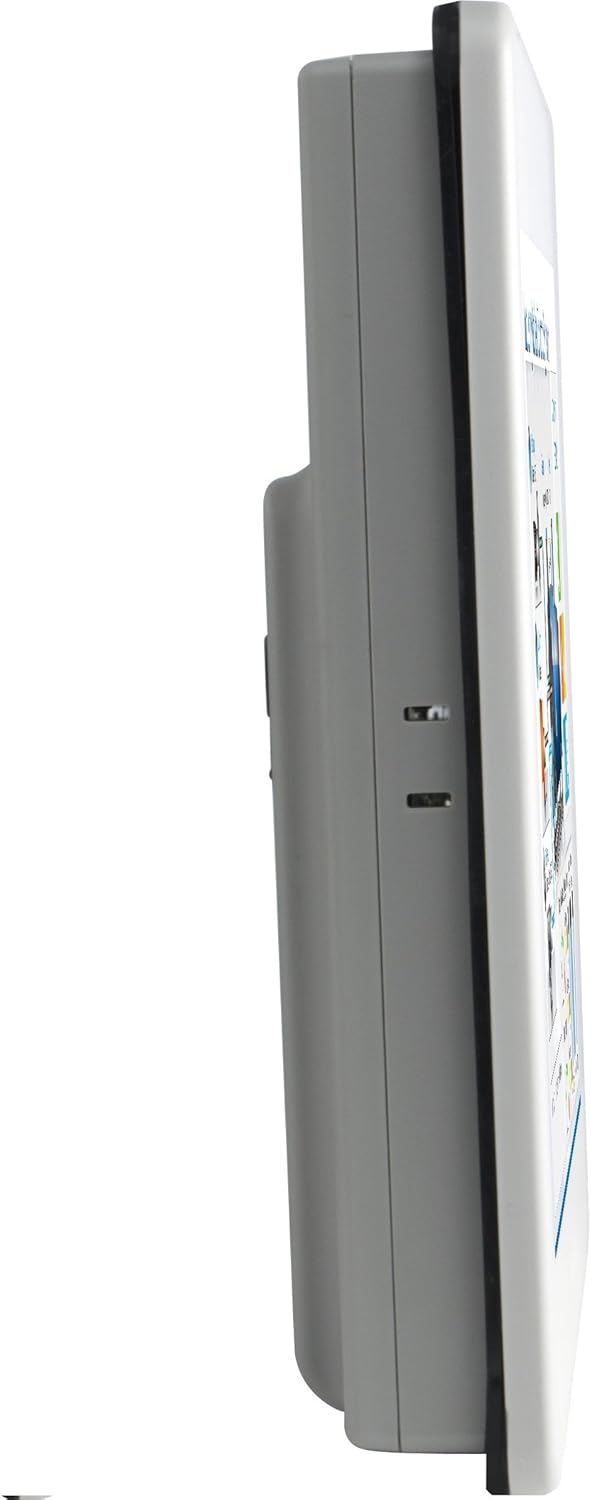
Hình 4.2: Mặt bênfile of the MT8100iE, illustrating its compact form factor suitable for panel mounting.
4.3 Phía sau View

Hình 4.3: Phía sau view of the MT8100iE, highlighting the mounting holes for panel installation, the fuse holder for power protection, and the system reset button.
4.4 Cổng giao tiếp

Hình 4.4: Dưới cùng view of the MT8100iE, detailing the various communication ports including USB, Ethernet, COM1 (RS-232), and COM2 (RS-485 2W/4W).
5. Thiết lập
5.1 Bảng điều khiển gắn
- Cut an opening in the control panel according to the dimensions provided in the installation guide (refer to the separate installation template for precise measurements).
- Insert the MT8100iE HMI into the cutout from the front.
- From the rear of the panel, insert the four mounting brackets into the slots on the HMI unit.
- Tighten the screws on the mounting brackets evenly until the HMI is securely fastened to the panel. Do not overtighten.
5.2 kết nối nguồn
- Connect a 24V DC power supply to the power input terminal block on the rear of the HMI.
- Ensure correct polarity (+ and -).
- Secure the connection firmly.
5.3 Kết nối truyền thông
- Cổng nối tiếp: Use the COM1 (RS-232) and COM2 (RS-485 2W/4W) ports to connect to PLCs or other serial devices. Refer to your PLC's documentation for specific wiring diagrams.
- Cổng mạng: Connect an Ethernet cable to the RJ45 port for network communication with PLCs or for remote access.
- Cổng USB: Use the USB host ports for connecting USB flash drives for project transfers or other peripherals.
6. Hướng dẫn vận hành
6.1 Bật nguồn
Once all connections are secure, apply power to the HMI. The power indicator LED will illuminate, and the HMI will boot up, displaying the configured project.
6.2 Project Download
To load a new project or update an existing one:
- Create or modify your HMI project using the EasyBuilder Pro software on a PC.
- Connect the PC to the HMI via Ethernet or USB.
- In EasyBuilder Pro, use the 'Download' function to transfer the project to the HMI.
- The HMI will restart with the new project loaded.
6.3 Thao tác trên màn hình cảm ứng
The MT8100iE features a resistive touchscreen. Use your finger or a non-sharp stylus to interact with the on-screen elements such as buttons, input fields, and displays.
6.4 PLC Communication
The HMI is designed to communicate with various PLCs. Ensure the communication settings (protocol, baud rate, station ID, etc.) configured in your EasyBuilder Pro project match those of your connected PLC.
7. Bảo trì
Regular maintenance ensures optimal performance and longevity of your HMI.
- Vệ sinh: Sử dụng một mềm, damp khăn để lau màn hình và casing. Do not use abrasive cleaners or solvents. Ensure no liquid enters the device.
- Cập nhật chương trình cơ sở: Periodically check the Weintek website for firmware updates to ensure your HMI has the latest features and bug fixes.
- Thay thế cầu chì: If the HMI does not power on, check the fuse located on the rear panel. Replace it with a fuse of the same type and rating if necessary. Always disconnect power before replacing the fuse.
- Điều kiện môi trường: Đảm bảo môi trường hoạt động nằm trong phạm vi nhiệt độ và độ ẩm quy định để tránh hư hỏng.
KHAI THÁC. Xử lý sự cố
Phần này cung cấp giải pháp cho những vấn đề thường gặp mà bạn có thể gặp phải.
| Vấn đề | Nguyên nhân có thể | Giải pháp |
|---|---|---|
| HMI does not power on. | Không có nguồn điện, đấu dây sai, cầu chì bị cháy. | Check power connection, verify wiring polarity, replace fuse if blown. |
| Màn hình cảm ứng không phản hồi. | Screen calibration issue, hardware fault. | Perform screen calibration (refer to EasyBuilder Pro documentation), contact support if issue persists. |
| Cannot communicate with PLC. | Incorrect communication settings, wrong cable, PLC offline. | Verify communication protocol, baud rate, and station ID in EasyBuilder Pro. Check cable connections. Ensure PLC is powered on and running. |
| Project download fails. | Network issue, incorrect IP address, firewall blocking. | Check network cable, verify HMI and PC IP addresses are in the same subnet. Temporarily disable firewalls for testing. |
9. Thông số kỹ thuật
| Tính năng | Sự miêu tả |
|---|---|
| Số hiệu mẫu | eMT3070A1WK |
| Kích thước màn hình | 10.2 inch |
| Nghị quyết | 800 x480 |
| Tỷ lệ khung hình | 1.66:1 |
| Bề mặt màn hình | Bóng loáng |
| Ký ức | Bộ nhớ Flash 128 MB tích hợp |
| Đồng hồ thời gian thực (RTC) | Đúng |
| Đánh giá bảng điều khiển phía trước | NEMA4/IP65 Compliant |
| Cổng nối tiếp | COM1 RS-232 / COM2 RS-485 (2W/4W) |
| Thông báo qua Email | Status e-Mail notification feature |
10. Bảo hành và Hỗ trợ
Weintek products are manufactured to high quality standards. For warranty information and technical support, please refer to the official Weintek website or contact your authorized distributor. Keep your purchase receipt as proof of purchase for warranty claims.
For software downloads, drivers, and additional resources, visit the official Weintek support portal.


