1. Giới thiệu
This manual provides detailed instructions for the installation, operation, and maintenance of your HeatTech 30 sqft Electric Floor Heating Mat Kit. This system is designed to provide radiant floor heating for various floor coverings in residential and commercial applications.
The HeatTech Electric Radiant Floor Heating System is suitable for new construction and retrofits, residential homes, apartment buildings, bathrooms, kitchens, saunas, and mud rooms. It is compatible with ceramic or porcelain tile, stone, granite, marble, laminate, engineered wood, and vinyl floors.

Image: The HeatTech 30 sqft Electric Floor Heating Mat Kit, showing the rolled heating mat, Aube thermostat, and cold lead wire.
2. Thành phần sản phẩm
Your HeatTech Electric Floor Heating Mat Kit includes the following components:
- Electric Radiant Heating Mat: 30 sqft (20" wide x 18.3ft long), 120V, 3.0 Amps, 360 Watts. Features adhesive backing for easy installation and a single armored 10ft long cold lead wire. The heating cable is approximately 1/8" thick with 3" spacing.
- AUBE TH115-AF-120S Digital Programmable Thermostat: A 7-day programmable floor sensing thermostat with an LCD display and backlight.
- Cảm biến sàn: Included with the thermostat for accurate floor temperature sensing.
- Detailed Installation Manual: (Tài liệu này)

Image: The Aube TH115-AF-120S digital programmable thermostat, its packaging, floor sensor, and installation accessories.
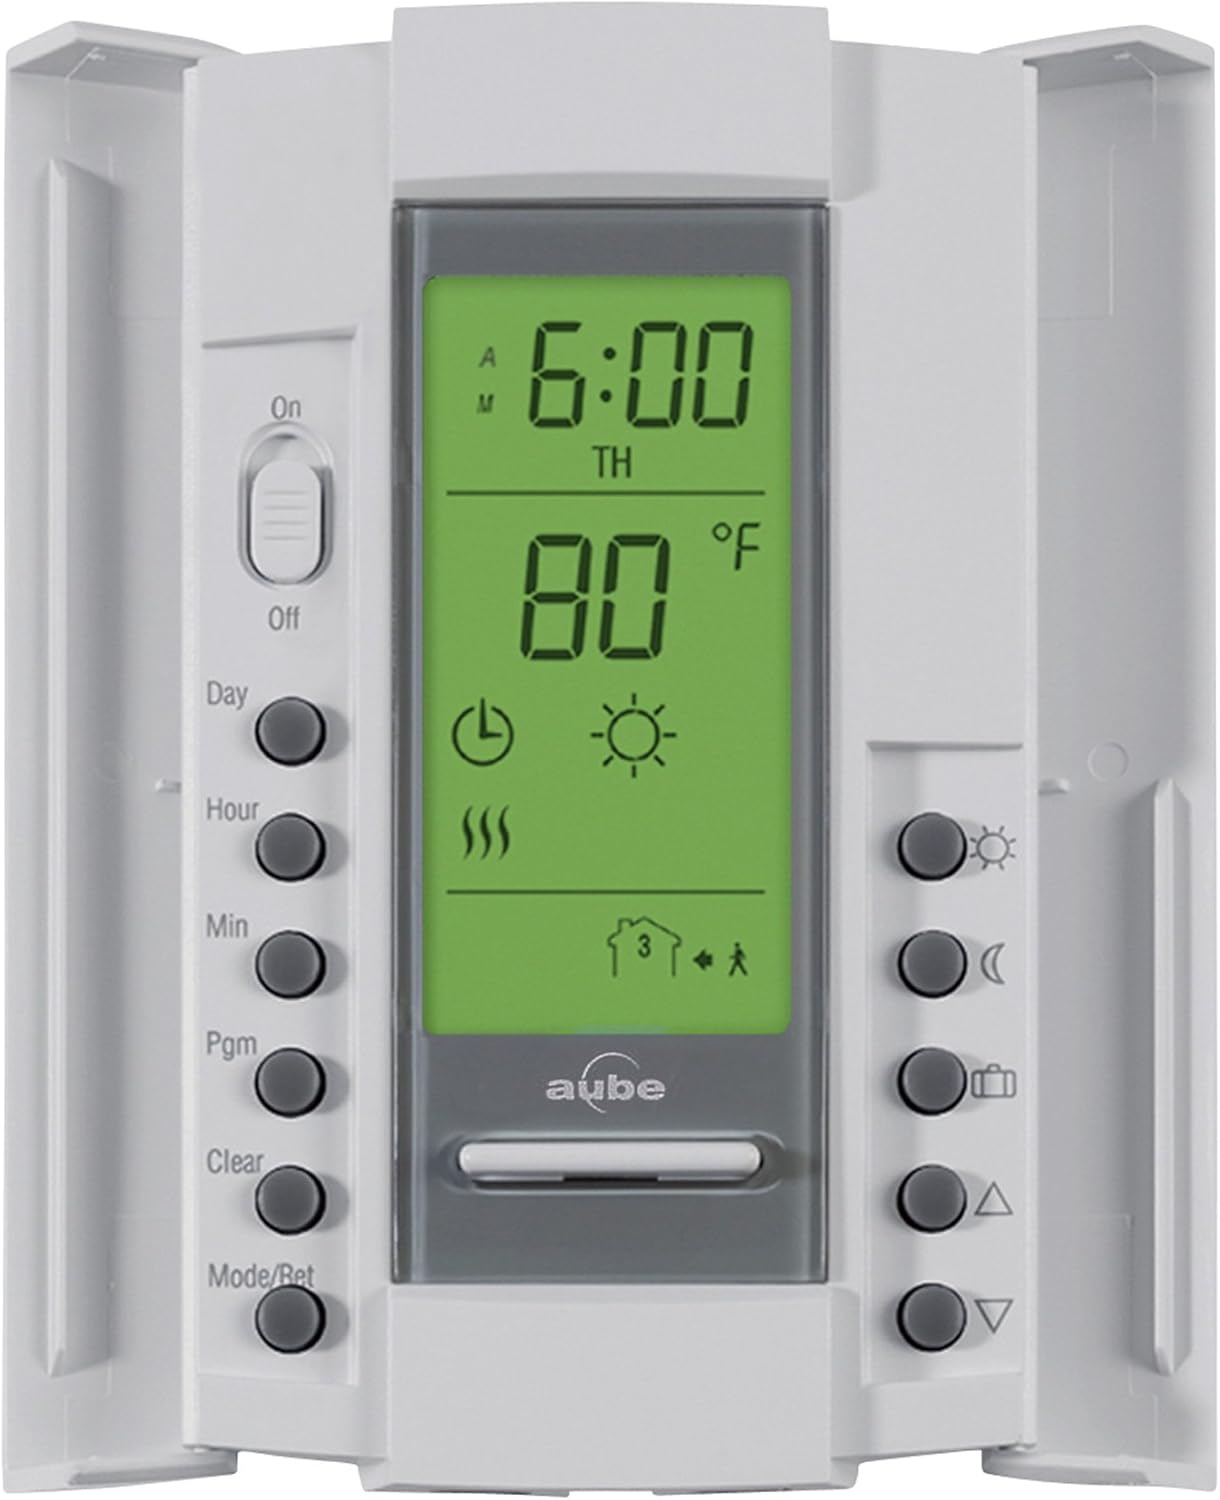
Hình ảnh: Một chi tiết view of the Aube TH115-AF-120S thermostat's LCD screen and control buttons.
3. Hướng dẫn cài đặt
Thông tin an toàn quan trọng: Installation must be performed by a qualified electrician in accordance with local electrical codes. Ensure power is disconnected before beginning installation. The heating mat cable is labeled for use with a GFCI thermostat. Verify local building codes regarding GFCI requirements for radiant floor heating systems.
3.1. Planning and Layout
- Measure the area to be heated to ensure the 30 sqft mat is appropriate.
- Plan the mat layout, avoiding permanent fixtures like cabinets, toilets, and bathtubs.
- Ensure the cold lead wire can reach the thermostat location without being cut or damaged.
- The mat's red-colored mesh backing can be cut to make turns and rotations. Không được cắt dây điện trở màu xanh.
3.2. Mat Cutting and Turning
The mesh backing can be cut to adjust the mat's direction. Always ensure the blue heating cable remains intact.

Image: Illustrations demonstrating how to perform 180-degree turns, open corner turns, obstacle cuts, and full corner turns by cutting the mesh backing without damaging the heating cable.
- 180 Degree Turn: Cut the mesh between the heating cables and rotate the mat section.
- Open Corner Turn: Cut the mesh to allow the mat to turn around an open corner.
- Obstacle Cut: Cut the mesh to route the mat around fixed obstacles, ensuring the heating cable maintains proper spacing.
- Full Corner Turn: Cut the mesh, rotate, and flip the mat section to navigate a full corner.
3.3. Floor Construction and Application
The heating mat is installed directly beneath the finished floor covering. The adhesive backing helps the mat lay flat and stay flat during installation. The following diagrams illustrate typical installation methods for framed and slab floors.
3.3.1. Framed Floor Applications

Image: Cross-section diagrams illustrating three methods for installing the heating system on a framed floor: thin-set mortar over framed floor, thin-set mortar over framed floor with plywood, and thick-set cement mortar with lath.
- Thin-set mortar over framed floor: Tile/stone, latex-Portland cement mortar bond coat, heating cable, backer board, mortar bed, plywood subfloor, insulation, joist.
- Thin-set mortar over framed floor (alternative): Tile/stone, latex-Portland cement mortar bond coat, heating cable, plywood, plywood subfloor, insulation, joist.
- Thick-set cement mortar with lath: Tile/stone, latex-Portland cement mortar bond coat, heating cable, metal or plastic lath, cement mortar bed, plywood subfloor, insulation, joist.
3.3.2. Slab Floor Applications
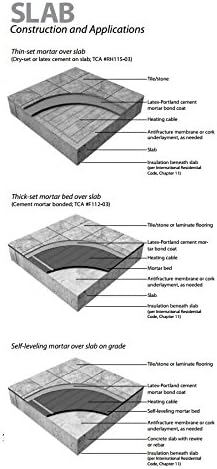
Image: Cross-section diagrams illustrating three methods for installing the heating system on a slab floor: thin-set mortar over slab, thick-set mortar bed over slab, and self-leveling mortar over slab on grade.
- Thin-set mortar over slab: Tile/stone, latex-Portland cement mortar bond coat, heating cable, anti-fracture membrane or cork underlayment (as needed), slab, insulation beneath slab.
- Thick-set mortar bed over slab: Tile/stone or laminate flooring, latex-Portland cement mortar bond coat, heating cable, mortar bed, anti-fracture membrane or cork underlayment (as needed), slab, insulation beneath slab.
- Self-leveling mortar over slab on grade: Tile/stone or laminate flooring, latex-Portland cement mortar bond coat, heating cable, self-leveling mortar bed, concrete slab with rebar, insulation beneath slab.
After the mat is laid, the floor sensor should be placed equidistant between two heating cables and embedded in a thin layer of mortar or self-leveling compound. Ensure the sensor wire is protected.
4. Operating Instructions (AUBE TH115-AF-120S Thermostat)
The AUBE TH115-AF-120S is a 7-day programmable thermostat designed for radiant floor heating. Refer to the separate AUBE thermostat manual for detailed programming instructions. Key features include:
- Có thể lập trình 7 ngày: Allows for customized heating schedules for each day of the week.
- Floor Sensing: Utilizes the included floor sensor to maintain precise floor temperature.
- Màn hình LCD: Provides clear temperature and program information.
- Chế độ nghỉ phép: Reduces energy consumption when away.
- Hiển thị nhiệt độ: Shows current and set temperatures.
To operate, ensure the thermostat is properly wired and the floor sensor is correctly installed. Use the control buttons on the thermostat to set the desired temperature and program heating schedules. The thermostat will automatically regulate the floor heating mat to maintain the set temperature.
5. Bảo trì
The HeatTech Electric Floor Heating Mat System is designed for maintenance-free operation once installed. No expensive equipment to buy or maintain (such as boilers, circulators, controls).
- Vệ sinh thường xuyên: Hãy giữ cho bộ điều nhiệt luôn sạch sẽ và không bám bụi.
- Kiểm tra hệ thống: Periodically verify that the system is heating as expected. If not, refer to the troubleshooting section.
- Tránh thiệt hại: Ensure no heavy objects or sharp tools are used on the floor that could damage the heating cables beneath.
KHAI THÁC. Xử lý sự cố
If your HeatTech Electric Floor Heating System is not functioning correctly, consider the following:
- Không có nhiệt:
- Check the thermostat settings to ensure it is in heating mode and the set temperature is above the current floor temperature.
- Kiểm tra xem cầu dao điện của hệ thống sưởi có bị ngắt không.
- Ensure all electrical connections to the thermostat are secure.
- Đọc nhiệt độ không chính xác:
- Confirm the floor sensor is properly installed and not damaged.
- Refer to the AUBE thermostat manual for sensor calibration or diagnostic information.
- Thermostat Issues:
- If the thermostat display is blank, check power supply.
- If programming issues occur, consult the AUBE thermostat's specific instruction manual or reset the thermostat to factory settings if applicable.
- GFCI Compatibility Note: Some users have reported that the supplied AUBE TH115-AF-120S thermostat may not be GFCI compatible, despite the heating mat requiring a GFCI-protected circuit by code. Always verify local electrical codes and ensure your installation meets all safety requirements. If a GFCI-protected thermostat is required, you may need to install an external GFCI breaker or a different GFCI-compliant thermostat.
For issues not resolved by these steps, contact a qualified electrician or HeatTech customer support.
7. Thông số kỹ thuật
| Tính năng | Chi tiết |
|---|---|
| Thương hiệu | công nghệ nhiệt |
| Tên mẫu | HTMAT-KIT-120V-30sqft |
| Kích thước thảm | 30 sqft (20" wide x 18.3ft long) |
| Tậptage | 120 vôn |
| Cái gì?tage | 360 Watt |
| AmpCông suất erage | 3 Amps |
| Heating Cable Thickness | ~1/8 inch |
| Heating Cable Spacing | 3 inch |
| Cold Lead Wire Length | 10 feet (armored) |
| Mô hình nhiệt | AUBE TH115-AF-120S (7-day Programmable, Floor Sensing) |
| trường điện từ | Zero Electromagnetic Field (Zero EMF) |
| Chứng nhận | UL listed for USA and Canada, ETL listed |
| Phương pháp cài đặt | Self-adhesive mesh backing |
| Compatible Floor Types | Ceramic/Porcelain Tile, Stone, Granite, Marble, Laminate, Engineered Wood, Vinyl |
8. Bảo hành và Hỗ trợ
- Heating Mats: 25-year Manufacturer's Warranty.
- AUBE Thermostats: 3-year Manufacturer's Warranty.
For warranty claims or technical support, please contact HeatTech customer service. Ensure you have your purchase details and model number available.
For detailed information regarding the AUBE TH115-AF-120S thermostat, please refer to the separate manual provided by AUBE or visit their official support webđịa điểm.


