1. Giới thiệu
The SPL 2Control is a compact and user-friendly stereo monitor controller designed to provide comprehensive control over your digital audio workstation's (DAW) monitoring functions. It ensures high-quality audio reproduction through both studio monitors and headphones, allowing you to hear every detail of your mix. Key features include a precise speaker volume potentiometer, active circuitry for sound integrity, and a unique Crossfeed control for accurate headphone monitoring that simulates a stereo speaker image.
2. Hướng dẫn an toàn
- Vui lòng đọc kỹ hướng dẫn này trước khi sử dụng thiết bị.
- Giữ lại hướng dẫn này để tham khảo sau này.
- Không để thiết bị tiếp xúc với mưa hoặc hơi ẩm để tránh hỏa hoạn hoặc điện giật.
- Đảm bảo thông gió thích hợp; không chặn bất kỳ lỗ thông gió nào.
- Chỉ sử dụng các phụ kiện/tập tin đính kèm do nhà sản xuất chỉ định.
- Ngắt dây nguồn khi có sấm sét hoặc khi không sử dụng trong thời gian dài.
- Chuyển mọi dịch vụ bảo dưỡng cho nhân viên có trình độ.
- Tránh đặt thiết bị gần các nguồn nhiệt như bộ tản nhiệt, thanh nhiệt, bếp lò hoặc các thiết bị khác (bao gồm amplò phản ứng) tạo ra nhiệt.
3. Nội dung gói hàng
Upon unpacking, please verify that the following items are included:
- 1 x SPL 2Control Module
- 1 x Power Cord
- Hướng dẫn sử dụng này
4. Sản phẩm hếtview
4.1 Các chỉ báo và điều khiển bảng điều khiển phía trước
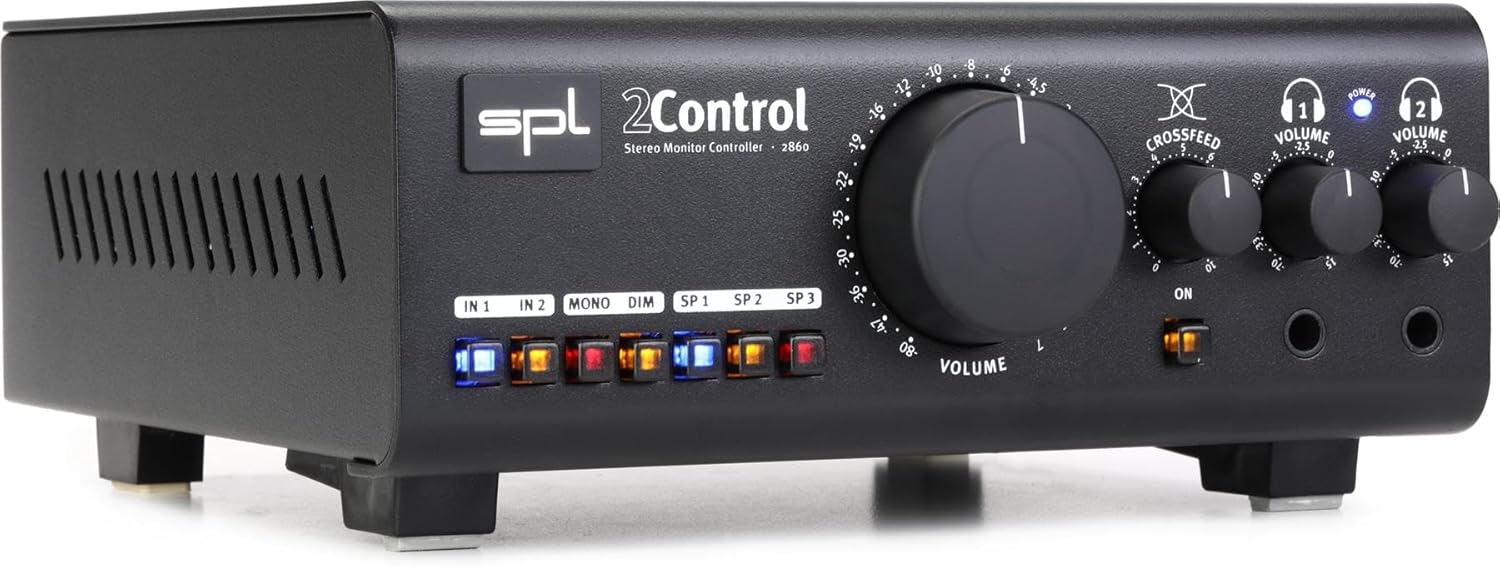
Hình 1: Front Panel of the SPL 2Control Stereo Monitor Controller.
This image displays the front panel of the SPL 2Control. From left to right, it features input selection buttons (IN 1, IN 2), function buttons (MONO, DIM), speaker output selection buttons (SP 1, SP 2, SP 3), a large central master VOLUME knob, a CROSSFEED knob, and two individual headphone VOLUME knobs with corresponding headphone output jacks. A power indicator LED is visible above the headphone controls.
- IN 1 / IN 2 Buttons: Selects the active stereo input source.
- Nút MONO: Sums the stereo signal to mono for compatibility checking.
- Nút DIM: Reduces the output volume by a fixed amount (e.g., -20dB) for temporary level reduction.
- SP 1 / SP 2 / SP 3 Buttons: Selects the active stereo speaker output pair.
- Núm VOLUME: Master volume control for selected speaker outputs.
- CROSSFEED Knob: Adjusts the stereo panorama for headphone monitoring to simulate a speaker listening environment.
- HEADPHONE VOLUME 1 / 2 Knobs: Independent volume controls for the two headphone outputs.
- HEADPHONE 1 / 2 Jacks: 1/4-inch stereo headphone outputs.
- ĐÈN LED NGUỒN: Chỉ ra thiết bị đã được bật nguồn.
4.2 Rear Panel Connections (Inferred)
The rear panel typically houses the audio input and output connections, as well as the power input. Based on common audio equipment and product specifications, you can expect:
- Đầu vào analog: Balanced XLR or TRS inputs for connecting your audio interface or mixer.
- Đầu ra loa: Multiple sets of balanced XLR or TRS outputs for connecting up to three pairs of studio monitors.
- Công suất đầu vào: Connector for the included power cord.
5. Thiết lập
- Vị trí: Position the SPL 2Control on a stable, flat surface, ensuring adequate ventilation around the unit.
- Kết nối nguồn điện: Connect the provided power cord to the power input on the rear panel of the 2Control and then to a suitable AC power outlet.
- Kết nối đầu vào: Connect the stereo outputs of your audio interface, mixer, or other audio source to the IN 1 and/or IN 2 inputs on the rear panel using balanced XLR or TRS cables.
- Kết nối loa: Connect your studio monitors to the SP 1, SP 2, and/or SP 3 outputs on the rear panel using balanced XLR or TRS cables. Ensure correct left and right channel connections.
- Kết nối tai nghe: Plug your headphones into the HEADPHONE 1 and/or HEADPHONE 2 jacks on the front panel.
- Bật nguồn ban đầu: Ensure all volume controls are set to their minimum positions before powering on the unit. Then, connect the power cord to the wall outlet. The POWER LED on the front panel will illuminate.
6. Hướng dẫn vận hành
- Chọn một đầu vào: Nhấn một trong hai Vào năm 1 or Vào năm 2 button to select your desired audio source. The active button will illuminate.
- Selecting Speaker Outputs: Nhấn nút SP 1, SP 2, hoặc SP 3 button to route the audio to the corresponding pair of studio monitors. Only one speaker output can be active at a time.
- Adjusting Master Volume: Slowly turn the large ÂM LƯỢNG knob clockwise to increase the listening level for the selected speaker outputs. Turn counter-clockwise to decrease.
- Tổng hợp đơn sắc: Nhấn nút BỆNH TĂNG BẠCH CẦU ĐƠN NHÂN button to sum the stereo signal to mono. This is useful for checking phase compatibility and mix balance. Press again to return to stereo.
- Chức năng làm mờ: Nhấn nút MỜ button to temporarily reduce the output volume. This is useful for quick conversations or when you need to lower the volume without losing your main volume setting. Press again to restore the original volume.
- Giám sát tai nghe:
- Plug your headphones into the desired headphone jack (HEADPHONE 1 or 2).
- Adjust the individual HEADPHONE VOLUME 1 or 2 knob to set the listening level for your headphones.
- Sử dụng CHÉP CHÉO knob to adjust the stereo image for headphone listening. Turning it clockwise increases the crossfeed, simulating a more natural speaker-like stereo field by blending the left and right channels slightly.
7. Bảo trì
- Vệ sinh: Hãy dùng khăn mềm, khô để lau sạch bên ngoài thiết bị. Không sử dụng chất tẩy rửa dạng lỏng hoặc dung môi.
- Thông gió: Ensure that the ventilation slots are kept clear of dust and debris to prevent overheating.
- Kho: Nếu cất giữ thiết bị trong thời gian dài, hãy ngắt nguồn điện và cất giữ ở nơi khô ráo, thoáng mát.
KHAI THÁC. Xử lý sự cố
| Vấn đề | Nguyên nhân có thể | Giải pháp |
|---|---|---|
| Không có âm thanh từ loa. |
|
|
| Không có âm thanh từ tai nghe. |
|
|
| Âm thanh bị méo. |
|
|
9. Thông số kỹ thuật
| Tính năng | Chi tiết |
|---|---|
| Tên mẫu | 2 Control (also known as 2860) |
| Thương hiệu | SPL |
| Loại loa | Màn hình |
| Sử dụng được đề xuất | Control, Volume for Monitors |
| Thiết bị tương thích | Monitors, Speakers |
| Cấu hình kênh âm thanh vòm | 2.0 |
| Màu sắc | Đen |
| Các thành phần bao gồm | 1 x SPL Control Module |
| Kích thước sản phẩm (D x R x C) | 8.66" x 8.46" x 3.15" |
| Trọng lượng sản phẩm | 7.06 pound (khoảng 3.2 kg) |
| Nguồn điện | Điện có dây |
| Công nghệ kết nối | TRS, XLR |
| Chế độ đầu ra âm thanh | Âm thanh nổi |
| Kiểu lắp đặt | Giá để bàn |
| Nhà sản xuất | Sound Performance Lab |
10. Bảo hành và Hỗ trợ
The SPL 2Control Monitor Controller comes with a limited warranty. For specific warranty terms, duration, and conditions, please refer to the documentation provided with your purchase or visit the official SPL website. For technical support, service, or inquiries, please contact the manufacturer, Sound Performance Lab, or your authorized dealer.
Nhà sản xuất: Sound Performance Lab


