1. Hướng dẫn an toàn quan trọng
Please read all instructions carefully before operating the appliance and retain them for future reference. Always follow basic safety precautions to reduce the risk of fire, electric shock, and injury.
- Không sử dụng thiết bị khi dây điện hoặc phích cắm bị hỏng.
- Đảm bảo voltage specified on the product label matches your local power supply.
- Tránh để thiết bị gần nguồn nhiệt, ánh nắng trực tiếp và hơi ẩm.
- Không nhúng thiết bị vào nước hoặc chất lỏng khác.
- Rút phích cắm của thiết bị trước khi vệ sinh hoặc thực hiện bất kỳ bảo trì nào.
- Thiết bị này chỉ được sử dụng trong nhà.
- Để xa tầm tay trẻ em.
2. Sản phẩm hếtview
The Afloia Miro Pro is a 2-in-1 appliance designed to purify the air and humidify your environment. It features a detachable humidifier module, a 3-stage filtration system, and ambient LED lighting.

Image: The Afloia Miro Pro unit operating in a living room, illustrating air purification and humidification benefits.
Thành phần:
- Main Air Purifier Unit
- Humidifier Module (detachable)
- 3-in-1 Air Filter (Pre-filter, Activated Carbon, High-efficiency filter)
- Bộ lọc tạo ẩm
- Bộ đổi nguồn

Hình ảnh: Mặt trước view of the Afloia Miro Pro unit, showing its compact design.
3. Thiết lập
3.1 Tháo dỡ
Carefully remove all components from the packaging. Ensure all packing materials are removed from the unit before use.
3.2 Cài đặt bộ lọc
The 3-in-1 air filter and humidifier filter may come pre-installed or require installation. Follow these steps:
- Place the main air purifier unit on a flat, stable surface.
- Twist the base of the air purifier unit counter-clockwise to unlock and remove the bottom cover.
- Insert the 3-in-1 air filter into the main unit, ensuring it is seated correctly.
- Đậy nắp đáy lại và xoay theo chiều kim đồng hồ để khóa chặt.
- If using the humidifier module, ensure the humidifier filter is correctly placed inside it.

Image: Illustration of the 3-in-1 high-efficiency filter layers.

Image: The 3-in-1 air filter for the Afloia Miro Pro.

Image: The humidifier filter for the Afloia Miro Pro.
3.3 Attaching the Humidifier Module
The humidifier module attaches securely to the top of the air purifier unit via a precision-engineered bottom serration design. Align the module with the top of the purifier and gently twist until it locks into place. The humidifier module is designed to work in conjunction with the purifier and cannot function independently.

Hình ảnh: Chi tiết view of the humidifier module's internal structure and top-filling feature.
3.4 Đổ đầy bể nước
The humidifier features a top-filling design for convenience.
- Remove the top cover of the humidifier module.
- Pour clean tap water directly into the water tank. Do not exceed the maximum fill line. The tank capacity is 64 oz.
- Lắp lại nắp trên một cách an toàn.

Image: Demonstrates the easy top-filling method for the humidifier's water tank.
3.5 kết nối nguồn
Connect the power adapter to the unit and then plug it into a suitable electrical outlet.
4. Hướng dẫn vận hành
The Afloia Miro Pro features intuitive button controls.
4.1 Bật/Tắt nguồn
- Nhấn nút Nguồn một lần để bật thiết bị.
- Nhấn nút Nguồn một lần nữa để tắt thiết bị.
4.2 Lựa chọn chế độ
The unit can operate as an air purifier only or as an air purifier with humidification.
- When the humidifier module is attached and filled with water, the unit will operate in 2-in-1 mode (purification + humidification).
- To use as an air purifier only, detach the humidifier module. The main unit will function independently.
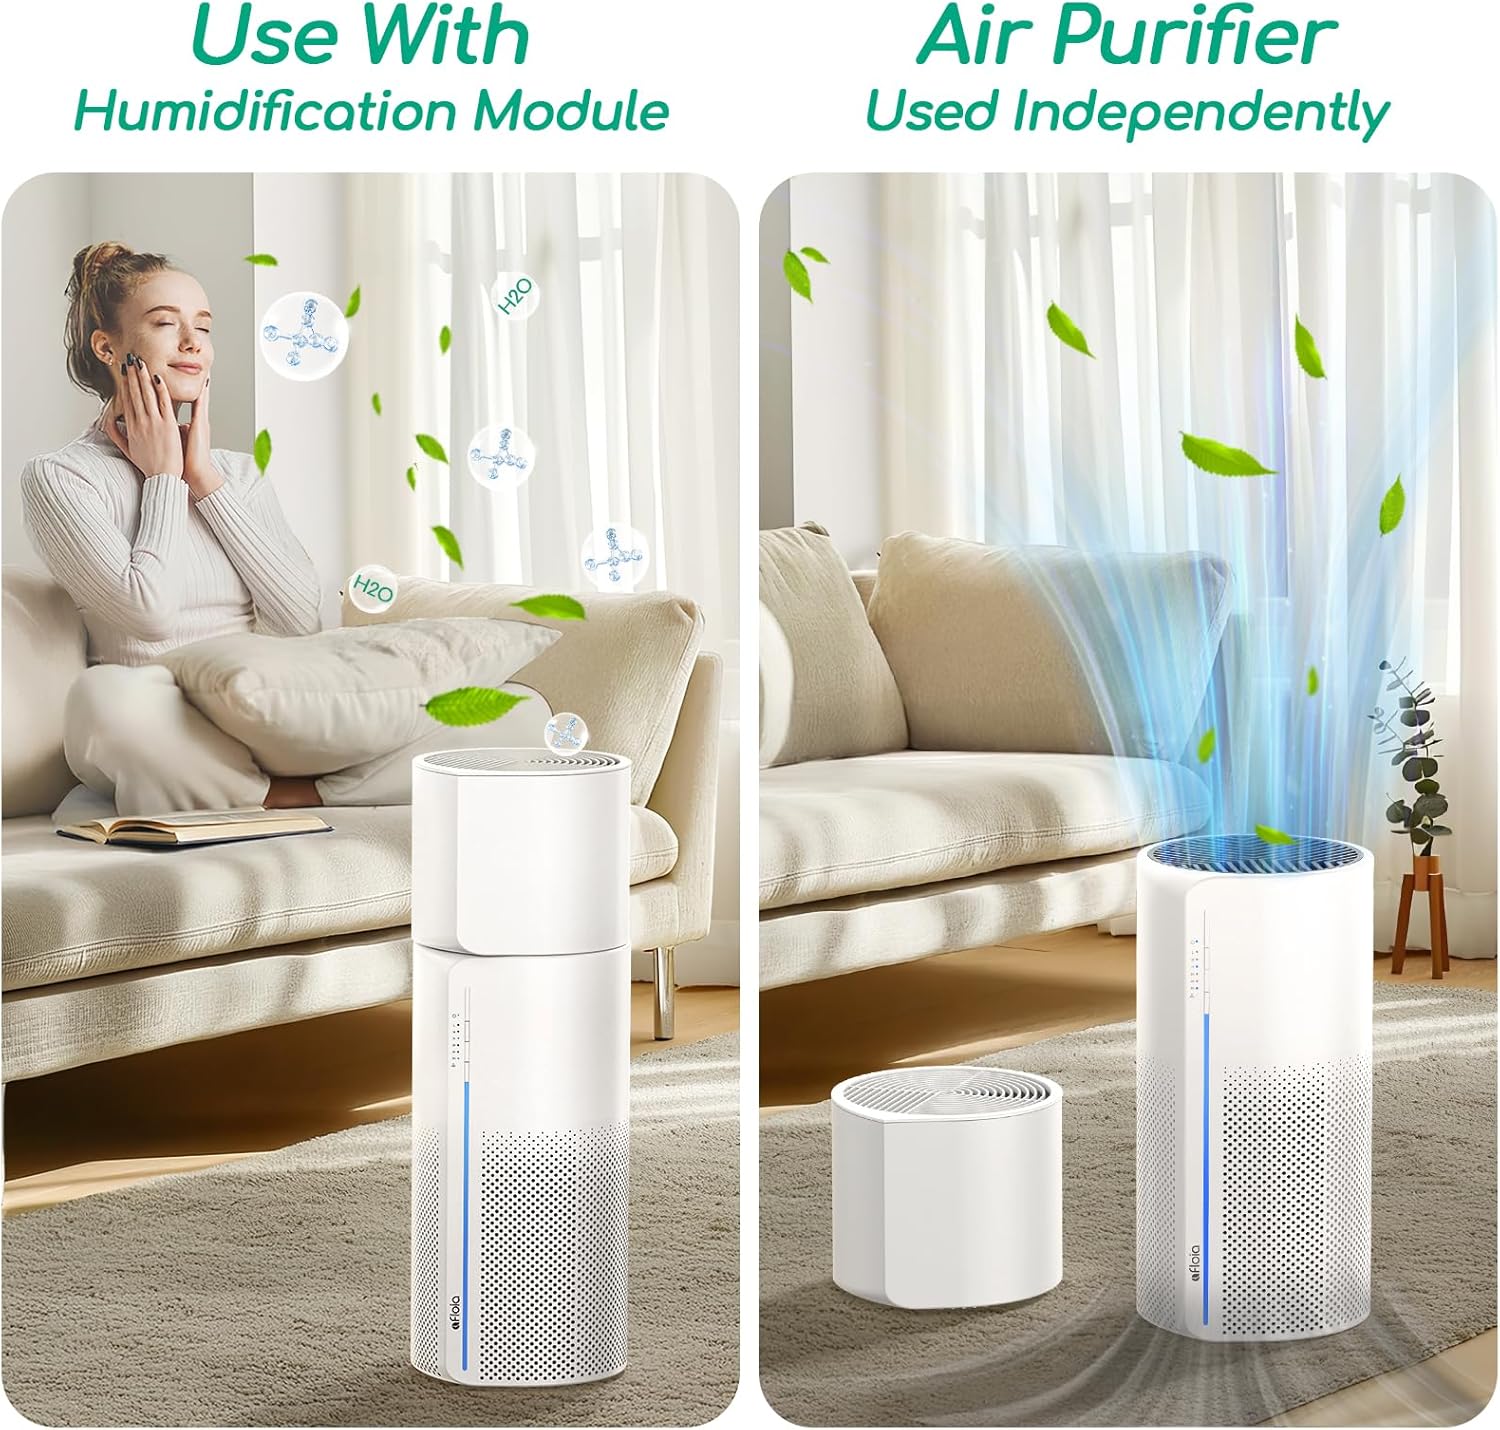
Image: Illustrates the flexibility of using the unit with or without the humidification module.
4.3 Điều khiển tốc độ quạt
Adjust the fan speed to your preference using the dedicated button (if available, refer to control panel icons). The unit typically offers multiple fan speeds, including a quiet Sleep Mode.

Image: The unit in a bedroom, highlighting its quiet operation at 24dB in Sleep Mode.
4.4 Ambient LED Lighting
The unit features seven vibrant LED light modes. Press the Light button to cycle through colors or select a fixed color. To turn off the lights for an undisturbed night's rest, press the button until the lights are off.
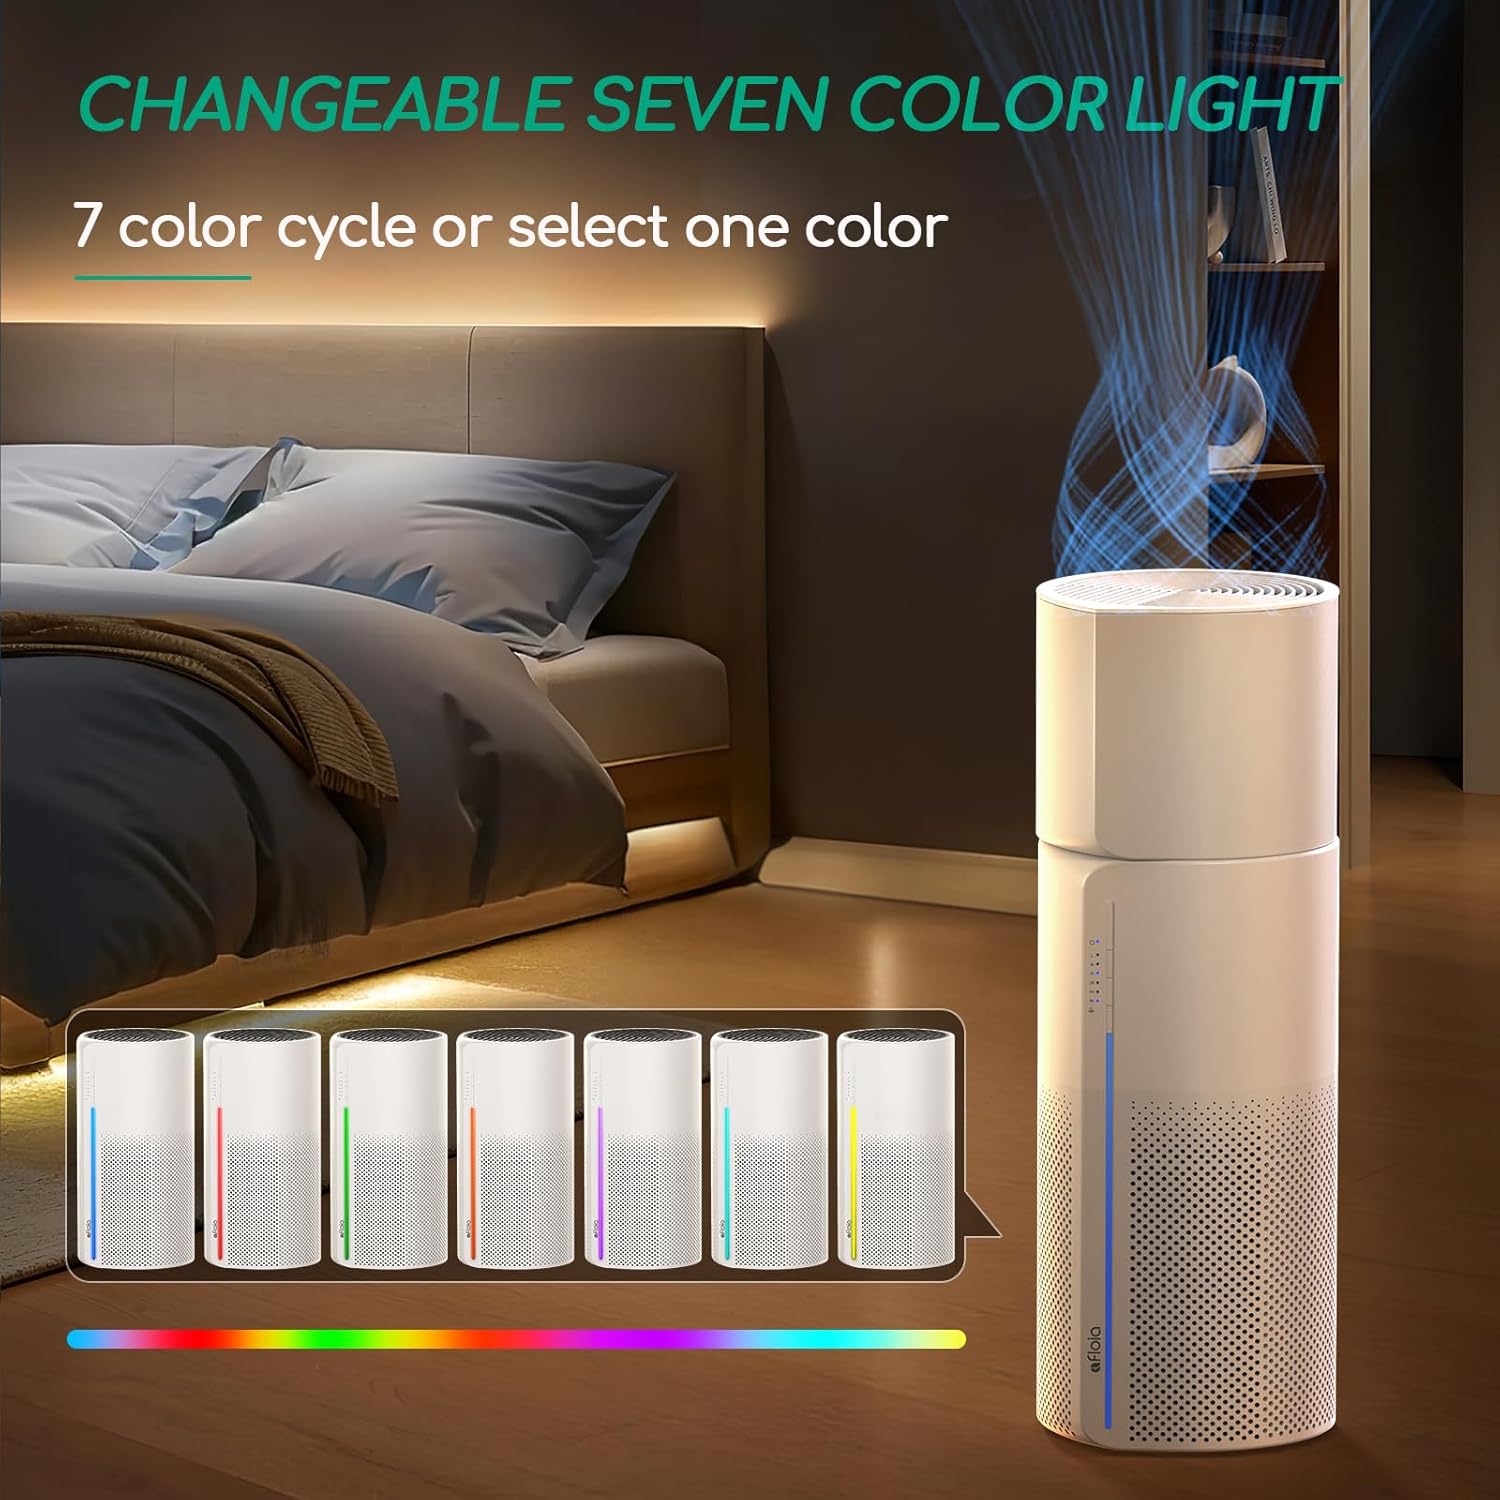
Image: The unit showcasing its changeable seven-color LED light feature.
4.5 Điều khiển hẹn giờ
The unit may include a timer function to set specific operating durations. Refer to the control panel for the timer button and available settings.
5. Bảo trì
5.1 Thay thế bộ lọc
The unit is equipped with an intelligent filter replacement alert. A red LED will flash continuously when the filter reaches its saturation point, typically every 3-6 months, depending on usage and air quality.
- When the machine blinks red light, unplug the unit.
- Twist the base counter-clockwise to open and take out the used filter.
- Install the new Afloia 3-in-1 filter (B08CVFXPMC).
- Replace the bottom cover and twist clockwise to lock.
- Cắm điện vào máy và bật nó lên.
- Keep pressing the power button for 15 seconds until the red light resets successfully.

Image: Visual instructions for replacing the air filter.
5.2 Cleaning the Humidifier Module and Filter
Regular cleaning of the humidifier module and filter is essential to prevent mineral buildup and maintain healthy moisture output. The humidifier filter (B08L98WGCH) is washable.
- Unplug the unit and detach the humidifier module.
- Remove the humidifier filter from the module.
- For the humidifier filter: Soak it in a solution of vinegar and water. Gently clean the filter with a soft brush. Rinse thoroughly under running water to remove any residue.
- For the water tank: Wipe the interior with a soft cloth. Ensure all parts are dry before reassembly.

Image: Demonstrates how to easily clean the water tank and humidifier filter.

Image: Close-up of the humidifier filter with washing instructions.
KHAI THÁC. Xử lý sự cố
If you encounter issues with your Afloia Miro Pro, please refer to the following common problems and solutions:
| Vấn đề | Nguyên nhân có thể | Giải pháp |
|---|---|---|
| Đơn vị không bật | Không có nguồn điện; Dây nguồn chưa được kết nối đúng cách. | Ensure the power cord is securely plugged into the unit and a working electrical outlet. Check the power source. |
| No humidification/mist | Water tank empty; Humidifier module not properly attached; Humidifier filter clogged | Refill the water tank. Ensure the humidifier module is securely attached. Clean or replace the humidifier filter. |
| Filter replacement indicator (red LED) remains on after filter change | Filter reset procedure not completed | After replacing the filter, press and hold the power button for 15 seconds to reset the indicator. |
| Reduced air purification performance | Air filter is dirty or expired | Check the air filter and replace it if necessary. |
| Tiếng ồn bất thường | Vật cản trong quạt; Thiết bị không được đặt trên bề mặt ổn định. | Unplug the unit and check for any foreign objects. Ensure the unit is placed on a flat, stable surface. |
7. Thông số kỹ thuật
| Tính năng | Đặc điểm kỹ thuật |
|---|---|
| Số hiệu mẫu | Miro Pro |
| Thương hiệu | Afloia |
| Màu sắc | Trắng |
| Kích thước sản phẩm | 7.6"D x 7.6"W x 21.79"H |
| Trọng lượng sản phẩm | 7 Bảng Anh |
| Nguồn điện | DC |
| Cái gì?tage | 26 watt |
| Mức độ tiếng ồn | 24 Decibel (Chế độ ngủ) |
| Loại bộ điều khiển | Nút điều khiển |
| Lớp lọc | HEPA (3-in-1 Filtration) |
| CADR (Tỷ lệ phân phối không khí sạch) | 150 m³/giờ |
| Khu vực phủ sóng | Purifies air 5 times/hour in rooms up to 438 ft² |
| Đầu ra độ ẩm | 5 oz/h (Mist-Free) |
| Dung tích bình chứa nước | 64 oz |
| Hoạt động liên tục | Lên đến 12.5 giờ |
| Chứng nhận | CE Certified, EPA Certified, FCC Certified |
8. Bảo hành và Hỗ trợ
Afloia products are designed for reliability and performance. For specific warranty details, please refer to the warranty card included with your purchase or visit the official Afloia webđịa điểm.
Hỗ trợ khách hàng:
If you have any questions, require technical assistance, or need to report an issue, please contact Afloia customer support through the following channels:
- Webđịa điểm: Visit the official Afloia webtrang web dành cho câu hỏi thường gặp và thông tin liên hệ hỗ trợ.
- E-mail: Refer to your product packaging or warranty card for customer service email.