
1. Thông tin an toàn quan trọng
Please read all instructions carefully before using the EVTSCAN Projection Clock. Keep this manual for future reference.
- Không để thiết bị ở nơi có nhiệt độ quá cao, ánh nắng trực tiếp hoặc độ ẩm cao.
- Tránh làm rơi hoặc va đập mạnh vào đồng hồ.
- Không nên tự ý tháo rời hoặc sửa chữa thiết bị. Hãy liên hệ với nhân viên dịch vụ có chuyên môn.
- Use only the specified power adapter (DC 5.0V, 1.2A) or appropriate batteries (2xAAA, not included).
- Để xa tầm tay trẻ em.
2. Sản phẩm hếtview
The EVTSCAN Projection Clock is a versatile digital alarm clock featuring a 3-inch backlit LCD screen that displays time, date, day of the week, temperature, and humidity. It includes a projection function to display time and temperature on a wall or ceiling, dual alarms with snooze, and a USB port for charging mobile phones.
Các tính năng chính:
- 12/24-hour time format display.
- Date and day of the week display (7 languages for week).
- Temperature detection (-9℃ to +50℃) and humidity detection (20% to 95%).
- Projection function with 180-degree rotation for time and temperature.
- Dual alarm clocks with slowly increasinthể tích g.
- 5-minute snooze function.
- Cổng sạc USB dành cho thiết bị di động.
- Adjustable backlight with 4 levels (high, medium, low, off).

Hình 2.1: Đằng trước view of the EVTSCAN Projection Clock, showing the LCD display and projection lens.
3. Nội dung gói hàng
Khi mở hộp, vui lòng đảm bảo tất cả các mục được liệt kê dưới đây đều có mặt và trong tình trạng tốt:
- 1 x EVTSCAN Projection Clock
- 1 x Cáp USB
- 1 x Hướng dẫn sử dụng tiếng Anh
Note: 2xAAA batteries are required for battery power and are not included in the package.
4. Thiết lập
4.1 Cấp nguồn cho thiết bị
The EVTSCAN Projection Clock can be powered by either AAA batteries or via the included USB cable.
4.1.1 Lắp đặt pin
- Hãy tìm nắp đậy ngăn chứa pin ở mặt sau của đồng hồ.
- Slide open the cover.
- Lắp hai (2) pin AAA, đảm bảo lắp đúng cực (+/-).
- Đóng chặt nắp ngăn chứa pin.
Note: When powered by batteries, the backlight will only light up for 8 seconds when activated to conserve power. The projection lamp will also light up for 8 seconds.
4.1.2 USB Power Connection
- Connect the small end of the provided USB cable to the DC 5.0V 1.2A input port on the back of the clock.
- Connect the larger end of the USB cable to a compatible USB power adapter (not included) or a powered USB port.
Note: When powered by USB, the backlight and projection lamp can remain continuously on, with adjustable brightness for the backlight.
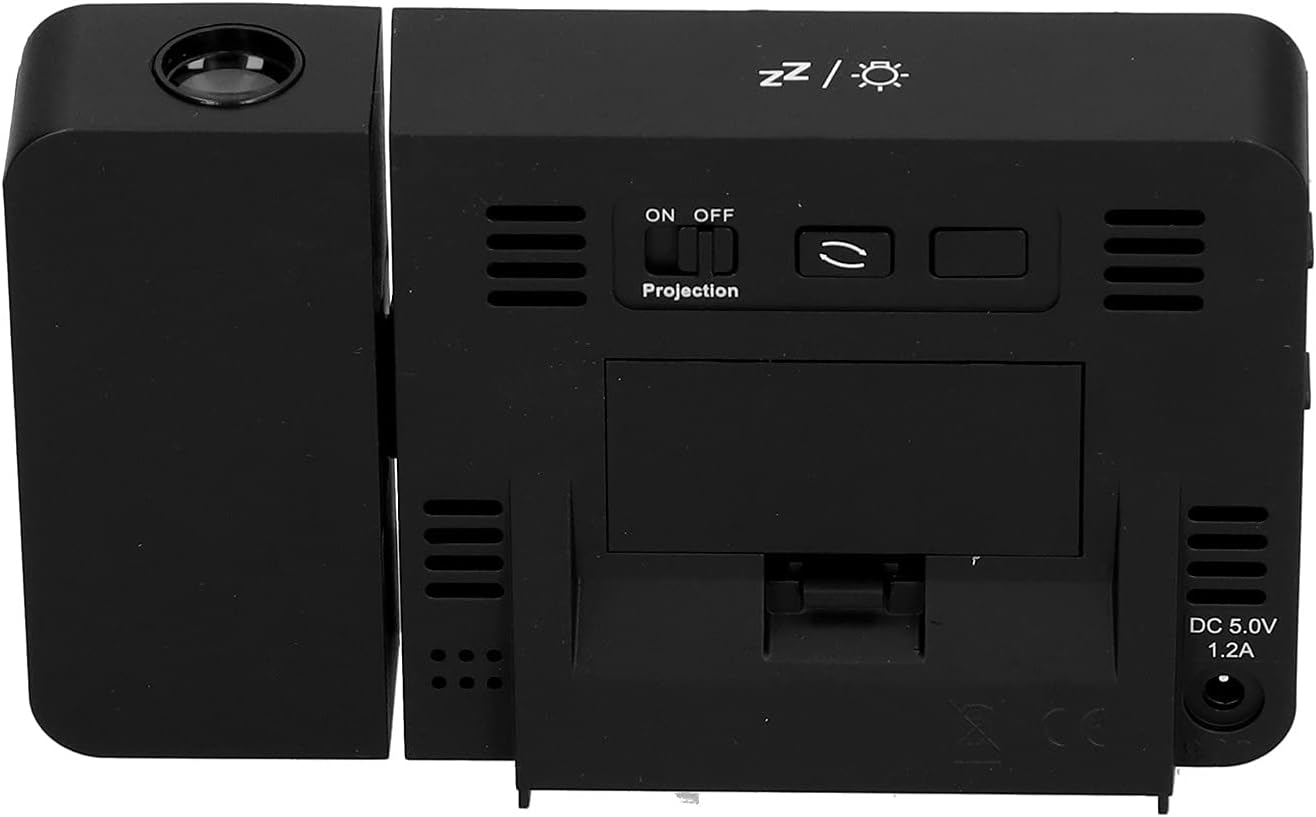
Hình 4.1: Ở phía sau view of the clock, indicating the battery compartment and DC 5.0V 1.2A power input.
5. Hướng dẫn vận hành
5.1 Chức năng nút
Familiarize yourself with the control buttons located on the front and sides of the clock:
- THỜI GIAN: Vào chế độ cài đặt thời gian.
- BÁO THỨC: Vào chế độ cài đặt báo động.
- +: Increases values, switches 12/24HR format, adjusts backlight.
- -: Decreases values, switches temperature units (℃/℉).
- Projection ON/OFF Switch: Activates or deactivates the projection. (Located on the back/side)
- Alarm 1 ON/OFF Switch: Activates or deactivates Alarm 1. (Located on the side)
- Alarm 2 ON/OFF Switch: Activates or deactivates Alarm 2. (Located on the side)
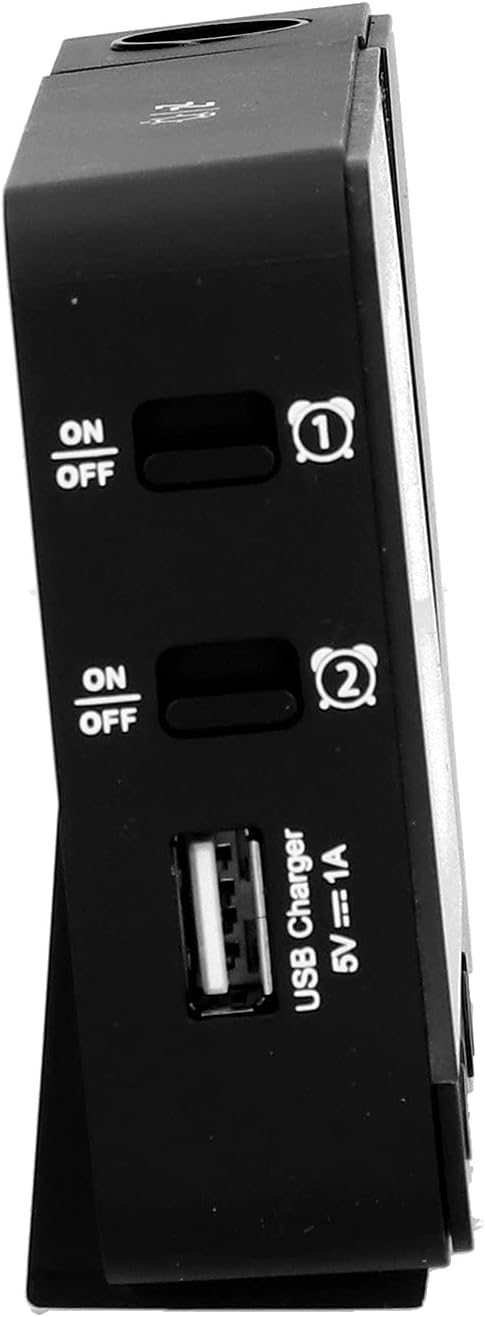
Hình 5.1: Bên view showing Alarm 1 and Alarm 2 ON/OFF switches, and the USB charging port.
5.2 Cài đặt ngày và giờ
- Nhấn và giữ THỜI GIAN button to enter time setting mode. The hour display will flash.
- Sử dụng + or - các nút điều chỉnh giờ.
- Nhấn THỜI GIAN again to confirm the hour and move to minute setting. Adjust with + or -.
- Tiếp tục nhấn THỜI GIAN to cycle through setting year, month, and day. Adjust each with + or -.
- Sau khi cài đặt ngày, nhấn THỜI GIAN lần cuối cùng để thoát khỏi chế độ cài đặt.
- Để chuyển đổi giữa định dạng 12 giờ và 24 giờ, hãy nhấn nút. + button during normal time display.
- To switch between Celsius (℃) and Fahrenheit (℉) for temperature, press the - button during normal time display.
5.3 Cài đặt báo thức
Đồng hồ có hai chế độ báo thức độc lập (Báo thức 1 và Báo thức 2).
- Nhấn và giữ BÁO THỨC button to enter Alarm 1 setting mode. The Alarm 1 hour display will flash.
- Sử dụng + or - các nút điều chỉnh giờ báo thức.
- Nhấn BÁO THỨC again to confirm the hour and move to Alarm 1 minute setting. Adjust with + or -.
- Nhấn BÁO THỨC again to move to Alarm 2 hour setting, and repeat the process for Alarm 2.
- After setting Alarm 2 minutes, press BÁO THỨC lần cuối cùng để thoát khỏi chế độ cài đặt.
- To activate or deactivate an alarm, use the corresponding BẬT/TẮT cảnh báo 1 or BẬT/TẮT cảnh báo 2 switch on the side of the clock. An alarm icon will appear on the display when active.
5.3.1 Chức năng báo lại
When an alarm sounds, press any button (except the alarm ON/OFF switch) to activate the 5-minute snooze function. The alarm will sound again after 5 minutes. To turn off the alarm completely, slide the corresponding alarm ON/OFF switch to OFF.
5.4 Hàm chiếu
The clock can project the time and temperature onto a wall or ceiling.
- Xác định vị trí Chiếu BẬT / TẮT switch on the back of the clock. Slide it to ON to activate the projection.
- Adjust the angle of the projection arm (the part with the lens) to direct the projection as desired. The arm can rotate nearly 180 degrees.
- The projection will display the current time and temperature in a soft red color.

Hình 5.2: Bên view showing the projection arm extended and ready for use.

Hình 5.3: The clock projecting time and temperature onto a wall in a bedroom setting.
5.5 Điều chỉnh đèn nền
When the clock is powered by USB, the backlight can be adjusted to four levels: high, medium, low, or off. Repeatedly press the + button during normal time display to cycle through the brightness levels.
When powered by batteries, the backlight will illuminate for 8 seconds when any button is pressed, then turn off to conserve power.
5.6 cổng sạc USB
The clock features a USB charging port (5V=1A) on its side. You can use this port to charge your mobile phone or other small electronic devices while the clock is connected to USB power.
Note: The USB charging port only functions when the clock is powered via the USB cable. It does not work when the clock is running on battery power.
6. Bảo trì
6.1 Vệ sinh
- Lau sạch bề mặt đồng hồ bằng một miếng vải mềm, khô.
- Do not use abrasive cleaners, solvents, or chemical sprays, as these may damage the finish or electronic components.
- Keep the projection lens clean for clear projection. Use a soft, lint-free cloth.
6.2 Thay thế pin
When the display becomes dim or the clock functions erratically while on battery power, it's time to replace the AAA batteries. Refer to Section 4.1.1 for battery installation instructions. Always replace both batteries at the same time with new ones.
KHAI THÁC. Xử lý sự cố
| Vấn đề | Nguyên nhân có thể | Giải pháp |
|---|---|---|
| Màn hình đồng hồ trống hoặc mờ. | No power, low batteries, or USB cable not connected. | Check battery installation and replace if necessary. Ensure USB cable is securely connected to a power source. |
| Projection is unclear or not visible. | Projection switch is OFF, lens is dirty, or projection distance is too far/close. | Ensure Projection switch is ON. Clean the projection lens. Adjust the clock's distance from the projection surface. |
| Chuông báo động không kêu. | Chức năng báo thức chưa được thiết lập hoặc đã bị tắt. | Verify alarm time is set correctly. Ensure the corresponding Alarm ON/OFF switch is in the ON position. |
| Cổng sạc USB không hoạt động. | Clock is running on battery power, or USB cable is not connected to a power source. | Ensure the clock is powered via the USB cable and connected to a functional power adapter. |
| Thời gian/ngày tháng không chính xác. | Time/date not set correctly. | Tham khảo Phần 5.2 để thiết lập lại thời gian và ngày tháng. |
8. Thông số kỹ thuật
| Người mẫu: | B0CLGDFCGX |
| Thương hiệu: | EVTSCAN |
| Vật liệu: | ABS (Acrylonitrile Butadiene Styrene) |
| Kích thước sản phẩm: | Xấp xỉ 13.5 x 8 x 2.5 cm (5.3 x 3.1 x 1.0 inch) |
| Cân nặng: | Khoảng 242g (8.5 oz) |
| Kiểu hiển thị: | Màn hình LCD kỹ thuật số có đèn nền |
| Nguồn điện: | 2xAAA batteries (not included) or DC 5.0V 1.2A via USB cable |
| Đầu ra sạc USB: | 5V=1A |
| Phạm vi phát hiện nhiệt độ: | -9℃ to +50℃ (1℃ resolution) |
| Phạm vi phát hiện độ ẩm: | 20% to 95% (1% resolution) |
| Temperature/Humidity Calibration Time: | 30 giây |
| Mức độ đèn nền: | 4 levels (High, Medium, Low, Off) when USB powered; 8s illumination when battery powered. |
| Phép chiếu Lamp: | Always on when USB powered; 8s illumination when battery powered. |

Hình 8.1: Product dimensions: 5.3 inches wide by 3.1 inches high.
9. Bảo hành và Hỗ trợ
EVTSCAN products are manufactured to high quality standards. For specific warranty information, please refer to the warranty card included with your purchase or contact your retailer.
If you encounter any issues or have questions regarding your EVTSCAN Projection Clock, please contact the seller or EVTSCAN customer support for assistance. Please have your model number (B0CLGDFCGX) ready when contacting support.
Để được hỗ trợ thêm, bạn có thể truy cập EVTSCAN Store on Amazon.