
1. Giới thiệu
This manual provides detailed instructions for the installation, operation, and maintenance of your OLONETO 100A Solar Charge Controller. This device is designed to manage power flow from your solar panel to your battery bank and DC loads, ensuring efficient charging and protection for your battery system. It supports 12V, 24V, 36V, and 48V battery systems with automatic voltage nhận dạng.
Note: This controller utilizes a combination of MPPT and PWM charging technologies. It is not a 100% true MPPT controller.
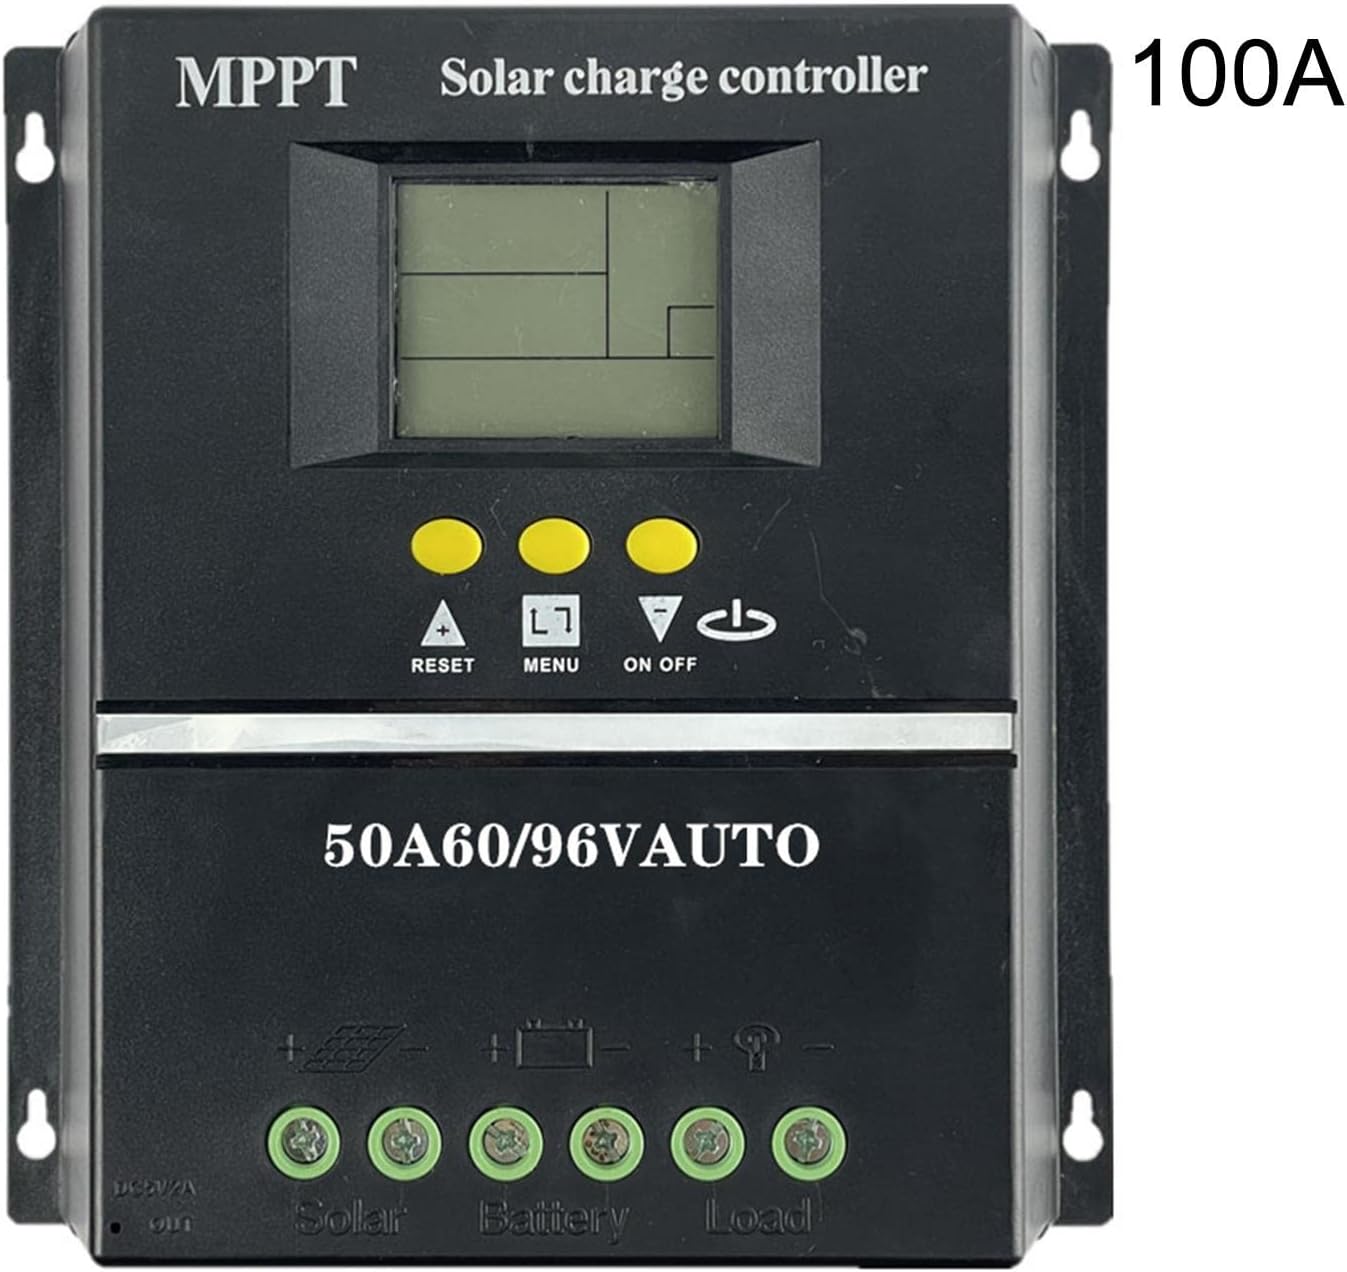
Hình 1: Mặt trước view of the OLONETO 100A Solar Charge Controller, showing the LCD display, control buttons, and connection terminals. The "100A" rating is visible on the top right.
2. Hướng dẫn an toàn
- Ensure all connections are tight and correct to prevent damage to the controller or other components.
- Luôn kết nối pin với bộ điều khiển Đầu tiên, and then connect the solar panel. Disconnect in the reverse order: solar panel first, then battery. Failure to follow this sequence may damage the controller.
- Đảm bảo lượng pintage is sufficient for the controller to recognize the system voltage (e.g., >10V for 12V battery, >20V for 24V battery, >30V for 36V battery, >40V for 48V battery).
- Lắp đặt bộ điều khiển ở khu vực thông thoáng, tránh ánh nắng trực tiếp, nhiệt độ cao và độ ẩm.
- Không nên tự ý sửa chữa hoặc thay đổi bộ điều khiển. Hãy liên hệ với nhân viên kỹ thuật có chuyên môn để được hỗ trợ.
3. Tính năng sản phẩm
The OLONETO Solar Charge Controller offers several key features for efficient solar power management:
- Vol tự độngtage Nhận dạng: Automatically detects 12V, 24V, 36V, or 48V battery systems.
- Màn hình LCD: Provides real-time information on battery status, charging parameters, and load status.
- Đầu ra USB kép: Convenient 5V output for charging mobile phones and other USB devices.
- Các thông số có thể điều chỉnh: Allows users to customize charging and discharge settings.
- Smart Charge Management: Tối ưu hóa quá trình sạc pin để kéo dài tuổi thọ pin.
- Bảo vệ môi trường: Designed with green environmental protection principles.
- Automatic Focusing MPPT Tracking: High charging efficiency with non-stop detection during charging and bidirectional focusing tracking.

Figure 2: Diagram illustrating key features of the solar charge controller, including LCD display for battery power supply voltage, smart charge capabilities, 5V USB output, adjustable parameters, and green environmental protection.

Figure 3: Image highlighting the automatic focusing MPPT tracking feature, which ensures high charging efficiency and continuous detection during the charging process.
4. Thiết lập và Cài đặt
4.1 Trình tự đấu dây
- Kết nối pin: Kết nối pin với các cực pin của bộ điều khiển. Đảm bảo đúng cực (+ với + và - với -). Bộ điều khiển sẽ tự động phát hiện điện áp pin.tage.
- Kết nối tấm pin mặt trời: Kết nối tấm pin mặt trời với các cực đấu nối tấm pin mặt trời của bộ điều khiển. Đảm bảo đúng cực tính.
- Kết nối tải DC (Tùy chọn): Connect your DC loads to the controller's load terminals. Ensure correct polarity.
Important: Always follow this connection order: Battery → Solar Panel → Load. To disconnect, follow the reverse order: Load → Solar Panel → Battery.
4.2 Recommended Solar Panel Voltage
- Vì 12V battery systems: Use a solar panel with approximately 18V đầu ra.
- Vì 24V battery systems: Use a solar panel with approximately 30-37V đầu ra.
- Vì 36V battery systems: Use a solar panel with approximately 45-55V đầu ra.
- Vì 48V battery systems: Use a solar panel with approximately 60-72V đầu ra.
4.3 Sơ đồ đấu dây

Figure 4: Basic wiring diagram showing connections for the solar panel, battery, and DC loads to the controller. Ensure positive (+) and negative (-) terminals are correctly matched.

Figure 5: Detailed wiring diagram illustrating connections for the solar panel, battery, DC load, and the integrated USB output for charging external devices.
5. Hướng dẫn vận hành
5.1 Initial Power-Up and Display
Once the battery is connected, the controller's LCD display will power on, showing current system parameters. The controller automatically identifies the battery voltage (12V, 24V, 36V hoặc 48V).
5.2 Chức năng nút
- ▲ (Up/Reset): Used to increase values during setting, or as a reset function.
- THỰC ĐƠN: Used to navigate through display screens and enter/exit setting modes.
- ▼ (Down/On/Off): Used to decrease values during setting, or to toggle the DC load on/off.
5.3 Sạc Voltage Cài đặt
To adjust charging parameters:
- After connecting the battery, ensure the clock is set and saved (see 5.4 Clock Setting).
- Nhấn và giữ "▲" button for 3-5 seconds. The screen will display "L**V" (floating charging voltagvà).
- Sử dụng "▼" button to adjust the floating charging voltage.
- Briefly press "▲" again. The screen will display "H**V" (boost charging voltagvà).
- Sử dụng "▼" button to adjust the boost charging voltage.
- Briefly press "▲" again. The screen will display "F**V" (low-voltage cắt đứt tậptage for DC load).
- Sử dụng "▼" button to adjust the low-voltage cắt đứt tậptage.
- After making all desired adjustments, press and hold the "▲" button for 3-5 seconds to save the settings and exit.
5.4 Cài đặt đồng hồ
To set the internal clock:
- Đảm bảo pin đã được kết nối.
- Nhấn vào "▲" hoặc "▼" buttons to navigate to the clock setting interface.
- Sử dụng "▲" Và "▼" buttons to adjust the time.
- Briefly press the "MENU" button (represented as "□" in some descriptions) to save the clock setting.
5.5 Load Protection Voltage Tham khảo
The following are typical battery charging voltages for different system voltagđó là:
- Khi sử dụng một 12V battery, the battery charging voltage is typically 13.7V.
- Khi sử dụng một 24V battery, the battery charging voltage is typically 27.4V.
- Khi sử dụng một 36V battery, the battery charging voltage is typically 41.1V.
- Khi sử dụng một 48V battery, the battery charging voltage is typically 54.8V.
6. Bảo trì
- Kiểm tra thường xuyên: Kiểm tra định kỳ tất cả các kết nối dây điện để đảm bảo độ kín và chống ăn mòn.
- Độ sạch sẽ: Giữ bộ điều khiển sạch sẽ, không bụi bẩn. Dùng khăn khô để lau chùi.
- Thông gió: Hãy đảm bảo khu vực lắp đặt luôn được thông gió tốt để tránh quá nhiệt.
- Tình trạng pin: Theo dõi tình trạng pin và mức pin của bạntage regularly to ensure optimal system performance.
KHAI THÁC. Xử lý sự cố
| Vấn đề | Nguyên nhân có thể | Giải pháp |
|---|---|---|
| Màn hình bộ điều khiển tắt. | Không có pin được kết nối hoặc dung lượng pintage quá thấp. | Connect battery or ensure battery voltage is above minimum threshold (e.g., >10V for 12V system). |
| Không sạc được từ tấm pin mặt trời. | Solar panel not connected, incorrect polarity, or insufficient sunlight. | Check solar panel connections and polarity. Ensure adequate sunlight. |
| Tậptage identification error. | Pin voltage was too low when connected initially. | Đảm bảo dung lượng pintage is above the minimum threshold before connecting to the controller. Disconnect and reconnect the battery. |
| DC load not working. | Load is off, incorrect wiring, or battery voltage is below low-voltage cắt đứt. | Check load connection and polarity. Press the "▼" button to toggle load. Check battery voltage and adjust low-voltage cut-off if necessary. |
8. Thông số kỹ thuật
| Tham số | Giá trị |
|---|---|
| Người mẫu | 100A |
| Thương hiệu | OLONETO |
| Hệ thống Voltage | Tự động 12V / 24V / 36V / 48V |
| Công nghệ sạc | MPPT/PWM Hybrid |
| Đầu ra USB | Dual USB, 5V |
| Trọng lượng sản phẩm | 200 gam |
| Kích thước (Xấp xỉ) | 190mm (7.48in) x 180mm (7.08in) |

Figure 6: Physical dimensions of the solar charge controller, showing approximate measurements of 190mm (7.48 inches) in width and 180mm (7.08 inches) in height.
9. Bảo hành và Hỗ trợ
Để biết thông tin bảo hành và hỗ trợ kỹ thuật, vui lòng tham khảo tài liệu đi kèm khi mua hàng hoặc liên hệ với nhà bán lẻ. Vui lòng giữ lại hóa đơn mua hàng để phục vụ cho các yêu cầu bảo hành.


