
Foxeer Reaper Extreme 2.5W
Hướng dẫn sử dụng Foxeer Reaper Extreme 2.5W VTX
Model: Reaper Extreme 2.5W
1. Sản phẩm hếtview
The Foxeer Reaper Extreme 2.5W is a high-power 5.8GHz Video Transmitter (VTX) designed for FPV (First Person View) long-range drones. It features adjustable power output levels, including Pitmode, 25mW, 200mW, 500mW, 1.5W, and 2.5W, providing flexibility for various flight scenarios and regulatory requirements. Its compact size and wide input voltage range make it suitable for a broad range of FPV builds.

Hình 1: Trên cùng view of the Foxeer Reaper Extreme 2.5W VTX, featuring a teal-colored heatsink with the Foxeer logo and mounting screw locations.
2. Thông số kỹ thuật
| Tính năng | Đặc điểm kỹ thuật |
|---|---|
| Tên sản phẩm | Reaper Extreme 2.5W |
| Đầu vào Voltage | 7~36V (2-8S LiPo compatible) |
| Đầu ra Voltage | 5V (for camera/FC) |
| Kênh | 40CH |
| Công suất đầu ra | Pitmode / 25mW / 200mW / 500mW / 1.5W / 2.5W |
| Sự tiêu thụ | 1.2A at 9V (at max power) |
| Cân nặng | 13g |
| Kích thước | 36mm x 27.5mm x 8mm |
| Gắn mẫu lỗ | 20x20mm (standard FPV stack size) |
| Ăng-ten kết nối | MMCX |
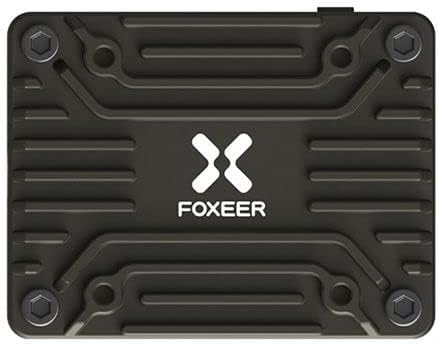
Figure 2: Pinout and feature diagram of the Foxeer Reaper Extreme VTX, indicating connections for Video, GND, 5V Out, Tramp, and 7-36V In, along with control buttons (KEY, CH, BAND, PWR) and MMCX antenna connector.
3. Thiết lập và Cài đặt
Proper installation is crucial for optimal performance and longevity of your VTX. Always ensure power is disconnected before making any connections.
3.1 Sơ đồ đấu dây
Connect the VTX to your flight controller (FC) and camera according to the following pinout:
- BĂNG HÌNH: Connect to the video input of your FPV camera.
- GND: Connect to a common ground point on your FC or PDB.
- 5V RA: Provides regulated 5V power for your FPV camera.
- TRAMP: Connect to a UART TX pad on your FC for SmartAudio/Tramp Kiểm soát giao thức.
- 7~36V IN: Connect directly to your main battery voltage (2-8S LiPo). Ensure correct polarity.

Hình 3: Chi tiết view of the Foxeer Reaper Extreme VTX connection pads, illustrating the layout for Video, GND, 5V Out, Tramp, and power input.
3.2 Lắp đặt
The Reaper Extreme VTX features a 20x20mm mounting pattern, allowing it to be stacked with most modern flight controllers and ESCs. Use appropriate standoffs and screws to secure the VTX, ensuring no components are short-circuited by the frame or other electronics.
3.3 Kết nối ăng-ten
Connect a 5.8GHz FPV antenna to the MMCX connector. Ensure the antenna is securely attached before powering on the VTX. Running the VTX without an antenna can cause permanent damage.
4. Hướng dẫn vận hành
The Foxeer Reaper Extreme VTX can be configured via physical buttons or through SmartAudio/Tramp protocol via your flight controller's OSD (On-Screen Display).
4.1 Nút điều khiển
The VTX has four buttons: KEY, CH, BAND, and PWR. These buttons allow manual adjustment of channels, bands, and power levels.
- CH (Kênh): Short press to cycle through channels (CH1-CH8).
- BAN NHẠC: Short press to cycle through bands (A, B, E, F, R).
- PWR (Công suất): Long press to cycle through power levels (Pitmode, 25mW, 200mW, 500mW, 1.5W, 2.5W).
- CHÌA KHÓA: This button may be used for locking/unlocking settings or other advanced functions depending on firmware. Refer to the latest Foxeer documentation for specific usage.
Ghi chú: Always ensure you are operating within legal power limits for your region. Use Pitmode or low power for testing to avoid interference.
4.2 SmartAudio/Tramp Giao thức
For convenient configuration, connect the VTX's TRAMP pad to a UART TX pad on your flight controller. Enable the VTX (SmartAudio or Tramp) feature in your flight controller's Betaflight/ArduPilot configurator. This allows you to change VTX settings directly from your FPV goggles' OSD menu.
5. Bảo trì và chăm sóc
- Quản lý nhiệt: The Reaper Extreme VTX can generate significant heat, especially at higher power outputs. Ensure adequate airflow around the VTX during operation. Avoid enclosing it in tight spaces without ventilation.
- Antenna Protection: Always connect an antenna before powering on the VTX. Disconnecting the antenna while powered can permanently damage the VTX.
- Độ sạch sẽ: Keep the VTX free from dirt, dust, and moisture. If it gets wet, ensure it is completely dry before reapplying power.
- Kiểm tra thể chất: Periodically inspect the VTX for any signs of physical damage, loose connections, or burnt components.
KHAI THÁC. Xử lý sự cố
6.1 Không có tín hiệu video
- Kiểm tra kết nối: Verify all wiring (Video, GND, Power) is correct and secure.
- Ăng-ten: Ensure the antenna is properly connected to the VTX and the receiver.
- Quyền lực: Confirm the VTX is receiving adequate power (7-36V). Check for correct polarity.
- Channel/Band Mismatch: Ensure your FPV goggles/receiver are set to the exact same channel and band as the VTX.
- Pitmode: Check if the VTX is in Pitmode (very low power output). Increase power if necessary.
6.2 Poor Video Quality / Static
- Antenna Quality/Placement: Use a good quality antenna. Ensure it is not obstructed by carbon fiber or other components.
- Công suất đầu ra: Increase the VTX power output if you are experiencing range issues or heavy interference.
- Sự can thiệp: Keep the VTX away from other noisy electronics (ESCs, motors, high-current wires). Add capacitors to your power system if experiencing power line noise.
- Frequency Overlap: Ensure no other FPV systems nearby are using the same frequency.
6.3 VTX Overheating
- Luồng không khí: Ensure sufficient airflow around the VTX. Avoid mounting it in enclosed spaces.
- Công suất đầu ra: Operating at 2.5W for extended periods, especially on the ground, will generate significant heat. Reduce power if not needed.
- Ăng-ten: Verify the antenna is securely connected. Running without an antenna causes rapid overheating and damage.
7. Bảo hành và Hỗ trợ
For specific warranty information, technical support, or service inquiries, please refer to the official Foxeer webhoặc liên hệ với nhà bán lẻ. Giữ lại hóa đơn mua hàng để yêu cầu bảo hành.
This manual provides general guidelines. Specifications and features are subject to change without prior notice.
Tài liệu liên quan - Reaper Extreme 2.5W
 |
Foxeer Reaper Extreme VTX: Thông số kỹ thuật, hoạt động và hướng dẫn tần số Hướng dẫn toàn diện về Foxeer Reaper Extreme VTX, bao gồm thông số kỹ thuật, thao tác nút bấm, bảng tần số và chế độ PIT. Tìm hiểu cách thiết lập kênh, băng tần và mức công suất cho hệ thống FPV của bạn. |
 |
Foxeer Reaper Extreme VTX: Thông số kỹ thuật, hoạt động và hướng dẫn tần số A comprehensive guide to the Foxeer Reaper Extreme VTX, detailing its specifications, LED indicators, button operations for channel, band, and power selection, unlocking frequencies, PIT mode, and important notes regarding TRAMP protocol compatibility. |
 |
Foxeer Reaper Extreme VTX: Thông số kỹ thuật, hoạt động và hướng dẫn tần số Comprehensive guide to the Foxeer Reaper Extreme VTX, covering its specifications, LED indicators, button operations, frequency table, unlock features, and PIT mode. Includes details on power output, channels, and Tramp hỗ trợ giao thức. |
 |
Foxeer Reaper Extreme VTX: User Manual and Specifications Detailed user manual for the Foxeer Reaper Extreme VTX, covering its specifications, LED indicators, button operations for channel, band, and power selection, frequency table, unlocking procedure, and PIT mode. Includes important notes on Tramp protocol integration. |
 |
Hướng dẫn sử dụng Foxeer Reaper Extreme VTX Sách hướng dẫn sử dụng Foxeer Reaper Extreme VTX, nêu chi tiết thông số kỹ thuật, thao tác nút, bảng tần số và chế độ PIT. |
 |
Foxeer Reaper Extreme VTX: Thông số kỹ thuật, hoạt động và hướng dẫn tần số Hướng dẫn toàn diện về Foxeer Reaper Extreme VTX, bao gồm thông số kỹ thuật chi tiết, đèn LED báo trạng thái, nút điều khiển kênh, băng tần và lựa chọn công suất, bảng tần số và các tính năng nâng cao như chế độ PIT và mở khóa nguồn. Bao gồm các lưu ý thiết yếu về thiết lập và vận hành. |
Ask a question about this manual
Ask about setup, troubleshooting, compatibility, parts, safety, or missing instructions. Manuals+ will review the question and use this page’s manual context to help answer it.