
1. Giới thiệu
The HQST 20A PWM Flush Mount Solar Charge Controller is designed to efficiently manage power flow from your solar panels to your battery bank, ensuring optimal charging and protection. It is compatible with both 12V and 24V battery systems, supporting various battery types including Lithium, Sealed (AGM), Gel, and Flooded batteries. This manual provides essential information for proper installation, operation, and maintenance of your solar charge controller.
2. Sản phẩm hếtview
Familiarize yourself with the components of your HQST solar charge controller:
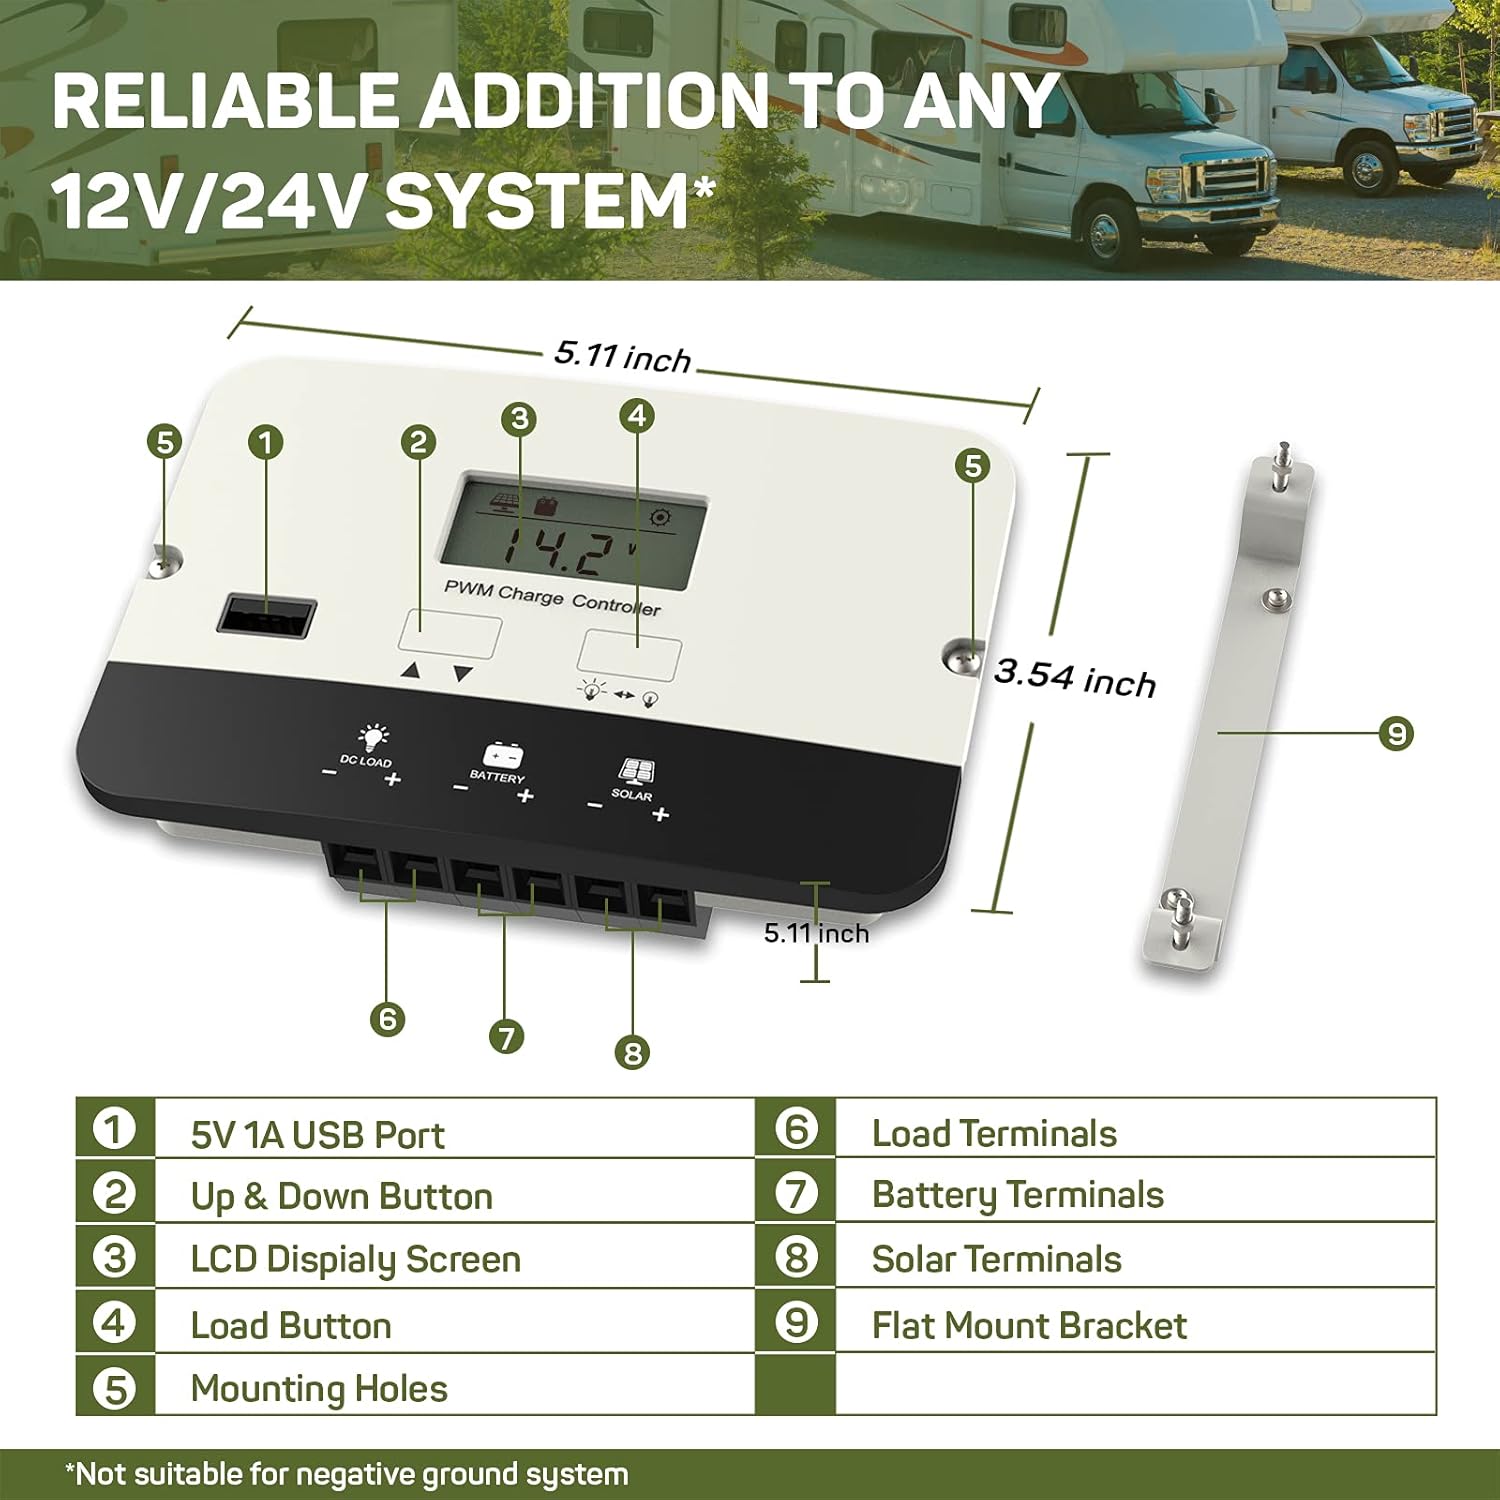
This diagram illustrates the key components and dimensions of the HQST 20A PWM Flush Mount Solar Charge Controller. It measures approximately 5.11 inches in length and 3.54 inches in width.
- 5V 1A USB Port: For charging USB-compatible devices.
- Nút Lên & Xuống: Used for navigating display screens and adjusting settings.
- Màn hình hiển thị LCD: Shows real-time system data and settings.
- Load Button: Controls the DC load output.
- Gắn lỗ: For securing the controller during installation.
- Trạm trung chuyển hàng hóa: Kết nối với các tải DC của bạn.
- Đầu cực của pin: Connect to your battery bank.
- Solar Terminals: Connect to your solar panel array.
- Flat Mount Bracket: Optional bracket for surface mounting.
3. Thiết lập
3.1 Gắn Bộ điều khiển
The controller offers flexible mounting options:

The controller can be installed using either a flush mount for a seamless look or a flat mount with the provided bracket. Choose a location that is dry, well-ventilated, and away from direct sunlight or heat sources.
- Khung hình phẳng: Integrate the controller directly into a panel or wall for a clean finish.
- Lắp phẳng: Use the included bracket to mount the controller on a surface.
Ensure adequate space around the controller for air circulation to prevent overheating.
3.2 Kết nối dây
Follow the correct wiring sequence to prevent damage to the controller or battery:
- Kết nối pin: First, connect the battery to the controller's battery terminals (7). Ensure correct polarity (positive to positive, negative to negative). The LCD will power on.
- Kết nối tấm pin mặt trời: Next, connect the solar panel to the controller's solar terminals (8). Ensure correct polarity.
- Kết nối tải DC: Finally, connect your DC loads to the controller's load terminals (6). Ensure correct polarity.
Trình tự ngắt kết nối: To disconnect the system, reverse the order: disconnect the load, then the solar panel, and finally the battery.

This wiring diagram illustrates the proper connection order for the solar panel, battery, and DC load to the HQST solar charge controller.

When connecting wires, ensure they are inserted into the correct square socket for the cable, not the screw hole. Fully unscrew the terminal screws, insert the wire ends, then tighten the screws securely.
3.3 Cài đặt loại pin
The controller automatically recognizes 12V/24V Sealed (AGM), Gel, and Flooded batteries. For Lithium batteries, manual parameter setting is required:

The LCD display allows for manual adjustment of battery parameters, especially crucial for Lithium-ion batteries.
- Press and hold the 'Up & Down' button to enter the setting mode.
- Use the 'Up & Down' buttons to navigate to the battery type setting (e.g., "b01" for Gel, "b02" for Sealed, "b03" for Flooded, "b04" for Lithium).
- For Lithium batteries, further adjust charging voltage, điện áp xả quá mứctage, and other parameters as per your battery manufacturer's specifications.
- Press and hold the 'Load' button to save the settings and exit.
4. Hướng dẫn vận hành
4.1 Màn hình LCD Điều hướng
The LCD screen provides real-time monitoring of your solar system:

The intuitive LCD screen cycles through various operational data, including battery voltagđ, PV tậptage, charge current, load current, controller temperature, and battery state of charge (SOC).
- Press the 'Up & Down' button (2) to manually cycle through the displayed parameters.
- The display will automatically cycle through parameters if no button is pressed for a few seconds.
4.2 Kiểm soát tải
The controller features a DC load output with multiple control modes:
- Press the 'Load' button (4) to manually turn the DC load output on or off.
- The controller supports 17 different load control modes, allowing for customized operation (e.g., dusk-to-dawn, timed operation). Refer to the full manual for detailed instructions on setting load modes.
4.3 cổng sạc USB
The integrated 5V 1A USB port (1) can charge small electronic devices. This port is active when the DC load output is enabled.
4.4 4-Stage Sạc thông minh
The controller employs an advanced 4-stagThuật toán sạc điện tử tối ưu hóa sức khỏe và tuổi thọ pin:

This graph illustrates the voltage và chuyên nghiệp hiện tạifiles during the 4-stage charging process, including Bulk, Boost/Absorption, Float, and Equalization stagnghĩa là
- Phí số lượng lớn: Cung cấp dòng điện tối đa để sạc pin nhanh chóng.
- Boost/Absorption Charge: Duy trì âm lượng không đổitage để đảm bảo pin được sạc đầy mà không bị sạc quá mức.
- Phí nổi: Giảm âm lượngtagở mức điện áp thấp hơn để duy trì pin ở trạng thái sạc đầy, bù đắp cho sự tự xả pin.
- Phí cân bằng: (For lead-acid batteries only) Periodically overcharges the battery to balance cell voltages and prevent sulfation.
5. Bảo trì
To ensure the longevity and optimal performance of your HQST solar charge controller, perform the following maintenance checks:
- Kiểm tra thường xuyên: Periodically check all wiring connections for tightness and signs of corrosion. Loose connections can cause voltaghiện tượng giảm điện áp và quá nhiệt.
- Độ sạch sẽ: Keep the controller's exterior clean and free from dust, dirt, and debris. Use a dry cloth for cleaning. Do not use harsh chemicals or abrasive materials.
- Thông gió: Ensure that the installation area remains well-ventilated to allow for proper heat dissipation. Blocked vents can lead to overheating and reduced efficiency.
- Tình trạng pin: Monitor your battery's health and performance regularly. Follow the battery manufacturer's maintenance guidelines.
KHAI THÁC. Xử lý sự cố
Nếu bạn gặp sự cố với bộ điều khiển sạc năng lượng mặt trời, hãy tham khảo các sự cố và giải pháp phổ biến sau:
| Vấn đề | Nguyên nhân có thể | Giải pháp |
|---|---|---|
| Controller Display is Off | No power from battery or incorrect battery connection. | Kiểm tra các kết nối pin và đảm bảo đúng cực. Kiểm tra điện áp pin.tage cao hơn điện áp hoạt động tối thiểutage. |
| Pin không sạc | No solar input, incorrect solar panel connection, or faulty solar panel. | Ensure solar panels are receiving adequate sunlight. Check solar panel wiring for correct polarity and secure connections. Test solar panel voltage. |
| DC Load Not Working | Load output disabled, incorrect load connection, or over-discharge protection active. | Press the Load button to enable output. Check load wiring for correct polarity and secure connections. Verify battery voltage is above the over-discharge protection threshold. |
| Error Code Displayed (e.g., E02) | Specific system fault (e.g., E02 typically indicates over-discharge). | Consult the full product manual for a complete list of error codes and their corresponding solutions. Address the underlying issue (e.g., charge battery for E02). |
If the problem persists after attempting these solutions, please contact HQST customer support.
7. Thông số kỹ thuật
| Tính năng | Đặc điểm kỹ thuật |
|---|---|
| Người mẫu | 20A PWM Flush Mount |
| Hệ thống Voltage | 12V / 24V Auto-recognition (Lithium batteries require manual setting) |
| Dòng điện sạc tối đa | 20A |
| Khả năng tương thích pin | Lithium, Sealed (AGM), Gel, Flooded |
| Sạc Stages | 4-Stage (Bulk, Boost/Absorption, Float, Equalization) |
| Đầu ra USB | 5V 1A |
| Kiểu hiển thị | Màn hình tinh thể lỏng |
| Kích thước sản phẩm (D x R x C) | 5.11 x 3.54 x 1.36 inch |
| Trọng lượng sản phẩm | 9.1 ounce |
| Nhiệt độ hoạt động tối đa | 45°C (113°F) |
| Tính năng bảo vệ | Reverse polarity, over-voltage, over-current, over-discharge, short-circuit, reverse current. |
8. Bảo hành và Hỗ trợ
This HQST product is backed by a Bảo hành 10 năm, reflecting our commitment to quality and durability. For any technical assistance, troubleshooting, or warranty claims, please contact HQST customer support.
You can find contact information and additional resources on the official HQST webđịa điểm: www.hqst.com
Please have your product model number (20A PWM Flush Mount) and purchase details ready when contacting support.