
AUTOWIKI CB30-0511-09S0
AUTOWIKI Sương mù Lamp Hướng dẫn sử dụng bộ lắp ráp
Model: CB30-0511-09S0
Compatible with 2008-2010 BMW 5 Series (E60/E61) - 525i, 528i, 528xi, 530i, 535i, 535xi, 550i
1. Giới thiệu
Thank you for choosing AUTOWIKI Fog Lamp Assemblies. This manual provides essential information for the proper installation, operation, and maintenance of your new fog lights. These fog lamp assemblies are designed to enhance visibility in adverse weather conditions such as fog, heavy rain, or snow, improving driving safety. Please read this manual thoroughly before installation and keep it for future reference.
Ghi chú: These fog lamp assemblies are specifically designed for 2008-2010 BMW 5 Series (E60/E61) models and are not compatible with models equipped with the M Package.
2. Thông tin an toàn
- Always disconnect the vehicle's battery before performing any electrical work to prevent short circuits or electrical shock.
- Đeo thiết bị bảo hộ cá nhân (PPE) phù hợp, chẳng hạn như kính an toàn và găng tay, trong quá trình lắp đặt.
- Hãy đảm bảo xe được đỗ trên bề mặt bằng phẳng và phanh tay đã được kéo.
- If you are unsure about any step of the installation process, seek assistance from a qualified automotive technician.
- Verify that the fog lights are securely mounted and all connections are tight before driving.
- These fog lights meet SAE and DOT standards for automotive lighting.
3. Nội dung gói hàng
Khi mở gói hàng, vui lòng kiểm tra xem tất cả các thành phần đều có đầy đủ và không bị hư hỏng:
- 1 Pair of AUTOWIKI Fog Lamp Assemblies (Left and Right)
- 2 Halogen Bulbs (H8 12V35W)
- Fixed Accessories for Installation

Hình ảnh: Mặt trước view of the AUTOWIKI Fog Lamp Assemblies, showing both left and right units.
4. Thông số kỹ thuật
| Tính năng | Đặc điểm kỹ thuật |
|---|---|
| Thương hiệu | AUTOWIKI |
| Số hiệu mẫu | CB30-0511-09S0 |
| Khả năng tương thích | 2008-2010 BMW 5 Series (E60/E61) |
| Màu ống kính | Thông thoáng |
| Vật liệu ống kính | High Grade ABS Plastic |
| Loại bóng đèn | Halogen (H8 12V35W) |
| Kích thước (D x R x C) | 7.46 x 7.5 x 9.94 inch |
| Trọng lượng sản phẩm | 1.98 pound (mỗi đôi) |
| Chứng nhận | SAE and DOT Compliant |
| Tính năng đặc biệt | Waterproof, Dustproof, Anti-snow |

Image: Diagram showing the dimensions of the fog lamp assembly (9.94 inches height, 7.46 inches length, 7.5 inches width).
5. Thiết lập và Cài đặt
The installation process for these fog lamp assemblies is designed to be straightforward. However, professional installation is recommended if you are not familiar with automotive electrical systems or vehicle body work.
Các công cụ cần thiết (Không bao gồm):
- Bộ tua vít
- Bộ cờ lê ổ cắm
- Plastic trim removal tools (recommended)
- Kìm cắt/tước dây (nếu cần sửa đổi hệ thống dây điện)
Các bước cài đặt:
- Chuẩn bị xe: Park the vehicle on a flat, stable surface. Turn off the engine and engage the parking brake. Disconnect the negative terminal of the vehicle's battery to prevent electrical hazards.
- Access the Fog Light Area: Depending on your BMW 5 Series model (E60/E61), you may need to remove or partially remove the front bumper cover or fender liner to access the existing fog light assemblies. Refer to your vehicle's service manual for specific instructions on bumper removal.
- Remove Old Fog Lights: Locate the existing fog light assemblies. Disconnect the electrical connector from the back of the fog light. Unscrew or unclip any mounting hardware holding the old fog light in place and carefully remove it.
- Install New Halogen Bulbs: If the bulbs are not pre-installed, carefully insert the provided H8 halogen bulbs into the new AUTOWIKI fog lamp assemblies. Ensure they are seated correctly and twist to lock if applicable. Avoid touching the glass part of the bulb with bare hands.
- Mount New Fog Lights: Position the new AUTOWIKI fog lamp assembly into the opening. Align the mounting tabs or holes with the vehicle's chassis. Secure the new fog light using the provided fixed accessories or the original mounting hardware. Ensure it is firmly in place.
- Kết nối dây: Reconnect the vehicle's electrical connector to the new fog lamp assembly. Ensure the connection is secure.
- Lặp lại thao tác tương tự cho bên còn lại: Follow the same steps for the fog light on the opposite side of the vehicle.
- Lắp ráp lại xe: Reinstall any bumper covers or fender liners that were removed.
- Kết nối lại pin: Kết nối lại cực âm của ắc quy xe.
- Chức năng kiểm tra: Turn on your vehicle's ignition and activate the fog lights to ensure they are functioning correctly. Check both sides for proper illumination.
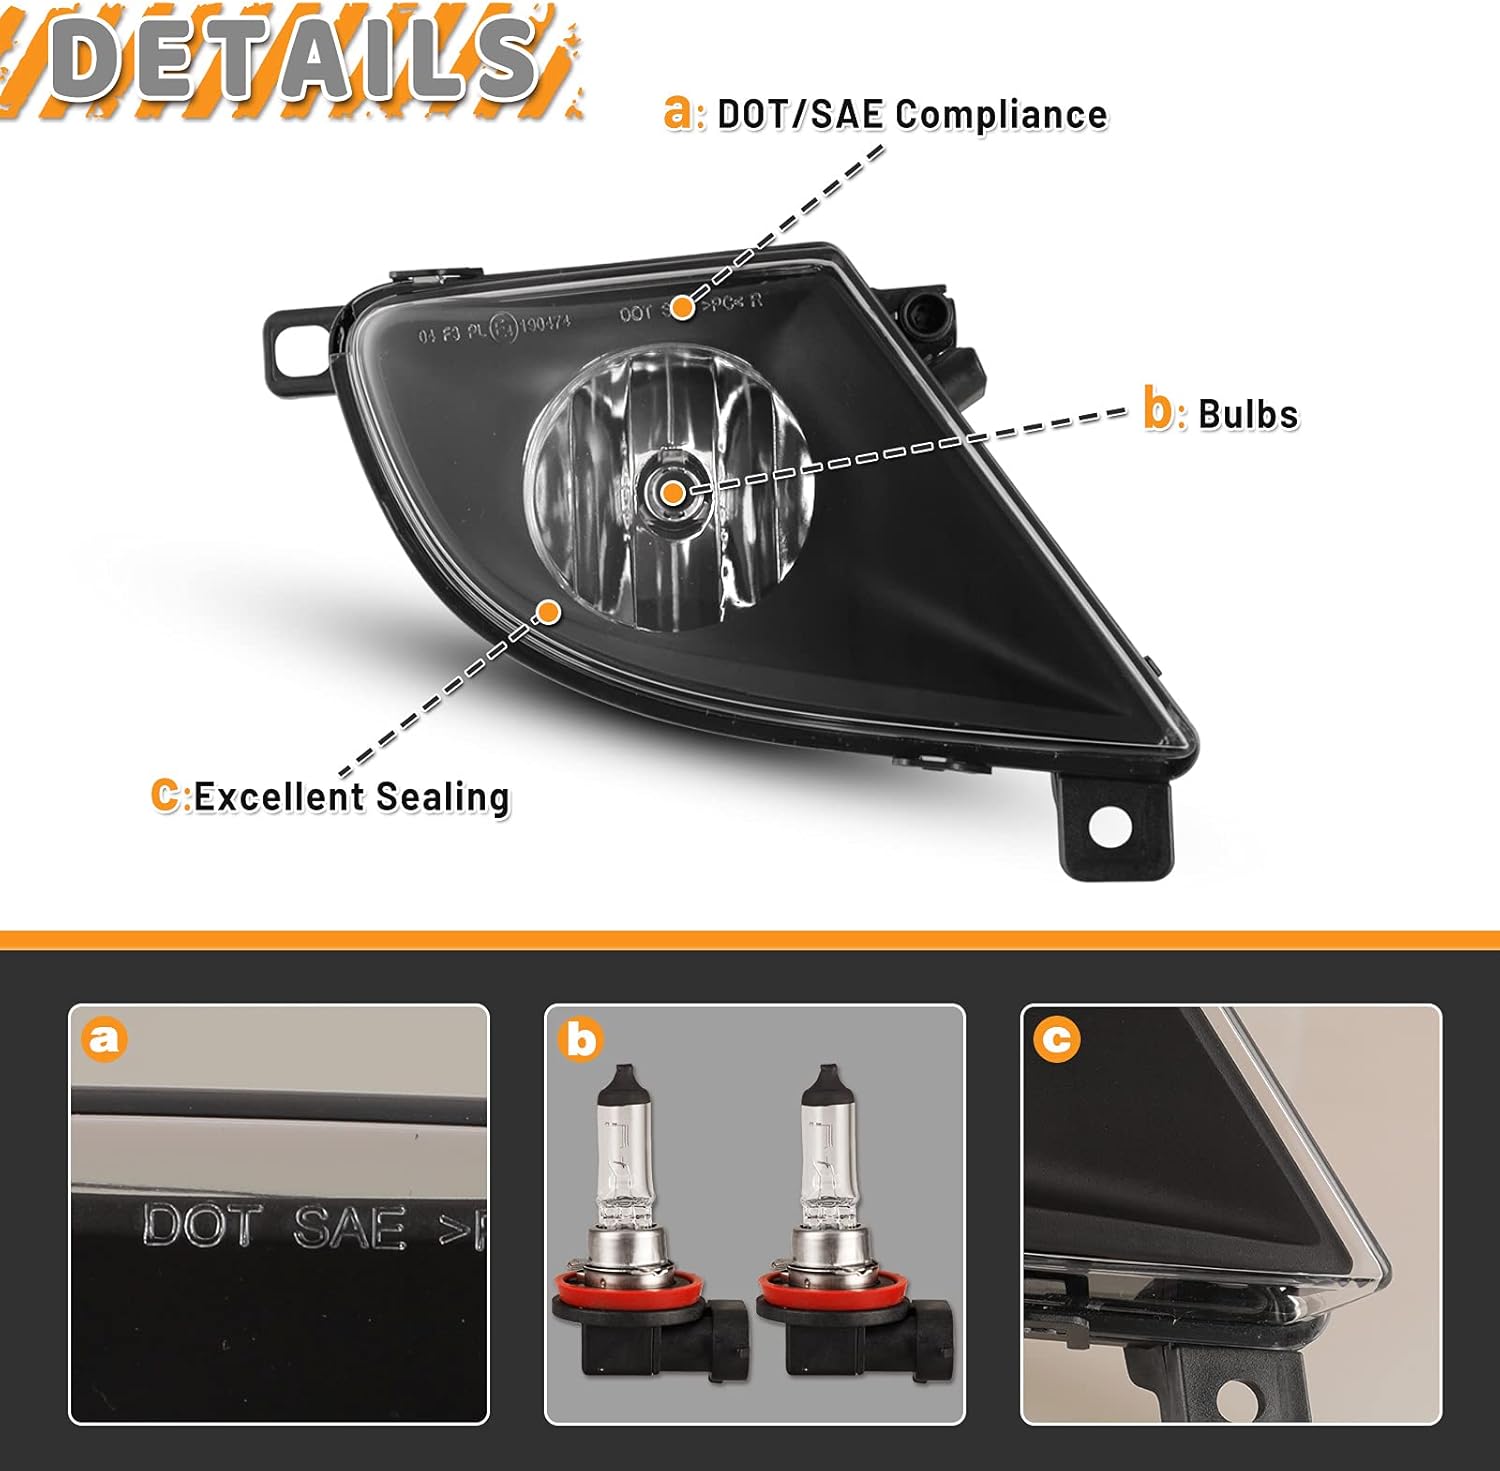
Hình ảnh: Cận cảnh view of the fog light highlighting DOT/SAE compliance markings, bulb location, and the excellent sealing around the lens.

Hình ảnh: Phía sau view of the fog light showing the light dimmer screw for adjustment, the sealing ring for bulb access, and the waterproof seal cap.
6. Hướng dẫn vận hành
Once installed, the AUTOWIKI Fog Lamp Assemblies operate in conjunction with your vehicle's existing fog light switch. Refer to your BMW 5 Series owner's manual for specific instructions on how to activate and deactivate the fog lights.
- Typically, fog lights are activated via a switch on the dashboard or steering column.
- They are designed for use in conditions of reduced visibility, such as fog, heavy rain, or snow.
- Always turn off fog lights when visibility improves to avoid dazzling oncoming drivers.

Image: A BMW 5 Series car on the road with the fog lights actively illuminated, demonstrating their function.
7. Bảo trì
Proper maintenance will ensure the longevity and optimal performance of your AUTOWIKI Fog Lamp Các nhà lắp ghép.
Vệ sinh:
- Regularly clean the fog light lenses with a soft cloth and mild automotive cleaning solution.
- Avoid abrasive cleaners or harsh chemicals that could damage the lens material.
- Ensure the lenses are free from dirt, mud, or ice, which can obstruct light output.
Thay thế bóng đèn:
- If a halogen bulb burns out, replace it with an H8 12V35W halogen bulb.
- To replace, disconnect the battery, access the rear of the fog light (as in installation), twist or unclip the bulb holder, remove the old bulb, and insert the new one.
- Avoid touching the glass of the new bulb with bare hands, as oils can reduce its lifespan.
Tính năng chống thấm nước:
The fog lights are designed to be waterproof, dustproof, and anti-snow. However, avoid high-pressure washing directly onto the light seals to prevent potential water ingress over time.

Image: Visual representation of the fog lights' waterproof capabilities, with water splashing around them.
KHAI THÁC. Xử lý sự cố
If you encounter issues with your AUTOWIKI Fog Lamp Assemblies, refer to the following common problems and solutions:
| Vấn đề | Nguyên nhân có thể | Giải pháp |
|---|---|---|
| Fog lights do not turn on | Cầu chì bị nổ Lỏng kết nối điện bóng đèn bị lỗi Vehicle's fog light switch issue | Check and replace the vehicle's fog light fuse. Ensure all electrical connectors are securely plugged in. Inspect and replace bulbs if necessary. Consult a mechanic for vehicle electrical system diagnosis. |
| One fog light is not working | bóng đèn bị lỗi Loose connection to that specific light | Thay bóng đèn. Check the electrical connection at the back of the non-functioning light. |
| Ánh sáng yếu hoặc nhấp nháy | Kết nối điện kém Bóng đèn lão hóa Nguồn điện không đủ | Kiểm tra và cố định chắc chắn tất cả các kết nối dây điện. Thay bóng đèn. Have the vehicle's electrical system checked by a professional. |
| Độ ẩm bên trong ống kính | Condensation (normal in some conditions) Compromised seal | Small amounts of condensation should dissipate. If excessive or persistent, check for cracks or damage to the housing/seal. Ensure the waterproof seal cap is tightly closed. |
Để được hỗ trợ thêm, vui lòng tham khảo chính thức Hướng dẫn khắc phục sự cố (PDF) được cung cấp bởi nhà sản xuất.
9. Bảo hành và Hỗ trợ
AUTOWIKI products are designed for quality and durability. For information regarding product warranty, returns, or technical support, please contact AUTOWIKI customer service through the retailer where the product was purchased or visit the official AUTOWIKI store page.
AUTOWIKI Store: Visit the AUTOWIKI Store on Amazon
Customer recognition drives our passion to build better parts that help you safely hit the road and enjoy the all-out pleasure of driving.
Tài liệu liên quanCB30-0511-09S0

Ask a question about this manual
Ask about setup, troubleshooting, compatibility, parts, safety, or missing instructions. Manuals+ will review the question and use this page’s manual context to help answer it.