
Sorand AC 230V Floor Heating Thermostat
Sorand AC 230V Digital Programmable Floor Heating Thermostat User Manual
Model: AC 230V Floor Heating Thermostat
Giới thiệu
This manual provides comprehensive instructions for the installation, operation, and maintenance of your Sorand AC 230V Digital Programmable Floor Heating Thermostat. Please read this manual carefully before installation and use to ensure proper function and safety.
The thermostat is designed for electronic floor heating systems and other electrical heating elements. It features a large LCD with backlight, programmable temperature settings, and internal/external temperature sensing capabilities.
Thông tin an toàn
- Việc lắp đặt phải được thực hiện bởi thợ điện có trình độ.
- Đảm bảo ngắt nguồn điện trước khi lắp đặt hoặc bảo trì.
- Không để bộ điều nhiệt tiếp xúc với nước hoặc độ ẩm quá cao.
- Hoạt động trong phạm vi quy địnhtage và các giới hạn hiện tại.
Nội dung gói
Xác minh rằng tất cả các mục đều có trong gói hàng:
- 1 x Sorand AC 230V Digital Programmable Floor Heating Thermostat
- 1 x External Temperature Sensor Cable (approx. 3 meters)
- 2 x Vít lắp
- 1 x Hướng dẫn sử dụng (tài liệu này)

Image: Contents of the Sorand thermostat package, showing the main unit, external sensor cable, mounting screws, and the instruction manual.
Thiết lập và cài đặt
Quan trọng: Installation should only be carried out by a qualified electrician. Ensure the main power supply is turned off before commencing any wiring work.
Sơ đồ đấu dây
Refer to the wiring diagram on the back of the thermostat unit for correct connections. The terminals are typically labeled as follows:
- L1, N1: Power input (AC 230V)
- LOAD (1, 2): Connection to the heating element
- NTC (5, 6): Connection for the external floor temperature sensor

Hình ảnh: Phía sau view of the Sorand thermostat, displaying the wiring terminals and a simplified diagram for electrical connections.
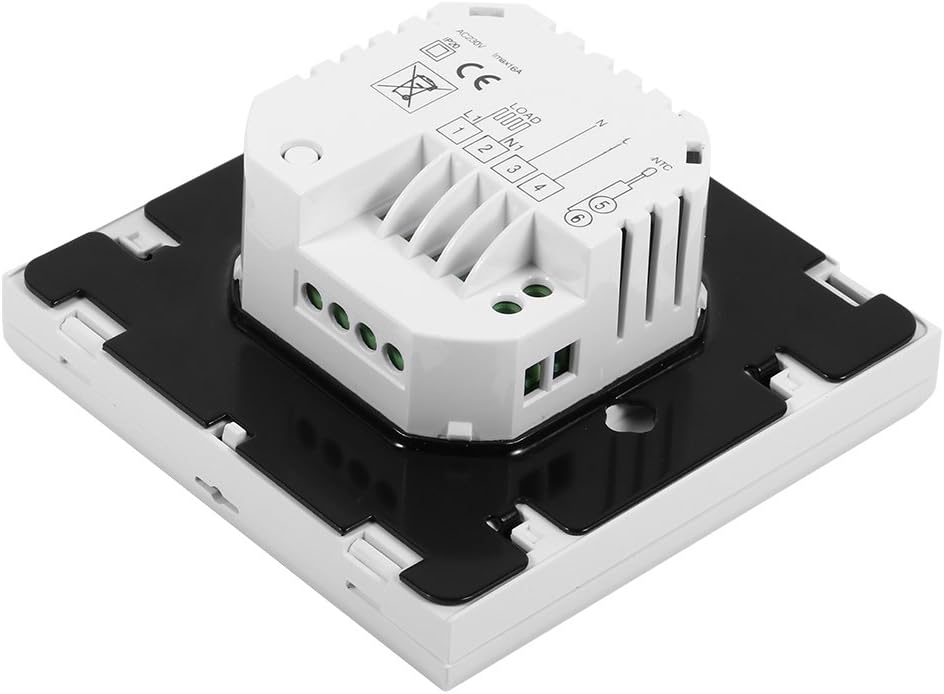
Hình ảnh: Bên view of the Sorand thermostat, illustrating the internal components and ports for wiring connections.
Lắp ráp
- Prepare a standard electrical wall box (86x86mm recommended).
- Connect the power supply, heating load, and external sensor wires according to the wiring diagram.
- Carefully push the wired thermostat into the wall box.
- Secure the thermostat to the wall box using the provided screws.
- Attach the front panel of the thermostat.
Hướng dẫn sử dụng
The thermostat features a large LCD and touch-sensitive buttons for easy operation.
Chức năng nút
- ⏻ (Sức mạnh): Bật/tắt bộ điều nhiệt.
- ↻ (Mode/Cycle): Chuyển đổi giữa chế độ thủ công và chế độ lập trình.
- ⏱ (Đồng hồ/Thời gian): Sets the time and enters programming mode.
- ▲ (Mũi tên lên): Increases temperature setting or adjusts values.
- ▼ (Mũi tên xuống): Decreases temperature setting or adjusts values.

Hình ảnh: Mặt trước view of the Sorand thermostat, highlighting the LCD screen and the five touch-sensitive control buttons below it.
Cài đặt thời gian và ngày
- Nhấn và giữ ⏱ trong 3 giây để vào chế độ cài đặt thời gian.
- Sử dụng ▲ Và ▼ các nút để điều chỉnh giờ, sau đó nhấn ⏱ to confirm and move to minutes, then day of the week.
- Nhấn ⏱ again to exit, or wait for 10 seconds for automatic exit.
Chế độ Thủ công Hoạt động
In manual mode, the thermostat maintains a constant temperature set by the user.
- Nhấn nút ↻ button to switch to manual mode (indicated by a hand icon or similar on the display).
- Sử dụng ▲ Và ▼ để cài đặt nhiệt độ mong muốn của bạn.
- The thermostat will now maintain this temperature.
Programmable Mode Operation (6 Periods)
The thermostat allows for 6 programmable periods per day, enabling different temperature settings at different times.
- Nhấn nút ↻ button to switch to programmable mode (indicated by a clock icon or similar).
- Nhấn và giữ ⏱ Nhấn giữ nút trong 3 giây để vào chế độ lập trình.
- The display will show the first period (e.g., "Period 1"). Use ▲ Và ▼ to set the start time and desired temperature for this period.
- Nhấn ⏱ to move to the next period and repeat the process for all 6 periods.
- After setting all periods, press ⏱ again or wait for automatic exit to save settings.
The thermostat will automatically follow the programmed schedule.
Sensor Selection (Internal/External)
The thermostat can use its internal sensor or the external floor sensor. The selection method is typically found in advanced settings or by a specific button combination. Refer to the on-screen indicators for the active sensor.
BẢO TRÌ
- Lau sạch màn hình hiển thị của bộ điều nhiệt và casinbằng vải mềm, khô. Không sử dụng chất tẩy rửa hoặc dung môi có tính mài mòn.
- Ensure the thermostat is free from dust and debris to maintain optimal performance.
- No user-serviceable parts inside. Do not attempt to open or repair the unit.
Xử lý sự cố
| Vấn đề | Nguyên nhân có thể | Giải pháp |
|---|---|---|
| Bộ điều nhiệt không hoạt động. | Không có nguồn điện; đấu dây sai. | Check circuit breaker. Verify wiring connections (consult a qualified electrician). |
| Hệ thống sưởi không bật/tắt được. | Incorrect temperature setting; thermostat in OFF mode; wiring issue. | Adjust set temperature. Ensure thermostat is ON. Check heating element wiring. |
| Đo nhiệt độ không chính xác. | Sensor malfunction; incorrect sensor selected. | Verify sensor connection. Check if internal or external sensor is active. |
| Màn hình trống hoặc nhấp nháy. | Biến động điện áp; lỗi bên trong. | Reset power to the thermostat. If issue persists, contact support. |
Thông số kỹ thuật
| Tính năng | Chi tiết |
|---|---|
| Thương hiệu | Sorand |
| Người mẫu | AC 230V Floor Heating Thermostat |
| Khối lượng làm việctage | Điện áp xoay chiều 230V, 50/60Hz |
| Tải trọng hiện tại | 12/16A (Electric Heating) |
| Sự chính xác | ±0.5℃ |
| Set-point Temperature Range | 5℃ - 35℃ |
| Giới hạn phạm vi nhiệt độ | 5℃ - 99℃ |
| Tiêu thụ điện năng | <0.3W |
| Cảm biến nhiệt độ | NTC (Internal and External) |
| Surface Size | Kích thước xấp xỉ 86 x 86 x 40 mm (3.4 x 3.4 x 1.6 inch) |
| Chiều dài cáp cảm biến ngoài | Xấp xỉ 3 mét (9.8 feet) |
| Vật liệu | PC+ABS |
| Kiểu hiển thị | Màn hình LCD kỹ thuật số có đèn nền |
| Phương pháp kiểm soát | Điều khiển bàn di chuột |
Bảo hành và Hỗ trợ
This product is covered by the manufacturer's standard warranty. Please refer to the product packaging or your point of purchase for specific warranty terms and conditions.
Để được hỗ trợ kỹ thuật, khắc phục sự cố hoặc yêu cầu bảo hành, vui lòng liên hệ trực tiếp với nhà bán lẻ hoặc nhà sản xuất. Vui lòng giữ lại hóa đơn mua hàng làm bằng chứng mua hàng.
Ask a question about this manual
Ask about setup, troubleshooting, compatibility, parts, safety, or missing instructions. Manuals+ will review the question and use this page’s manual context to help answer it.