1. Giới thiệu
Welcome to the Artillery Hornet 3D Printer User Manual. This guide provides comprehensive instructions for setting up, operating, maintaining, and troubleshooting your new 3D printer. The Artillery Hornet is designed for ease of use and high-quality printing, featuring a highly pre-assembled structure and advanced components for reliable performance.
2. Thông tin an toàn
- Luôn vận hành máy in ở nơi thông thoáng.
- Tránh xa tay khỏi các bộ phận chuyển động trong khi vận hành.
- Do not touch the hotend or heated bed during or immediately after printing, as they can reach high temperatures.
- Đảm bảo nguồn điện được kết nối và nối đất đúng cách.
- Unplug the printer from the power source before performing any maintenance or cleaning.
- Để máy in tránh xa các vật liệu dễ cháy và ánh nắng trực tiếp.
- Supervise children and pets when the printer is in operation.
3. Nội dung gói hàng
Khi mở hộp, vui lòng kiểm tra xem có đầy đủ tất cả các thành phần không:
- Artillery Hornet 3D Printer (95% pre-assembled)
- Giá đỡ ống sợi
- Cáp nguồn
- Cáp USB
- Tool Kit (wrenches, screwdrivers, etc.)
- SD Card with Test Filevà Phần mềm
- Hướng dẫn sử dụng (tài liệu này)
- Sampdây tóc
4. Sản phẩm hếtview
The Artillery Hornet features a robust metal integrated structure and a sleek design. Key components include:

Hình 4.1: Tổng thể view of the Artillery Hornet 3D Printer.
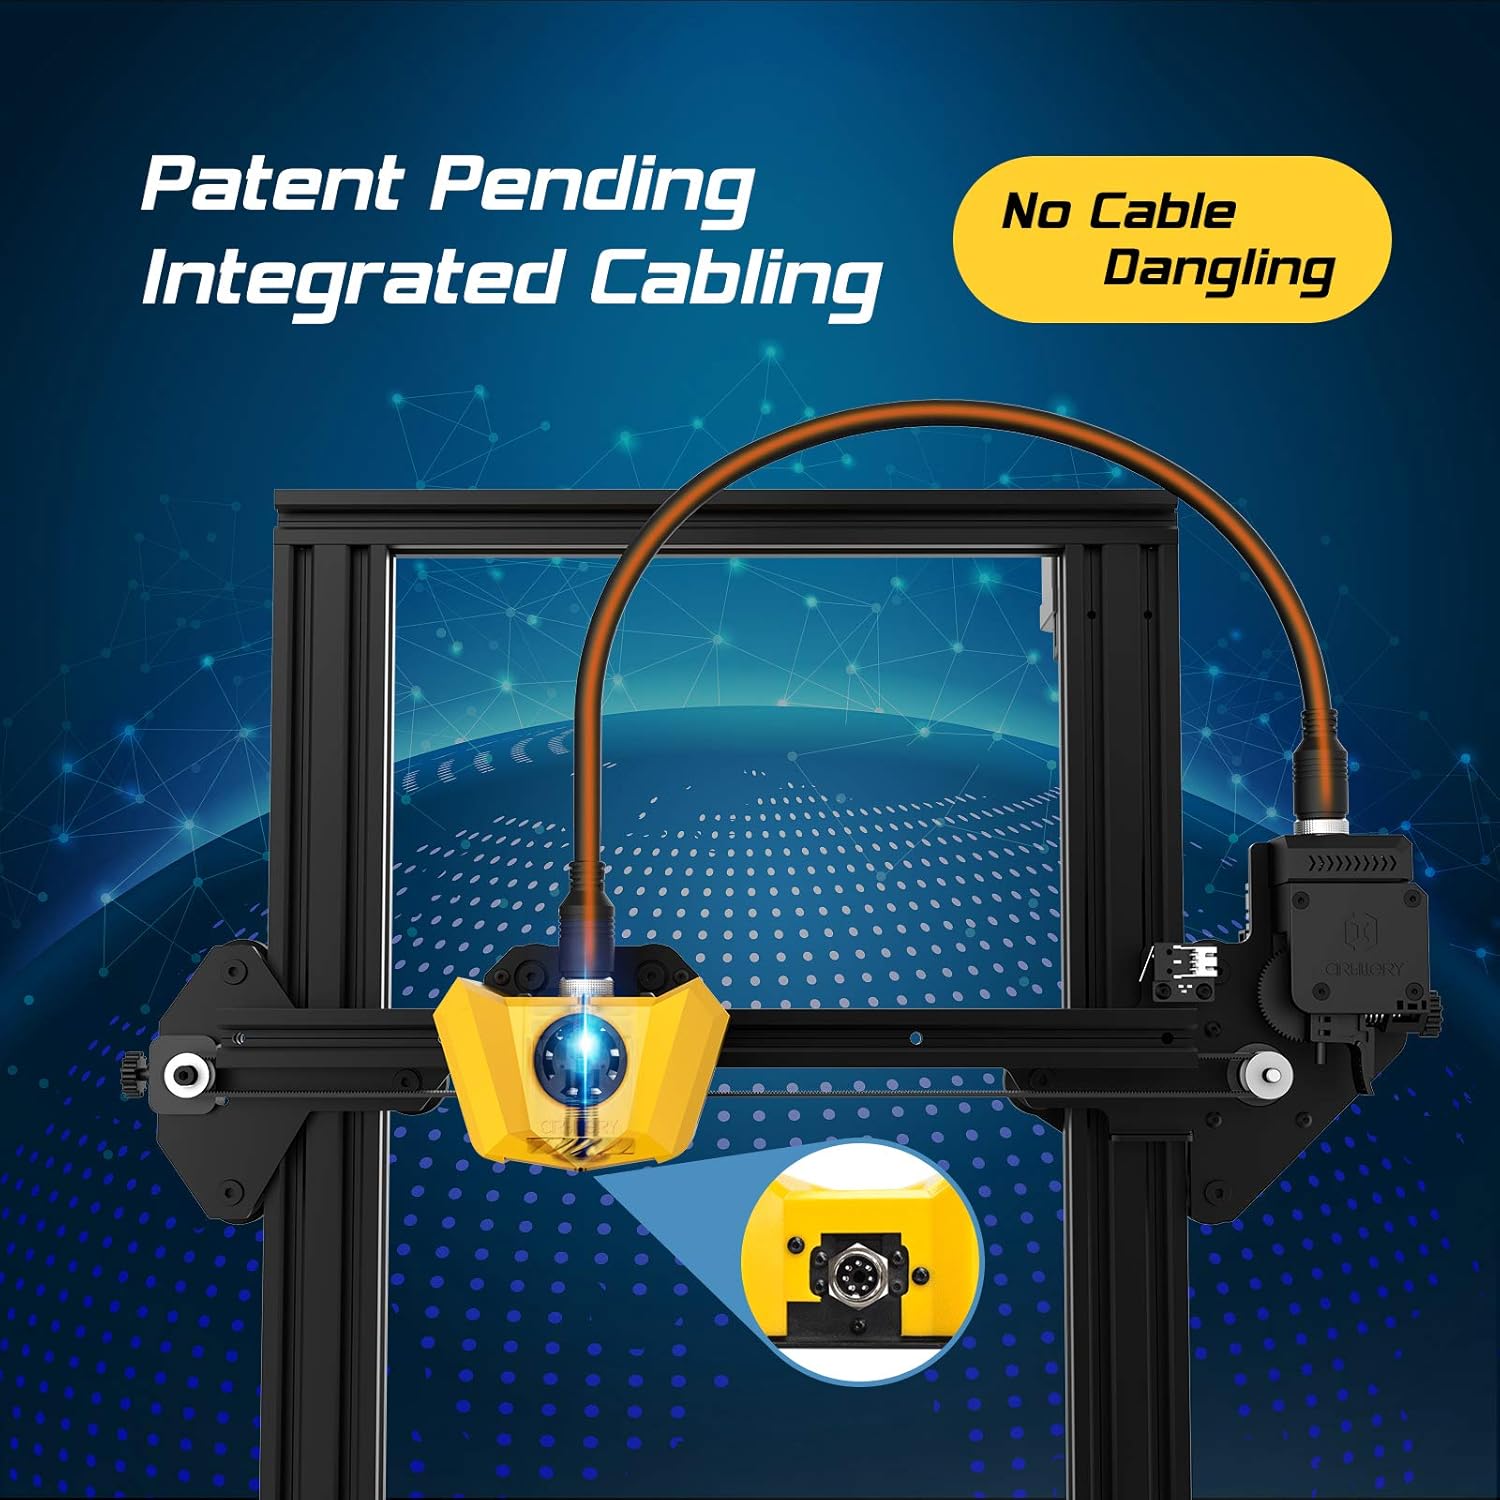
Figure 4.2: Close-up of the innovative integrated cabling system, designed to prevent cable dangling and ensure a neat setup.

Figure 4.3: Details of the New Titan Extruder and Modular Hotend, crucial for stable and precise filament feeding and melting.

Figure 4.4: The self-developed 32-bit motherboard with replaceable drivers, enabling ultra-silent printing and enhanced performance.

Figure 4.5: The user-friendly one-key knob integrated switch for easy operation and the adjustable filament holder designed to maintain a low center of gravity.
5. Hướng dẫn cài đặt
The Artillery Hornet is designed for quick and easy assembly, being 95% pre-assembled. Follow these steps to complete the setup:

Figure 5.1: The printer arrives 95% pre-assembled, requiring only a few minutes for final setup.
- Tháo hộp: Cẩn thận loại bỏ tất cả các thành phần khỏi bao bì.
- Attach Gantry: Secure the pre-assembled gantry to the base unit using the provided screws. The integrated cabling simplifies this connection.
- Lắp giá đỡ dây tóc: Mount the adjustable filament holder to the designated slot on the side of the printer.
- Kết nối nguồn: Cắm dây nguồn vào máy in, sau đó cắm vào ổ cắm điện có nối đất.
- Bật nguồn: Flip the power switch located at the rear of the base unit.
- Cân bằng giường: Perform manual bed leveling as instructed on the printer's display or in the detailed guide on the included SD card. Proper bed leveling is crucial for successful prints.
6. Hướng dẫn vận hành
Operating the Artillery Hornet is intuitive, thanks to its one-key knob integrated switch and efficient design.
6.1. Nạp sợi
- Place your filament spool onto the adjustable filament holder.
- Feed the filament through the filament sensor and into the Titan Extruder.
- Làm nóng đầu phun đến nhiệt độ thích hợp cho loại sợi in của bạn (ví dụ: 200°C cho PLA).
- Use the one-key knob to select the 'Load Filament' option. The extruder will automatically pull the filament through the hotend until it extrudes smoothly.
6.2. Bắt đầu in
- Prepare your 3D model using a slicing software (e.g., Cura, PrusaSlicer) and save it as a G-code file vào thẻ SD.
- Cắm thẻ SD vào khe cắm thẻ SD của máy in.
- Navigate the menu using the one-key knob to 'Print from SD' and select your desired G-code file.
- The printer will automatically heat up the bed and hotend, then begin printing. The self-developed 32-bit motherboard ensures ultra-silent operation during printing.
Video 6.1: Một quan chức quaview of the Artillery Hornet 3D Printer, showcasing its features and printing capabilities.
7. Bảo trì
Regular maintenance ensures optimal performance and longevity of your Artillery Hornet 3D Printer.
- Vệ sinh giường in: After each print, clean the print bed with isopropyl alcohol to ensure good adhesion for future prints.
- Làm sạch vòi phun: Periodically clean the nozzle to prevent clogs. Use a brass brush or needle to clear any residue.
- Lubricate Z-axis Rod: Apply a small amount of lithium grease or similar lubricant to the Z-axis lead screw every few months to ensure smooth vertical movement.
- Kiểm tra dây đai: Inspect the X and Y axis belts for proper tension and wear. Adjust if too loose or replace if damaged.
- Vệ sinh quạt: Ensure cooling fans (for hotend, part cooling, and power supply) are free from dust and debris to prevent overheating.
KHAI THÁC. Xử lý sự cố
Sau đây là một số vấn đề thường gặp và giải pháp tiềm năng:
| Vấn đề | Nguyên nhân có thể | Giải pháp |
|---|---|---|
| Sợi tơ không được cấp tơ | Nozzle clog, tangled filament, incorrect loading. | Clear nozzle, untangle filament, re-load filament carefully ensuring it enters the Bowden tube correctly. |
| Poor print adhesion / Prints lifting | Giường in không cân bằng, bề mặt in bẩn, nhiệt độ giường in không chính xác. | Re-level the print bed, clean the print surface with isopropyl alcohol, adjust bed temperature in slicing software. |
| Layering problems / Poor print quality | Loose belts, Z-axis wobble, incorrect print settings. | Check and tighten X/Y belts, ensure Z-coupler is secure, adjust print speed and temperature settings. |
| Máy in ồn ào | Loose components, worn bearings. | Check all screws and connections. The 32-bit motherboard is designed for silent operation, but external factors can cause noise. |
| Vấn đề quá nhiệt | Blocked cooling fans. | Ensure all cooling fans are clear of obstructions and functioning correctly. |
9. Thông số kỹ thuật
| Tính năng | Đặc điểm kỹ thuật |
|---|---|
| Xây dựng khối lượng | 220 x 220 x 250mm |
| Kích thước máy in | 17.1"D x 16.1"W x 18.5"H |
| Trọng lượng sản phẩm | 17.6 pound (8 kg) |
| Vật liệu | Nhôm |
| Màu sắc | Màu vàng |
| Loại máy đùn | New Titan Extruder |
| Hotend Type | Modular Hotend |
| Bo mạch chủ | 32-bit with replaceable drivers |
| Cuộc họp | 95% Pre-Assembled |

Figure 9.1: Dimensions of the Artillery Hornet 3D Printer.
10. Bảo hành và Hỗ trợ
For warranty information and technical support, please refer to the documentation included with your product or visit the official Artillery webtrang web. Giữ lại biên lai mua hàng làm bằng chứng mua hàng cho bất kỳ khiếu nại bảo hành nào.