
1. Giới thiệu
This manual provides essential information for the safe and efficient operation of your Rigol DS1104Z-S Plus 100 MHz Digital Oscilloscope. Please read this manual thoroughly before using the instrument to ensure proper functionality and to prevent damage. The Rigol DS1104Z-S Plus is a 4-channel digital storage oscilloscope designed for precise signal analysis with a 100 MHz bandwidth and a 1 GSa/s real-time samptỷ giá le le.
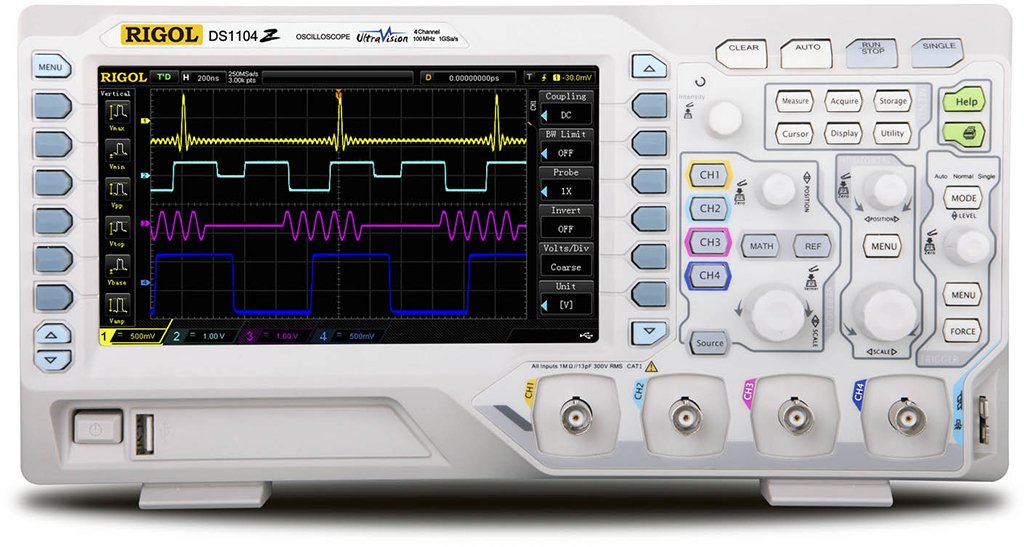
Figure 1: Rigol DS1104Z-S Plus Digital Oscilloscope. This image shows the front panel of the oscilloscope with its display, control knobs, and input channels.
2. Thông tin an toàn
Luôn tuân thủ các biện pháp phòng ngừa an toàn sau đây để tránh thương tích và hư hỏng thiết bị:
- Nguồn điện: Chỉ kết nối thiết bị với nguồn điện có mức âm lượng được chỉ địnhtage và tần số.
- Tiếp đất: Đảm bảo dụng cụ được nối đất đúng cách để tránh bị điện giật.
- Thông gió: Không chặn các lỗ thông gió. Đảm bảo luồng không khí lưu thông đầy đủ xung quanh thiết bị.
- Môi trường: Operate the oscilloscope in a dry, well-ventilated area, away from direct sunlight, high temperatures, and excessive dust.
- Thăm dò ý kiến: Use only probes designed for the specified voltage và tần số định mức.
- Bảo dưỡng: Hãy giao việc bảo dưỡng cho nhân viên kỹ thuật có trình độ chuyên môn. Không tự ý sửa chữa thiết bị.
- Vệ sinh: Ngắt nguồn điện trước khi vệ sinh. Sử dụng khăn mềm,amp vải. Không sử dụng chất tẩy rửa có tính mài mòn hoặc dung môi.
3. Nội dung gói hàng
Xác minh rằng gói của bạn chứa các mục sau:
- Rigol DS1104Z-S Plus Digital Oscilloscope
- Dây nguồn
- Passive Probes (4 units)
- Cáp USB
- Hướng dẫn nhanh
- Resource CD (User Manual, Programming Manual, Software)
4. Sản phẩm hếtview
The Rigol DS1104Z-S Plus features a user-friendly interface and robust design for various measurement applications.
4.1 Bảng điều khiển phía trước
The front panel includes the display, control knobs, function buttons, and input connectors for channels 1-4.
- Màn hình hiển thị: Shows waveforms, measurement results, and menu options.
- Điều khiển theo chiều dọc: Điều chỉnh voltage per division and position for each channel.
- Điều khiển theo chiều ngang: Adjust time per division and horizontal position.
- Bộ điều khiển kích hoạt: Set trigger level, mode, and type.
- Các nút chức năng: Access various menus such as Acquire, Measure, Storage, Utility, etc.
- Channel Inputs (CH1-CH4): BNC connectors for probe connection.
4.2 Bảng điều khiển phía sau
The rear panel provides power input, USB host/device ports, and LAN port for connectivity.
- Đầu vào nguồn AC: Dùng để kết nối dây nguồn.
- Cổng máy chủ USB: Để kết nối các thiết bị lưu trữ USB.
- Cổng thiết bị USB: For connecting to a PC.
- Cổng LAN: Để kết nối mạng và điều khiển từ xa.
5. Thiết lập
5.1 kết nối nguồn
- Hãy đảm bảo công tắc nguồn ở mặt sau đang ở vị trí TẮT.
- Kết nối dây nguồn đi kèm với đầu vào nguồn AC ở mặt sau của máy hiện sóng.
- Cắm đầu còn lại của dây nguồn vào ổ cắm điện xoay chiều có nối đất.
5.2 Kết nối đầu dò
- Connect the BNC connector of a passive probe to one of the input channels (CH1, CH2, CH3, or CH4) on the front panel.
- Connect the probe's ground clip to the circuit's ground reference.
- Set the attenuation ratio on the probe to match the setting on the oscilloscope (e.g., 1X or 10X).
5.3 Bật nguồn ban đầu
- Press the power switch on the rear panel to the ON position.
- The oscilloscope will perform a self-test and display the Rigol logo.
- After startup, the default waveform display will appear.
6. Hướng dẫn vận hành
This section covers basic operations for acquiring and analyzing waveforms.
6.1 Hiển thị dạng sóng cơ bản
- Thang đo dọc (VOLTS/DIV): Use the vertical scale knob for the active channel to adjust the voltagđộ nhạy cảm điện tử.
- Vị trí dọc: Use the vertical position knob to move the waveform up or down on the screen.
- Thang đo ngang (SEC/DIV): Use the horizontal scale knob to adjust the time base.
- Vị trí nằm ngang: Use the horizontal position knob to shift the waveform left or right.
6.2 Kích hoạt
Kích hoạt giúp ổn định các dạng sóng lặp lại và ghi lại các sự kiện phát một lần.
- Cấp độ kích hoạt: Điều chỉnh núm mức kích hoạt để thiết lập âm lượngtagđiểm mà tại đó kích hoạt xảy ra.
- Trigger Menu: Nhấn nút Menu kích hoạt button to configure trigger type (Edge, Pulse, Video, etc.), source, and slope.
- Chế độ kích hoạt: Select between Auto, Normal, and Single modes.
6.3 Chức năng đo lường
The oscilloscope offers various automatic measurement functions.
- Nhấn nút Đo lường button to display the measurement menu.
- Select desired measurements such as Vpp, Vmax, Vmin, Freq, Period, Rise Time, etc.
- The results will be displayed on the screen.
6.4 Lưu trữ dữ liệu
Waveforms and settings can be saved to internal memory or a USB storage device.
- Nhấn nút Kho cái nút.
- Select the storage type (Waveform, Setup, Image) and destination (Internal, USB).
- Follow the on-screen prompts to save the data.
7. Bảo trì
7.1 Vệ sinh
To maintain the instrument's appearance and performance:
- Ngắt dây nguồn trước khi vệ sinh.
- Sử dụng một miếng vải mềmampened with mild detergent and water to clean the exterior.
- Không sử dụng chất tẩy rửa có tính mài mòn, dung môi hoặc hóa chất mạnh.
- Ensure no liquid enters the instrument.
7.2 Hiệu chuẩn
The oscilloscope is factory calibrated. For optimal performance, periodic calibration by qualified service personnel is recommended, typically every 1-2 years, depending on usage.
7.3 Lưu trữ
When not in use for extended periods, store the oscilloscope in a dry, dust-free environment within the specified operating temperature range.
KHAI THÁC. Xử lý sự cố
This section lists common problems and their solutions. If the problem persists, contact Rigol customer support.
| Vấn đề | Nguyên nhân có thể | Giải pháp |
|---|---|---|
| Không hiển thị sau khi bật nguồn | Power cord not connected; Power switch off; Faulty power outlet | Check power cord connection; Ensure power switch is ON; Test power outlet with another device |
| Không hiển thị dạng sóng | Probe not connected; Incorrect channel settings; Trigger level incorrect; Input signal too small/large | Connect probe to active channel; Adjust vertical scale and position; Adjust trigger level; Check input signal source |
| Dạng sóng không ổn định | Incorrect trigger settings; Noisy signal | Adjust trigger level and mode; Check signal source for noise; Use averaging acquisition mode |
| Cannot save data to USB | USB drive not formatted correctly; USB drive full; USB drive faulty | Format USB drive to FAT32; Delete unnecessary files; Try a different USB drive |
9. Thông số kỹ thuật
Key technical specifications for the Rigol DS1104Z-S Plus Digital Oscilloscope:
- Băng thông: 100MHz
- Kênh: 4 kênh Analog
- Thời gian thực Sample Tỷ lệ: Lên đến 1 GSa/giây
- Độ sâu bộ nhớ: 12 Mpts (Standard), 24 Mpts (Optional)
- Tốc độ thu dạng sóng: Lên đến 30,000 wfms/s
- Trưng bày: 7-inch TFT LCD (800x480 resolution)
- Độ nhạy theo phương thẳng đứng: 1 mV/div đến 10 V/div
- Phạm vi cơ sở thời gian: 2 ns/div to 50 s/div
- Các loại trình kích hoạt: Edge, Pulse, Video, Slope, Alternate, Runt, Window, Delay, Setup/Hold, Nth Edge
- Giao diện: USB Host, USB Device, LAN, Pass/Fail, Trigger Out
- Nguồn điện: Điện có dây
- Trọng lượng sản phẩm: 1 Kilôgam
- Sự tuân thủ: CE
10. Bảo hành và Hỗ trợ
Rigol Technologies provides a standard warranty for its products. For detailed warranty terms and conditions, please refer to the warranty card included with your product or visit the official Rigol website. For technical support, service, or inquiries, please contact your local Rigol distributor or Rigol customer service. Contact information can typically be found on the Rigol website or in the documentation provided with your oscilloscope.
Chính thức Webđịa điểm: www.rigol.com