
1. Giới thiệu
Thank you for choosing the OSD Audio PRE-1 High Definition Preamplifier. This unit is designed to enhance your audio experience by providing versatile source selection and precise audio control. The PRE-1 acts as a central hub for various audio components, including turntables, CD/DVD players, and tape decks, delivering a clean and powerful signal to your main ampchất lót.
This manual provides detailed instructions for the proper setup, operation, and maintenance of your PRE-1 preamplifier. Please read this manual thoroughly before operating the unit to ensure optimal performance and longevity.
2. Thông tin an toàn quan trọng
- Nguồn điện: Chỉ kết nối thiết bị với loại nguồn điện được ghi trên nhãn đánh dấu.
- Thông gió: Ensure adequate ventilation. Do not block any ventilation openings. Install in accordance with the manufacturer’s instructions.
- Nước và độ ẩm: Không sử dụng thiết bị này gần nước hoặc để thiết bị tiếp xúc với nước nhỏ giọt hoặc bắn tung tóe.
- Nhiệt: Không lắp đặt gần bất kỳ nguồn nhiệt nào như bộ tản nhiệt, thanh nhiệt, bếp lò hoặc các thiết bị khác (bao gồm amplò phản ứng) tạo ra nhiệt.
- Vệ sinh: Chỉ lau sạch bằng vải khô.
- Bảo dưỡng: Đừng cố gắng tự bảo dưỡng sản phẩm này. Giới thiệu tất cả các dịch vụ cho nhân viên dịch vụ có trình độ.
- Tiếp đất: Thiết bị này phải được nối đất đúng cách.
3. Nội dung gói hàng
Vui lòng kiểm tra xem các mặt hàng sau có được bao gồm trong gói hàng của bạn hay không:
- OSD Audio PRE-1 High Definition Preampngười nói dối
- Cáp nguồn
- Hướng dẫn sử dụng (tài liệu này)
4. Sản phẩm hếtview
4.1. Bảng điều khiển phía trước
The front panel provides access to all primary controls and a microphone input for convenient use.

This image displays the front panel of the OSD Audio PRE-1 Preamplifier, including its physical dimensions for installation planning.

Một chi tiết view of the left side of the PRE-1's front panel, highlighting the Microphone Level, Bass, Midrange, and Treble adjustment knobs.

Một chi tiết view of the right side of the PRE-1's front panel, showing the Loudness, Balance, and Volume controls, along with input selection and function buttons.
- Nút nguồn: Bật hoặc tắt thiết bị.
- Đầu vào micrô: Giắc cắm 1/4 inch để kết nối micro.
- Mức micrô: Điều chỉnh âm lượng đầu vào của micro.
- Kiểm soát âm trầm: Điều chỉnh đầu ra tần số thấp.
- Mid Control: Adjusts the mid-range frequency output.
- Kiểm soát âm bổng: Điều chỉnh đầu ra tần số cao.
- Độ ồn: Engages or disengages a loudness contour for enhanced bass and treble at low volumes.
- Sự cân bằng: Điều chỉnh cân bằng kênh trái/phải.
- Âm lượng: Điều khiển âm lượng tổng cho tất cả các đầu ra.
- Chọn đầu vào: Rotary knob to choose between Phono, AUX1, AUX2, and CD/DVD inputs.
- Tape Button: Activates the Tape Monitor loop.
- Nút Mono: Combines stereo signals into a monaural output.
- Bộ lọc thấp: Engages a low-frequency cut-off filter.
- Tắt tiếng: Silences all audio output.
4.2. Bảng điều khiển phía sau
The rear panel houses all the necessary input and output connections for your audio system.
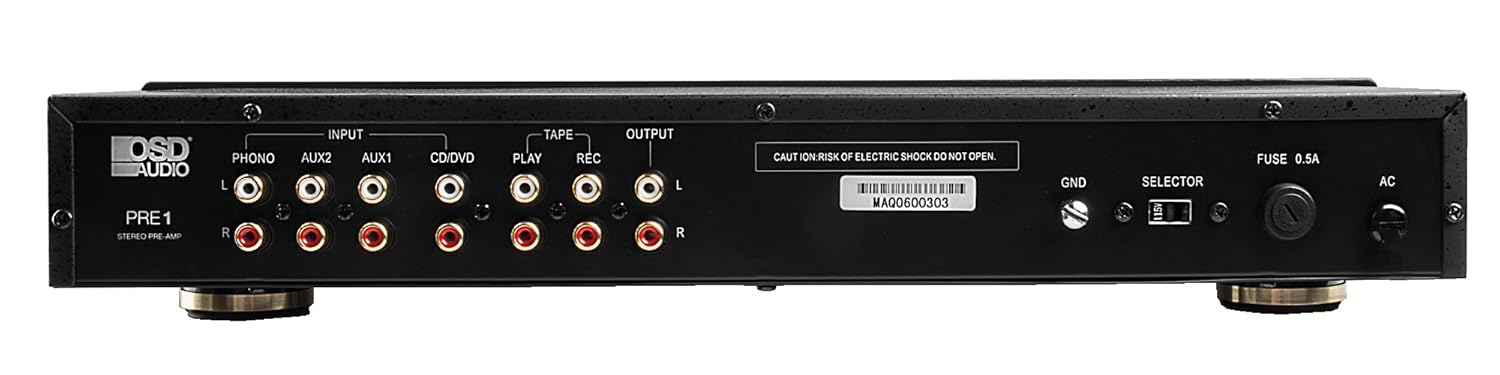
The rear panel of the PRE-1 Preamplifier, showing all input and output connections for various audio devices.
- Phono Input (L/R): RCA inputs for connecting a turntable. Includes a ground terminal.
- AUX1 Input (L/R): RCA inputs for general auxiliary devices.
- AUX2 Input (L/R): RCA inputs for a second auxiliary device.
- CD/DVD Input (L/R): RCA inputs for CD or DVD players.
- Tape Play (L/R): RCA inputs for the playback output of a tape deck or other recording device.
- Tape Rec (L/R): RCA outputs for connecting to the recording input of a tape deck or other recording device.
- Đầu ra (Trái/Phải): RCA outputs to connect to your main power ampchất lót.
- Ground Terminal (GND): Connects to the ground wire of your turntable to reduce hum.
- Công tắc chọn: For internal configuration (typically left in default position unless specified).
- Cầu chì: Replace only with the specified fuse type and rating.
- Đầu vào nguồn AC: Connects to the supplied power cable.
5. Thiết lập và kết nối
Follow these steps to properly set up your OSD Audio PRE-1 Preampngười lót:
- Vị trí: Place the PRE-1 on a stable, flat surface, ensuring adequate ventilation around the unit. Avoid placing it near heat sources or in direct sunlight.
- Tắt nguồn: Ensure all audio components, including the PRE-1 and your main amplifier, are turned off before making any connections.
- Kết nối nguồn:
- Bàn xoay: Connect the RCA cables from your turntable to the Phono Input (L/R) on the PRE-1. Connect the turntable's ground wire to the GND terminal on the PRE-1.
- Đầu đĩa CD/DVD: Connect the RCA cables from your CD/DVD player to the CD/DVD Input (L/R).
- Other Devices (e.g., Streamer, Tuner): Connect RCA cables from these devices to the AUX1 Input (L/R) or AUX2 Input (L/R).
- Máy ghi băng: Connect the playback outputs of your tape deck to the Tape Play (L/R) inputs. Connect the recording inputs of your tape deck to the Tape Rec (L/R) đầu ra.
- Kết nối tới Ampngười lót: Kết nối Output (L/R) RCA jacks on the PRE-1 to the input jacks of your main power ampchất lót.
- Kết nối nguồn điện: Kết nối cáp nguồn được cung cấp với Đầu vào nguồn AC on the rear panel of the PRE-1, then plug it into a suitable wall outlet.
- Bật nguồn ban đầu: Turn on your main power amplifier first, then turn on the PRE-1. When powering off, turn off the PRE-1 first, then your main ampchất lót.
6. Hướng dẫn vận hành
Once your PRE-1 is connected, follow these steps for basic operation:
- Chọn đầu vào: Sử dụng Lựa chọn đầu vào rotary knob on the front panel to choose the desired audio source (Phono, AUX1, AUX2, CD/DVD).
- Điều chỉnh âm lượng: Bắt đầu với Âm lượng knob at its minimum setting. Begin playing your selected audio source and slowly increase the volume to a comfortable listening level.
- Điều khiển âm thanh: Sử dụng Cá rô, Giữa, Và Âm bổng knobs to adjust the tonal characteristics of your audio. Turn clockwise to increase, counter-clockwise to decrease.
- Kiểm soát số dư: Điều chỉnh Sự cân bằng knob to fine-tune the left and right channel output for optimal stereo imaging.
- Độ ồn: Nhấn nút Độ to button to activate a contour that boosts bass and treble frequencies, which can be beneficial at lower listening volumes. Press again to deactivate.
- Bộ lọc thấp: Nhấn nút Bộ lọc thấp button to engage a filter that reduces very low frequencies. This can help eliminate rumble from turntables or other unwanted low-frequency noise. Press again to deactivate.
- Bệnh tăng bạch cầu đơn nhân: Nhấn nút Bệnh tăng bạch cầu đơn nhân button to combine the left and right stereo channels into a single monaural signal. This is useful for playing mono recordings. Press again for stereo.
- Tắt tiếng: Nhấn nút Tắt tiếng button to instantly silence the audio output. Press again to restore sound.
- Sử dụng micrô: Plug a microphone into the Đầu vào Mic. Adjust the microphone's volume using the Mức micrô nhô lên.
- Tape Monitoring/Recording: If you have a tape deck connected, select the appropriate input for playback. To record, ensure your tape deck is set to record and the PRE-1 is passing the desired source through the Tape Rec outputs.
7. Bảo trì
Proper care and maintenance will ensure the longevity and optimal performance of your PRE-1 Preampchất lót.
- Vệ sinh: Use a soft, dry cloth to clean the exterior of the unit. Do not use liquid cleaners, aerosols, or harsh chemicals, as they may damage the finish or internal components.
- Thông gió: Periodically check that the ventilation openings are free from dust and obstructions.
- Kết nối: Occasionally check all cable connections to ensure they are secure. Loose connections can lead to signal loss or interference.
- Kho: Nếu cất giữ thiết bị trong thời gian dài, hãy ngắt kết nối thiết bị khỏi ổ cắm điện và bảo quản ở nơi khô ráo, thoáng mát, tránh ánh nắng trực tiếp và nhiệt độ quá cao hoặc quá thấp.
KHAI THÁC. Xử lý sự cố
If you experience issues with your OSD Audio PRE-1, refer to the following common problems and solutions:
| Vấn đề | Nguyên nhân có thể | Giải pháp |
|---|---|---|
| Không có điện | Power cable not connected; Power outlet not active; Blown fuse | Ensure power cable is securely connected. Test the outlet with another device. Check and replace the fuse if necessary (refer to specifications for fuse type). |
| Không có âm thanh phát ra | Incorrect input selected; Volume too low; Mute engaged; Loose audio cables; Main amplifier off or incorrect input selected | Select the correct input source. Increase the volume. Disengage Mute. Check all RCA cable connections. Ensure your main amplifier is on and set to the correct input. |
| Âm thanh bị méo | Volume too high (clipping); Incorrect tone control settings; Faulty cables | Reduce the volume. Adjust Bass, Mid, and Treble controls to neutral or desired settings. Try replacing audio cables. |
| Tiếng vo ve hoặc tiếng ù ù | Ground loop; Loose ground wire (Phono); Interference from other electronics | Ensure turntable ground wire is connected to the PRE-1's GND terminal. Try moving the PRE-1 or other audio components away from power cables or other electronic devices. Use a ground loop isolator if necessary. |
| Micrô không hoạt động | Mic not connected; Mic Level too low; Faulty microphone | Ensure microphone is securely plugged into the Mic Input. Increase the Mic Level. Test with another microphone if available. |
9. Thông số kỹ thuật
Below are the technical specifications for the OSD Audio PRE-1 Preampngười lót:
| Tính năng | Đặc điểm kỹ thuật |
|---|---|
| Người mẫu | TRƯỚC-1 |
| Thương hiệu | Âm thanh OSD |
| Số lượng kênh | 2 |
| Kiểu lắp đặt | Lắp đặt bề mặt |
| Mã số UPC | 819603012446 |
| ASIN | B01MPYJLPX |
| Nhà sản xuất | Âm thanh OSD |
10. Bảo hành và Hỗ trợ
OSD Audio products are designed for reliability and performance. For specific warranty details and terms, please refer to the warranty card included with your product or visit the official OSD Audio website. If you require technical assistance or have questions not covered in this manual, please contact OSD Audio customer support.
OSD Audio Customer Support: Please visit the OSD Audio webTrang web này cung cấp thông tin liên hệ và các nguồn hỗ trợ.