
1. Giới thiệu
This manual provides essential information for the safe and efficient operation of your KitchenAid 5KMT223GER 2-Slot Automatic Toaster. Please read all instructions carefully before first use and retain for future reference.

Hình ảnh 1.1: Mặt trước view of the KitchenAid 5KMT223GER 2-Slot Automatic Toaster.
2. Hướng dẫn an toàn quan trọng
Khi sử dụng các thiết bị điện, cần luôn tuân thủ các biện pháp phòng ngừa an toàn cơ bản, bao gồm:
- Đọc tất cả hướng dẫn.
- Không chạm vào bề mặt nóng. Sử dụng tay cầm hoặc núm vặn.
- Để tránh bị điện giật, không nhúng dây điện, phích cắm hoặc máy nướng bánh mì vào nước hoặc chất lỏng khác.
- Cần phải giám sát chặt chẽ khi trẻ em sử dụng hoặc để thiết bị ở gần trẻ em.
- Rút phích cắm khỏi ổ cắm khi không sử dụng và trước khi vệ sinh. Để nguội trước khi lắp hoặc tháo các bộ phận.
- Không sử dụng bất kỳ thiết bị nào khi dây điện hoặc phích cắm bị hỏng, hoặc sau khi thiết bị gặp sự cố, bị rơi hoặc hư hỏng dưới bất kỳ hình thức nào. Vui lòng mang thiết bị đến cơ sở bảo hành được ủy quyền gần nhất để kiểm tra, sửa chữa hoặc điều chỉnh.
- Việc sử dụng các phụ kiện kèm theo không được nhà sản xuất thiết bị khuyến nghị có thể gây thương tích.
- Không sử dụng ngoài trời.
- Không để dây điện thòng xuống mép bàn hoặc quầy bếp hoặc chạm vào bề mặt nóng.
- Không đặt trên hoặc gần bếp gas, bếp điện nóng hoặc trong lò nướng đang được đun nóng.
- Để ngắt kết nối, hãy tắt bất kỳ nút điều khiển nào, sau đó rút phích cắm ra khỏi ổ cắm trên tường.
- Không sử dụng thiết bị cho mục đích khác ngoài mục đích đã định.
- Không được cho thực phẩm quá khổ, gói giấy bạc hoặc đồ dùng bằng kim loại vào máy nướng bánh mì vì chúng có thể gây ra nguy cơ hỏa hoạn hoặc điện giật.
- Có thể xảy ra hỏa hoạn nếu máy nướng bánh mì bị che phủ hoặc chạm vào vật liệu dễ cháy, bao gồm rèm cửa, rèm vải, tường, v.v. khi đang hoạt động.
- Không cố lấy thức ăn ra khi máy nướng bánh mì vẫn đang cắm điện.
- Không được vận hành mà không có người giám sát.
- Always remove the crumb tray for cleaning. Do not operate the toaster without the crumb tray in place.
3. Các bộ phận và tính năng
Familiarize yourself with the components of your KitchenAid 2-Slot Automatic Toaster:
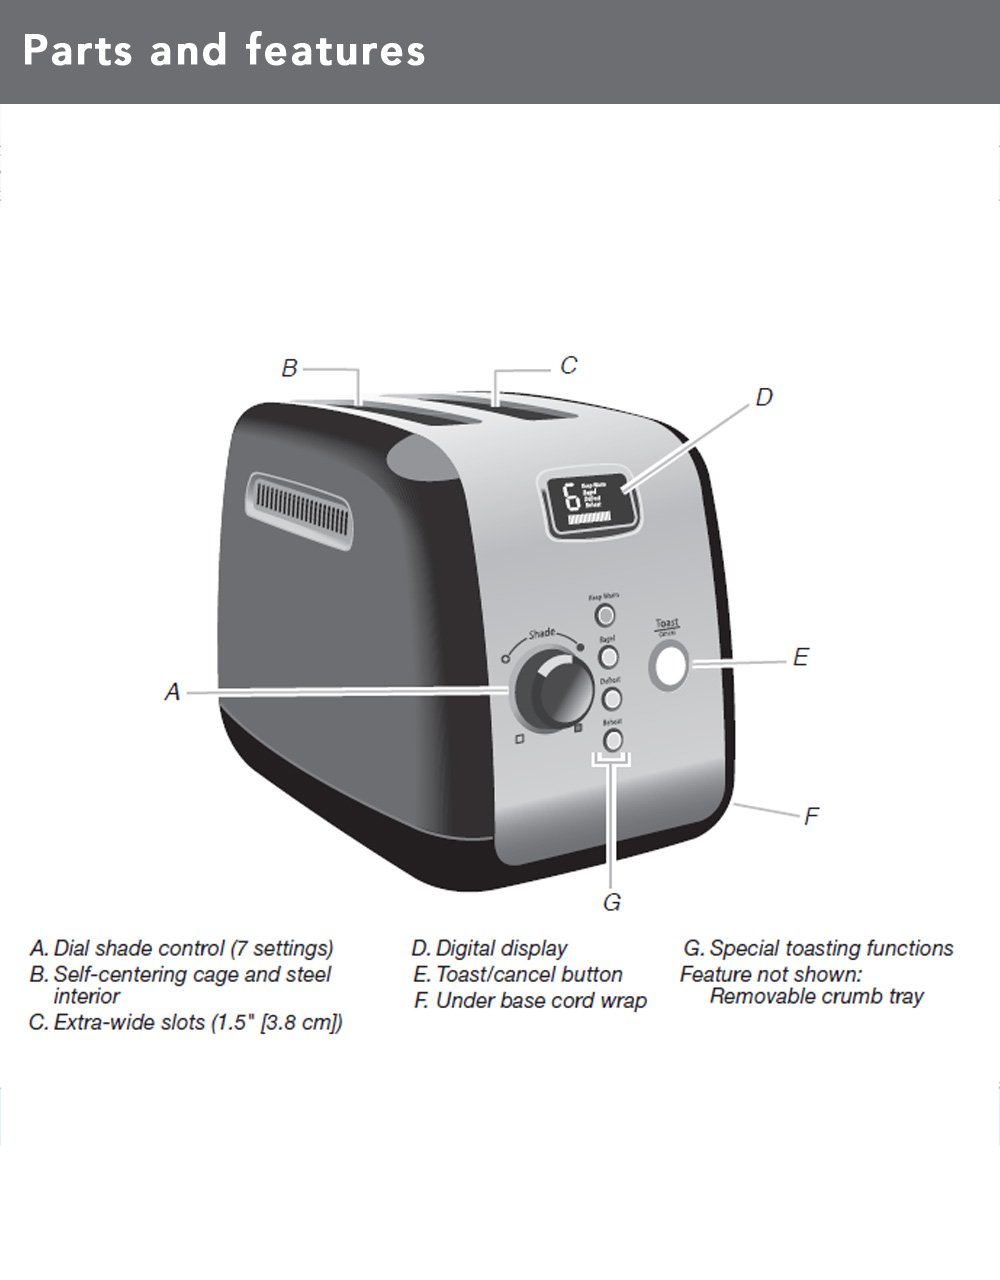
Image 3.1: Diagram illustrating the main parts and features of the toaster.
- Shade Control Dial (A): Adjusts the browning level with 7 settings.
- Self-Centering Bread Racks (B): Automatically centers bread for even toasting.
- Extra-Wide Slots (C): 3.8 cm (1.5 inches) wide slots accommodate various bread types.
- Digital Display (D): Shows selected shade setting and a countdown timer for toasting progress.
- Toast/Cancel Button (E): Initiates or cancels the toasting cycle. Features motorized lift.
- Under Base Cord Wrap (F): For convenient cord storage.
- Special Toasting Functions (G): Includes Keep Warm, Bagel, Defrost, and Reheat buttons.
- Khay vụn có thể tháo rời: Located at the back for easy cleaning (not shown in diagram).
4. Thiết lập
Before using your toaster for the first time:
- Mở hộp máy nướng bánh mì và tháo bỏ toàn bộ vật liệu đóng gói.
- Lau sạch bên ngoài máy nướng bánh mì bằng adamp Hãy đảm bảo khăn lau khô hoàn toàn trước khi cắm điện.
- Place the toaster on a stable, flat, heat-resistant surface, away from flammable materials.
- Ensure the crumb tray is properly inserted at the back of the toaster.
- For the first use, operate the toaster without bread on the highest shade setting (7) to burn off any manufacturing residues. A slight odor or smoke may be present; this is normal. Allow the toaster to cool completely.
5. Hướng dẫn vận hành
Follow these steps to toast bread and use the special functions:

Image 5.1: Bread slices inserted into the toaster's extra-wide slots.
5.1 Nướng bánh mì cơ bản
- Hãy cắm máy nướng bánh mì vào ổ cắm điện có nối đất.
- Place bread slices into the toasting slots. The self-centering racks will automatically adjust.
- Quay lại Nút xoay điều khiển bóng râm to select your desired browning level (1 for lightest, 7 for darkest). The digital display will show the selected shade.
- Nhấn nút Toast/Cancel Button. The motorized lift will lower the bread into the slots, and the toasting cycle will begin. The digital display will show a countdown.
- Once the cycle is complete, the toaster will automatically raise the toasted bread.
- Để dừng chu trình nướng bất cứ lúc nào, hãy nhấn nút Toast/Cancel Button. The bread will be raised.
5.2 Chức năng đặc biệt
Your toaster includes dedicated buttons for specialized toasting needs:
- GIỮ ẤM: Press this button after a toasting cycle to keep toasted food warm for up to one minute. The toaster will gently lower and raise the bread after the warming period.
- TÚI: This function toasts the cut-side of a bagel while gently warming the outer surfaces. Insert bagels with the cut side facing inwards. Select your desired shade, then press the BÁNH MÌ BÁNH NGỌT nút theo sau là Toast/Cancel Button.
- RÃ ĐÔNG: Use this function to defrost and toast frozen food. Select your desired shade, then press the RÃ ĐÔNG nút theo sau là Toast/Cancel Button. The toaster will automatically adjust the toasting time.
- LÀM LẠI: This function quickly reheats previously toasted food without further browning. Press the LÀM MỚI nút theo sau là Toast/Cancel Button.
6. Vệ sinh và bảo trì
Vệ sinh thường xuyên sẽ đảm bảo hiệu suất tối ưu và kéo dài tuổi thọ của máy nướng bánh mì.
6.1 khay vụn

Hình 6.1: Khay hứng vụn bánh có thể tháo rời để dễ dàng vệ sinh.
- Luôn rút phích cắm máy nướng bánh mì và để máy nguội hoàn toàn trước khi vệ sinh.
- Pull out the removable crumb tray located at the back of the toaster.
- Discard crumbs. The crumb tray can be washed in the top rack of a dishwasher or by hand with warm, soapy water. Rinse thoroughly and dry completely before reinserting.
- Never operate the toaster without the crumb tray properly inserted.
6.2 Ngoại thất
- Lau sạch bên ngoài máy nướng bánh mì bằng adamp vải và lau khô hoàn toàn.
- Không sử dụng chất tẩy rửa có tính mài mòn hoặc miếng cọ rửa vì chúng có thể làm xước bề mặt.
- Không bao giờ nhúng máy nướng bánh mì vào nước hoặc bất kỳ chất lỏng nào khác.
KHAI THÁC. Xử lý sự cố
If you experience issues with your toaster, refer to the following table for common problems and solutions:
| Vấn đề | Nguyên nhân có thể | Giải pháp |
|---|---|---|
| Máy nướng bánh mì không bật. | Không cắm điện; mất điệntage; cầu dao điện bị ngắt. | Đảm bảo máy nướng bánh mì được cắm chặt vào ổ cắm đang hoạt động. Kiểm tra cầu dao điện gia dụng. |
| Bread does not lower or raise. | Toaster not powered; Toast/Cancel button not pressed; food jammed. | Ensure power is on. Press Toast/Cancel button. Unplug toaster and carefully remove any jammed food. |
| Nướng không đều. | Độ dày bánh mì không đồng đều; vụn bánh bị vón cục. | Ensure bread slices are of similar thickness. Clean crumb tray regularly. |
| Mùi khói hoặc mùi cháy. | Food jammed; crumb buildup; high shade setting. | Immediately press Cancel. Unplug and allow to cool. Remove jammed food or clean crumb tray. Reduce shade setting for next use. |
Nếu sự cố vẫn tiếp diễn sau khi đã thử các giải pháp này, vui lòng liên hệ với bộ phận hỗ trợ khách hàng của KitchenAid.
8. Thông số kỹ thuật
| Tính năng | Chi tiết |
|---|---|
| Số hiệu mẫu | 5KMT223GER |
| Cái gì?tage | 1100 Watt |
| Tậptage | 220 vôn |
| Slot Count | 2 |
| Cài đặt bóng râm | 7 |
| Chức năng đặc biệt | Keep Warm, Bagel, Defrost, Reheat, Cancel |
| Vật liệu | Kim loại |
| Kích thước sản phẩm (D x R x C) | 25D x 34W x 25.5H Centimet |
| Trọng lượng sản phẩm | 2200 gam |
| Các thành phần bao gồm | Pop-up Toaster, Removable Crumb Tray |
9. Bảo hành và Hỗ trợ
Your KitchenAid 5KMT223GER 2-Slot Automatic Toaster is covered by a Bảo hành có giới hạn 2 năm kể từ ngày mua. Bảo hành này bao gồm các lỗi về vật liệu và tay nghề trong điều kiện sử dụng thông thường tại hộ gia đình.
For warranty service, technical support, or to order replacement parts, please contact KitchenAid customer service. Keep your purchase receipt as proof of purchase for warranty claims.