
1. Giới thiệu
This manual provides detailed instructions for the installation, operation, and maintenance of the ASUS M4A87TD EVO motherboard. This ATX motherboard supports AMD Phenom II, Athlon II, and Sempron 100 Series Processors with an AM3 socket, offering robust performance for personal computer systems. Key features include AMD 870 & SB850 chipset, DDR3 memory support, CrossFireX technology, SATA 6Gb/s, and USB 3.0 connectivity.
2. Thiết lập và Cài đặt
Proper installation is crucial for the stable operation of your system. Follow these steps carefully.
2.1 Sơ đồ bố trí bo mạch chủview
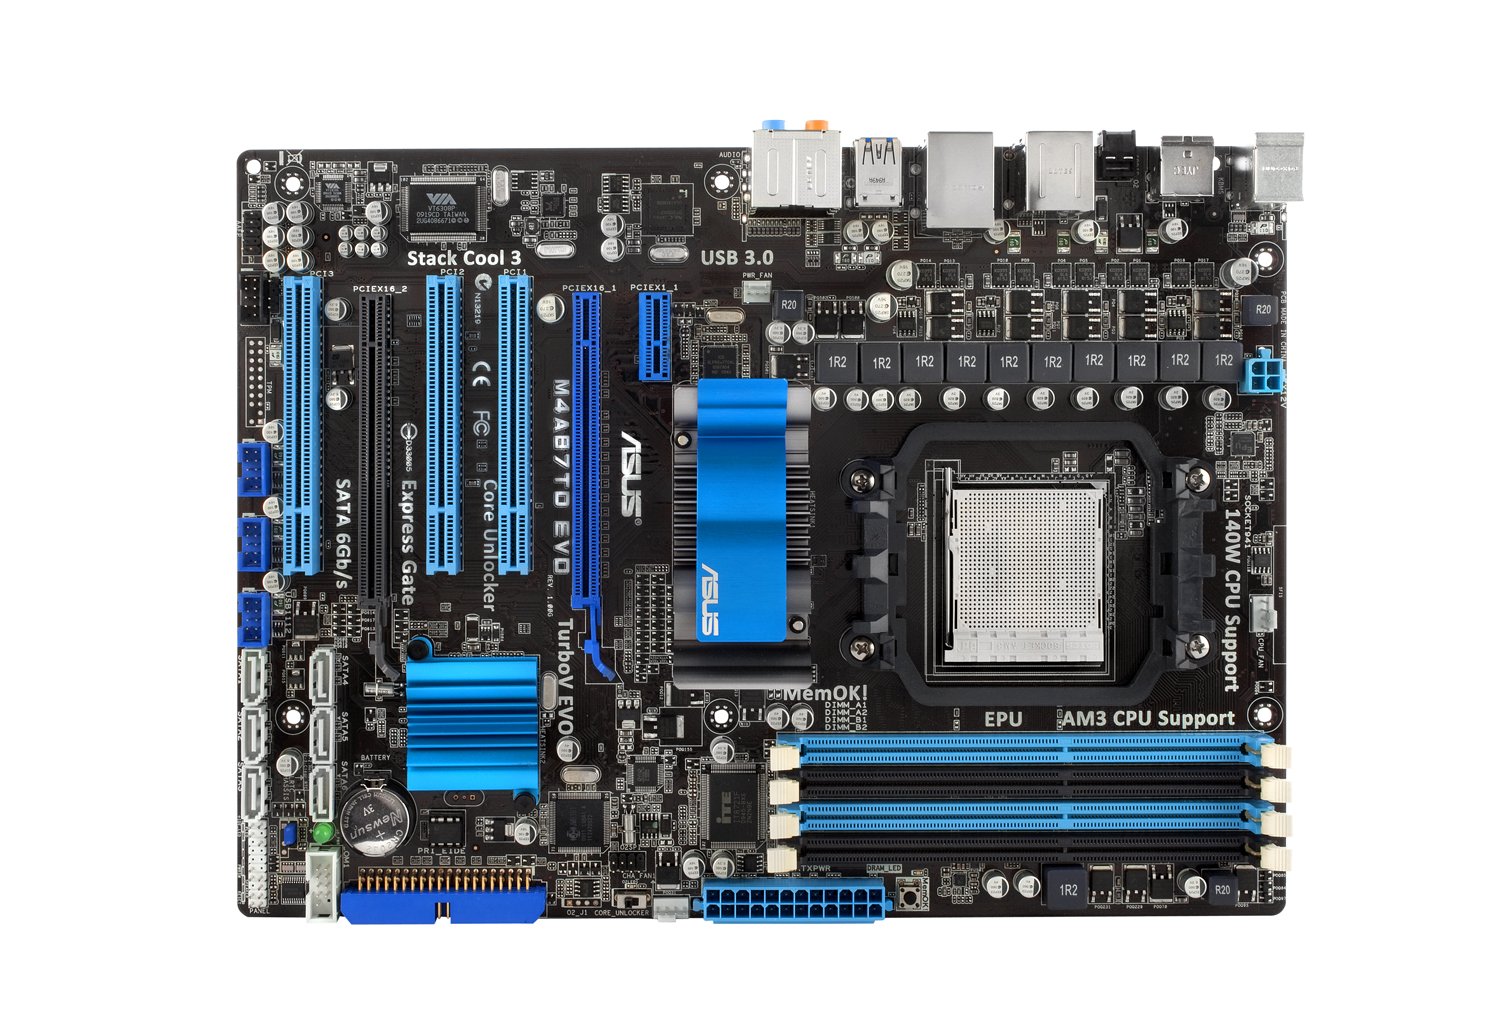
Hình 1: Đầy đủ view of the ASUS M4A87TD EVO Motherboard, highlighting various components and connectors.
2.2 Cài đặt CPU
The motherboard features an AM3 socket for compatible AMD processors. Ensure the CPU is correctly oriented before placing it into the socket.
- Xác định vị trí ổ cắm CPU trên bo mạch chủ.
- Nâng cần tải ở bên cạnh ổ cắm.
- Căn chỉnh dấu tam giác trên CPU với dấu tương ứng trên ổ cắm.
- Đặt CPU vào khe cắm một cách nhẹ nhàng, không dùng lực mạnh.
- Hạ cần gạt tải xuống để cố định CPU vào đúng vị trí.
Hình 2: Chi tiết view of the AM3 CPU socket area on the motherboard.
2.3 Cài đặt bộ nhớ (RAM)
The motherboard supports up to 16GB of DDR3 memory across four DIMM slots. For dual-channel operation, install memory modules in matched pairs.
- Mở các kẹp ở cả hai đầu khe cắm DIMM.
- Căn chỉnh rãnh trên mô-đun bộ nhớ sao cho khớp với chốt trong khe cắm DIMM.
- Nhấn chặt vào cả hai đầu của mô-đun bộ nhớ cho đến khi các kẹp khớp vào đúng vị trí.
Hình 3: View of the four DDR3 DIMM slots for memory installation.
2.4 Lắp đặt thẻ mở rộng
The motherboard includes two PCI-Express 2.0 x16 slots (supporting ATI CrossFireX), one PCI-Express 2.0 x1 slot, and three PCI slots.
- Select an appropriate expansion slot for your card (e.g., graphics card in a PCIe x16 slot).
- Remove the corresponding slot cover from your computer case.
- Align the card with the slot and press down firmly until it is seated.
- Cố định thẻ vào vỏ bằng ốc vít.
Figure 4: Expansion slots including PCI-Express x16, x1, and standard PCI slots.
2.5 Kết nối thiết bị lưu trữ
Connect SATA 6Gb/s (SATA3) and SATA 3Gb/s (SATA2) devices to the available ports.
- Identify the SATA 6Gb/s ports (typically labeled SATA6G_1, SATA6G_2) and SATA 3Gb/s ports.
- Connect one end of the SATA data cable to the motherboard port and the other end to your storage device (HDD/SSD).
- Ensure the storage device also receives power from the power supply unit.
Figure 5: SATA 6Gb/s and SATA 3Gb/s ports for connecting storage devices.
2.6 Kết nối nguồn
Connect the main 24-pin ATX power connector and the 4-pin ATX 12V power connector from your power supply unit to the motherboard.
- Đầu nối nguồn ATX 24 chân: Provides main power to the motherboard.
- Đầu nối nguồn ATX 12V 4 chân: Cung cấp thêm năng lượng cho CPU.
2.7 Các kết nối bảng I/O phía sau
Connect peripheral devices to the rear input/output ports.
- Cổng PS/2: For keyboard and mouse.
- Cổng USB 2.0/3.0: For various USB devices.
- eSATA2 Port: For external SATA devices.
- IEEE 1394 Ports: For FireWire devices.
- Cổng LAN RJ45: Đối với kết nối mạng.
- Audio I/O Jacks: For speakers, microphone, and other audio devices.
- Optical S/PDIF Out: Dành cho đầu ra âm thanh kỹ thuật số.
Figure 6: Rear I/O panel showing various connectivity options including USB 3.0, LAN, and audio ports.
3. Hướng dẫn vận hành
After successful hardware installation, proceed with system startup and software configuration.
3.1 Khởi động ban đầu và thiết lập BIOS
- Kết nối màn hình, bàn phím và chuột.
- Bật máy tính của bạn.
- Nhấn nút KHÔNG key during startup to enter the BIOS setup utility.
- Configure essential settings such as boot order, date, and time.
- Explore advanced features like Core Unlocker Và TurboV EVO for performance tuning, if desired. Refer to the BIOS utility for detailed explanations of each setting.
- Lưu các thay đổi và thoát khỏi BIOS.
3.2 Cài đặt hệ điều hành
Install your preferred operating system (e.g., Windows 10) from a bootable USB drive or optical disc.
3.3 Cài đặt trình điều khiển
Install the necessary drivers for the motherboard components, including chipset, LAN, audio, and USB 3.0 drivers. These are typically provided on a support DVD or available for download from the ASUS webđịa điểm.
4. Bảo trì
Regular maintenance helps ensure the longevity and stability of your motherboard.
- Loại bỏ bụi: Định kỳ vệ sinh bụi bẩn trên bo mạch chủ và các linh kiện bằng khí nén. Đảm bảo hệ thống đã tắt nguồn và rút phích cắm trước khi vệ sinh.
- Cập nhật BIOS: Hãy kiểm tra trang hỗ trợ của ASUS. website for the latest BIOS updates. Updating the BIOS can improve compatibility and system stability. Follow the instructions provided by ASUS carefully during the update process.
- Kiểm tra thành phần: Ensure all cables and components are securely seated. Loose connections can lead to intermittent issues.
KHAI THÁC. Xử lý sự cố
Phần này giải quyết những vấn đề phổ biến mà bạn có thể gặp phải.
- Hệ thống không khởi động:
- Verify all power supply connections to the motherboard (24-pin ATX and 4-pin ATX 12V).
- Hãy đảm bảo rằng bộ nguồn đã được bật.
- Kiểm tra các kết nối của công tắc nguồn mặt trước với bo mạch chủ.
- Không có đầu ra hiển thị:
- Hãy đảm bảo card đồ họa được cắm đúng cách vào khe PCIe và được cấp đủ nguồn điện.
- Check monitor connections and ensure the monitor is powered on and set to the correct input.
- If using integrated graphics (if available on your CPU/APU, though this board requires a discrete GPU), ensure the display cable is connected to the motherboard's video output.
- Các vấn đề về bộ nhớ (RAM):
- The motherboard features a DRAM LED that illuminates if there is an issue with memory detection.
- Reseat memory modules firmly in their slots.
- Test with one memory module at a time to identify a faulty stick or slot.
- Operating System Instability:
- Hãy đảm bảo tất cả trình điều khiển đã được cài đặt đúng cách và cập nhật đầy đủ.
- Check for overheating issues by monitoring CPU and chipset temperatures.
- Chạy các công cụ chẩn đoán bộ nhớ để kiểm tra lỗi RAM.
- USB Ports Remain Powered After Shutdown:
- This is a known characteristic for some configurations. To fully power off USB devices, either toggle the power supply switch off and on, or unplug and replug the power cable from the wall.
6. Thông số kỹ thuật
| Tính năng | Chi tiết |
|---|---|
| Thương hiệu | ASUS |
| Số hiệu mẫu | M4A87TD EVO |
| Ổ cắm CPU | Ổ cắm AM3 |
| Bộ xử lý tương thích | AMD Phenom II / Athlon II / Sempron 100 Series |
| Loại chipset | AMD 870 & SB850 |
| Công nghệ bộ nhớ RAM | DDR3 2000(O.C.)/1600/1333/1066 |
| Có sẵn khe cắm bộ nhớ | 4 (Dual Channel, ECC/Non-ECC Un-buffered) |
| Kích thước tối đa của bộ nhớ RAM | 16GB |
| Giao diện card đồ họa | PCI, PCI Express (2x PCIe 2.0 x16, 1x PCIe 2.0 x1, 3x PCI) |
| Hỗ trợ tiêu chuẩn Bus hệ thống. | SATA 6Gb/s (SATA 3) |
| Total SATA Ports | 7 (6x SATA 6Gb/s, 1x eSATA2) |
| Cổng USB | 12x USB 2.0 (6 rear, 6 by headers), 2x USB 3.0 (rear) |
| Số lượng cổng Ethernet | 1 (RTL8111E Gigabit LAN) |
| Âm thanh | 8-Channel HD Audio, Optical S/PDIF Out |
| Đầu nối nguồn | 1x 24-pin ATX, 1x 4-pin ATX 12V |
| Nền tảng | Windows 10 (Compatible) |
| Trọng lượng sản phẩm | 2.9 pound |
7. Thông tin bảo hành
The ASUS M4A87TD EVO motherboard comes with a Bảo hành 3 năm. For specific terms and conditions, please refer to the warranty card included with your product or visit the official ASUS support webđịa điểm.
8. Hỗ trợ
Để được hỗ trợ kỹ thuật, tải xuống trình điều khiển hoặc biết thêm thông tin, vui lòng truy cập trang hỗ trợ chính thức của ASUS. website. You can typically find support resources by searching for your product model, M4A87TD EVO, on the ASUS webđịa điểm.
Trang web chính thức của ASUS Webđịa điểm: https://www.asus.com/support/